Ford Fusion: Rear End Sheet Metal Repairs / Inner Quarter Panel and Wheelhouse. Removal and Installation
Ford Fusion 2013–2020 Service Manual / Body and Paint / Body and Paint / Rear End Sheet Metal Repairs / Inner Quarter Panel and Wheelhouse. Removal and Installation
Special Tool(s) / General Equipment
| Resistance Spotwelding Equipment | |
| Spherical Cutter | |
| Air Body Saw | |
| 8 mm Drill Bit | |
| MIG/MAG Welding Equipment | |
| Spot Weld Drill Bit | |
| Locking Pliers |
Materials
| Name | Specification |
|---|---|
| Seam Sealer TA-2-B, 3M™ 08308, LORD Fusor® 803DTM |
- |
| Flexible Foam Repair 3M™ 08463, LORD Fusor® 121 |
- |
Removal
-
Follow the health and safety precautions. WARNING:
Before beginning any service procedure in this
section, refer to Safety Warnings in section 100-00 General Information.
Failure to follow this instruction may result in serious personal
injury.
WARNING:
Before beginning any service procedure in this
section, refer to Safety Warnings in section 100-00 General Information.
Failure to follow this instruction may result in serious personal
injury.
Refer to: Health and Safety Precautions (100-00 General Information, Description and Operation).
-
Remove the following items.
Refer to: Quarter Panel LH (501-30 Rear End Sheet Metal Repairs, Removal and Installation).
Refer to: Back Panel and Reinforcement (501-30 Rear End Sheet Metal Repairs, Removal and Installation).
Refer to: Rocker Panel (501-29 Side Panel Sheet Metal Repairs, Removal and Installation).
-
Reposition the carpet and wiring harness away from the work area.
-
-
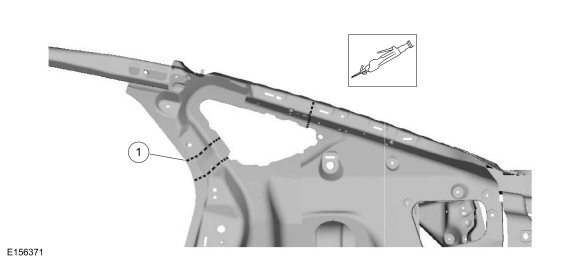
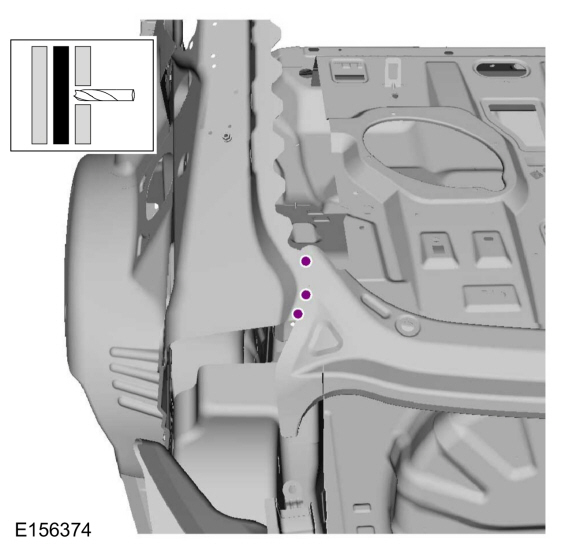
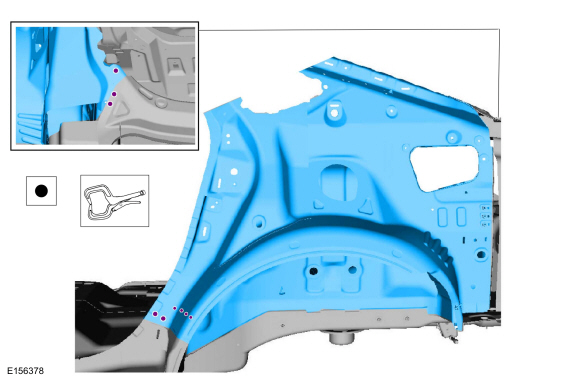
Carefully cut the outer panel only as indicated.
Use the General Equipment: Air Body Saw
-
Carefully cut the outer panel only as indicated.
 |
-
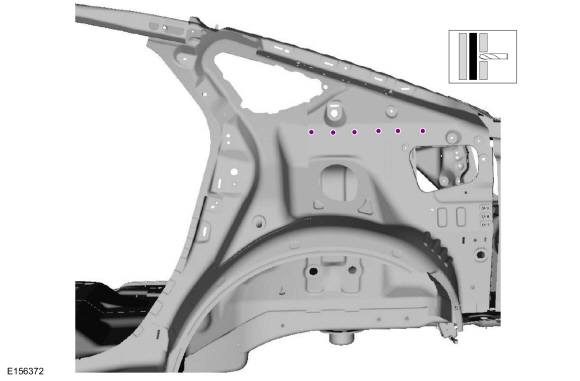
Drill out the spot welds.
Use the General Equipment: Spot Weld Drill Bit
 |
-
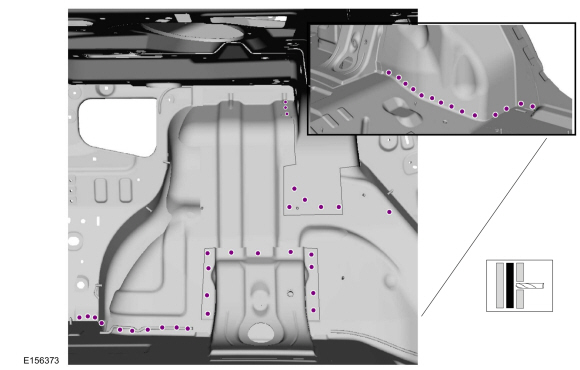
Drill out the spot welds.
Use the General Equipment: Spot Weld Drill Bit
 |
-
Drill out the spot welds.
Use the General Equipment: Spot Weld Drill Bit
 |
-
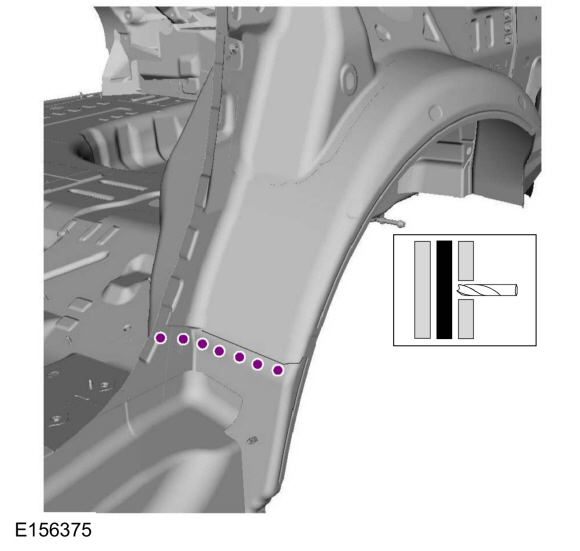
Drill out the spot welds.
Use the General Equipment: Spot Weld Drill Bit
 |
-
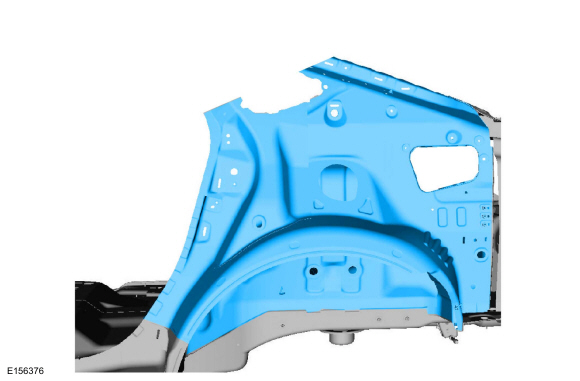
Remove the inner quarter panel and wheelhouse.
 |
Installation
-
Follow the health and safety precautions. WARNING:
Before beginning any service procedure in this
section, refer to Safety Warnings in section 100-00 General Information.
Failure to follow this instruction may result in serious personal
injury.
WARNING:
Before beginning any service procedure in this
section, refer to Safety Warnings in section 100-00 General Information.
Failure to follow this instruction may result in serious personal
injury.
Refer to: Health and Safety Precautions (100-00 General Information, Description and Operation).
-
Carefully cut the replacement panel to fit repair.
Use the General Equipment: Spherical Cutter
-
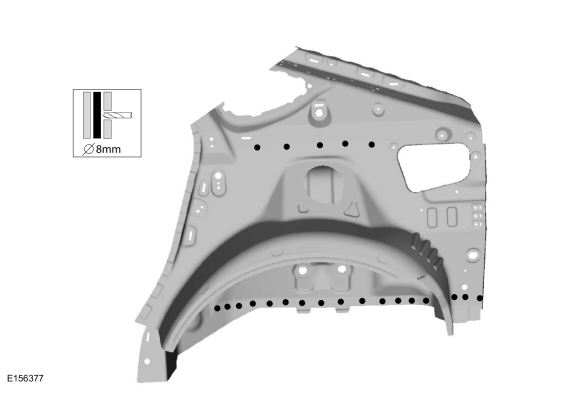
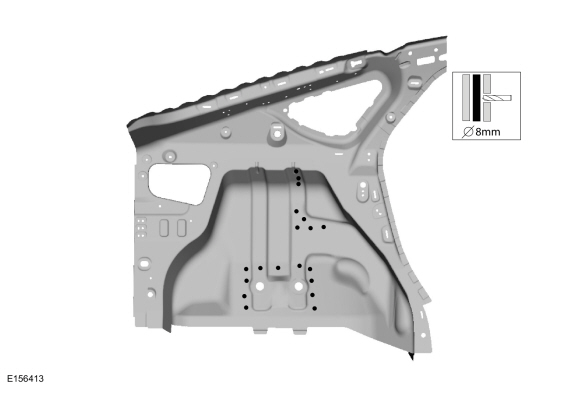
Drill plug welds holes in replacement panel.
Use the General Equipment: 8 mm Drill Bit
 |
-
Drill plug welds holes in replacement panel.
Use the General Equipment: 8 mm Drill Bit
 |
-
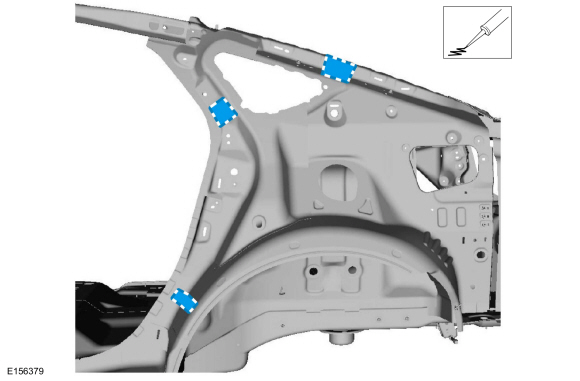
Install the inner quarter panel and wheelhouse, clamp in position and spot weld.
Use the General Equipment: Locking Pliers
Use the General Equipment: Resistance Spotwelding Equipment
 |
-
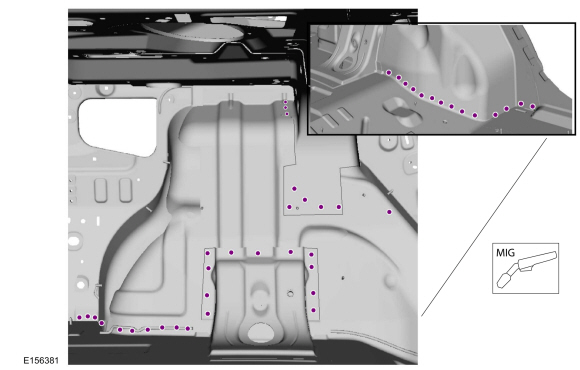
Install the plug welds.
Use the General Equipment: MIG/MAG Welding Equipment
 |
-
-
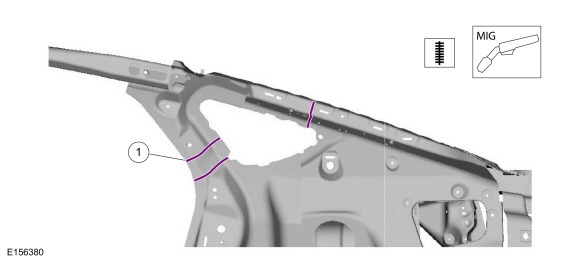
Stitch weld seams.
Use the General Equipment: MIG/MAG Welding Equipment
-
Stitch weld seams.
 |
-
Apply NVH material in original locations.
Material: Flexible Foam Repair / 3M™ 08463, LORD Fusor® 121
 |
-
Install the LH quarter panel.
Refer to: Quarter Panel LH (501-30 Rear End Sheet Metal Repairs, Removal and Installation).
-
Finish all joints using typical metal finishing techniques.
-
Sealing work: All areas must be sealed to production level.
Material: Seam Sealer / TA-2-B, 3M™ 08308, LORD Fusor® 803DTM
-
Refinish the repair area using a Ford approved paint system.
-
Restore corrosion protection.
Refer to: Corrosion Prevention (501-25 Body Repairs - General Information, General Procedures).
-
Reposition the carpet and the wiring harness.
-
Install the following items.
Refer to: Quarter Panel LH (501-30 Rear End Sheet Metal Repairs, Removal and Installation).
Refer to: Back Panel and Reinforcement (501-30 Rear End Sheet Metal Repairs, Removal and Installation).
Refer to: Rocker Panel (501-29 Side Panel Sheet Metal Repairs, Removal and Installation).

 Quarter Panel LH. Removal and Installation
Special Tool(s) /
General Equipment
Resistance Spotwelding Equipment
Hot Air Gun
Air Body Saw
8 mm Drill Bit
MIG/MAG Welding Equipment
Spot Weld Drill Bit
Locking Pliers
Materials
Name
Specification
Seam SealerTA-2-B, 3M™ 08308, LORD Fusor® 803DTM
-
Flexible Foam Repair3M™ 08463, LORD Fusor® 121
-
Removal
Rem..
Other information:
Ford Fusion 2013–2020 Service Manual: Rear Door Window Glass. Removal and Installation
Removal NOTE: LH side shown, RH side similar. NOTE: Removal steps in this procedure may contain installation details. Remove the rear door trim panel. Refer to: Rear Door Trim Panel (501-05 Interior Trim and Ornamentation, Removal and Installation). Remove the rear door upper moulding. Refer to: Rear Door Upper Moulding (501-08 Exterior Trim and Ornamentation, Rem..
Ford Fusion 2013–2020 Service Manual: Tire Pressure Monitoring System (TPMS). Diagnosis and Testing
DTC Charts DTC Chart: Radio Transceiver Module (RTM) Diagnostics in this manual assume a certain skill level and knowledge of Ford-specific diagnostic practices. REFER to: Diagnostic Methods (100-00 General Information, Description and Operation). RTM DTC Chart DTC Description Action U0146:00 Lost Communication with Gat..
Categories
- Manuals Home
- 2nd Generation Ford Fusion Owners Manual
- 2nd Generation Ford Fusion Service Manual
- Body Control Module (BCM). Removal and Installation
- Automatic Transmission Fluid Check - 1.5L EcoBoost™/2.0L EcoBoost™/2.5L. Automatic Transmission Fluid Check - 2.7L EcoBoost™
- Under Hood Overview - 1.5L EcoBoost™, 2.0L EcoBoost™, 2.5L, 2.7L EcoBoost™
- New on site
- Most important about car
Adjusting the Steering Wheel
WARNING: Do not adjust the steering wheel when your vehicle is moving.
Note: Make sure that you are sitting in the correct position.
Copyright © 2026 www.fofusion2.com