Ford Fusion: Rear End Sheet Metal Repairs / Quarter Panel LH. Removal and Installation
Special Tool(s) /
General Equipment
| Resistance Spotwelding Equipment |
| Hot Air Gun |
| Air Body Saw |
| 8 mm Drill Bit |
| MIG/MAG Welding Equipment |
| Spot Weld Drill Bit |
| Locking Pliers |
Materials
| Name |
Specification |
Seam Sealer
TA-2-B, 3M™ 08308, LORD Fusor® 803DTM |
-
|
Flexible Foam Repair
3M™ 08463, LORD Fusor® 121 |
-
|
Removal
-
Remove the following items.
Refer to: Rear Door (501-03 Body Closures, Removal and Installation).
Refer to: Fixed Glass (501-11 Glass, Frames and Mechanisms, General Procedures).
Refer to: Rear Bumper (501-19 Bumpers)
.
Refer to: Rear Lamp Assembly - 4-Door (417-01 Exterior Lighting)
.
Refer to: Fuel Tank Filler Pipe (310-01C Fuel Tank and Lines - 2.5L Duratec (125kW/170PS), Removal and Installation).
Refer to: Rear Seat Cushion (501-10B Rear Seats, Removal and Installation).
-
Reposition carpeting and wiring harness away from the working area.
-
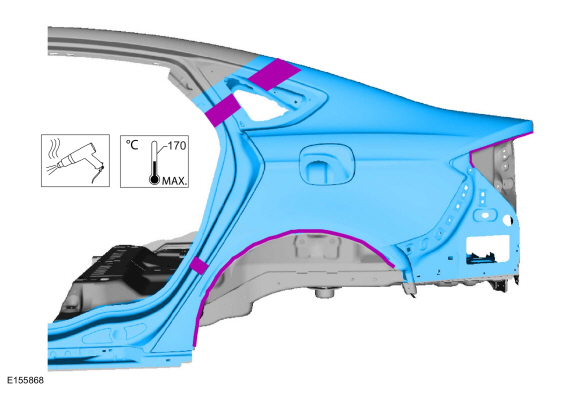
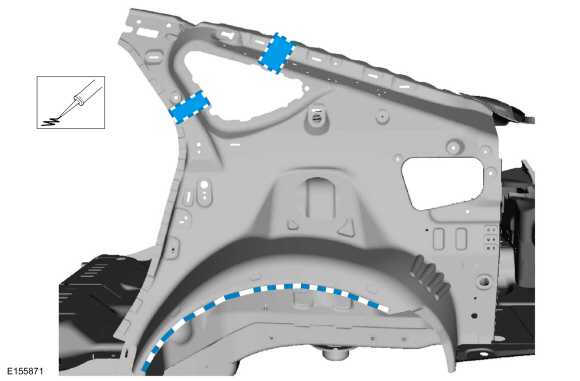
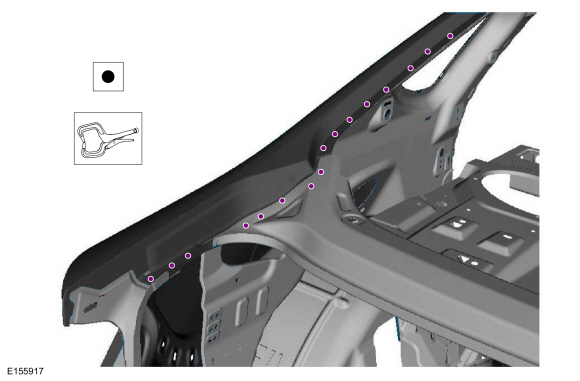
Carefully cut the outer panel only as indicated.
Use the General Equipment: Air Body Saw
-
Drill out the spot welds.
Use the General Equipment: Spot Weld Drill Bit
-
Drill out the spot welds.
Use the General Equipment: Spot Weld Drill Bit
-
Drill out the spot welds.
Use the General Equipment: Spot Weld Drill Bit
-
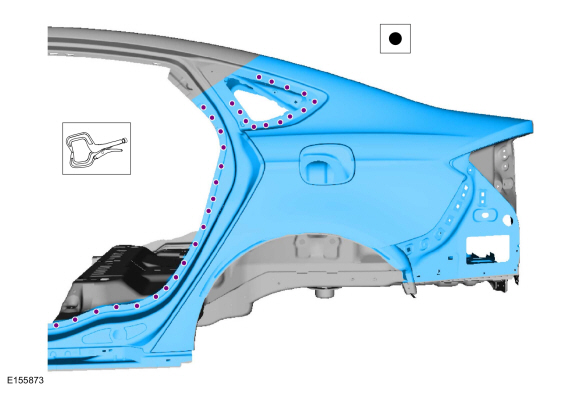
Break the adhesive bond and remove the quarter panel section.
Use the General Equipment: Hot Air Gun
Installation
-
 WARNING:
Before beginning any service procedure in this
section, refer to Safety Warnings in section 100-00 General Information.
Failure to follow this instruction may result in serious personal
injury.
WARNING:
Before beginning any service procedure in this
section, refer to Safety Warnings in section 100-00 General Information.
Failure to follow this instruction may result in serious personal
injury.
Refer to: Health and Safety Precautions (100-00 General Information, Description and Operation).
-
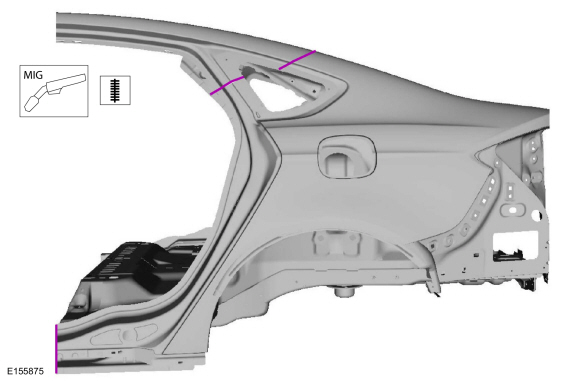
Cut the replacement panel to fit repair.
-
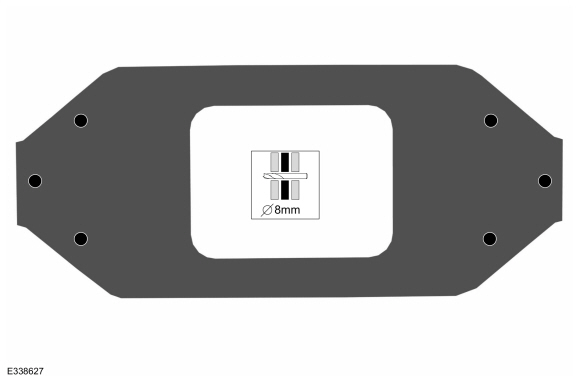
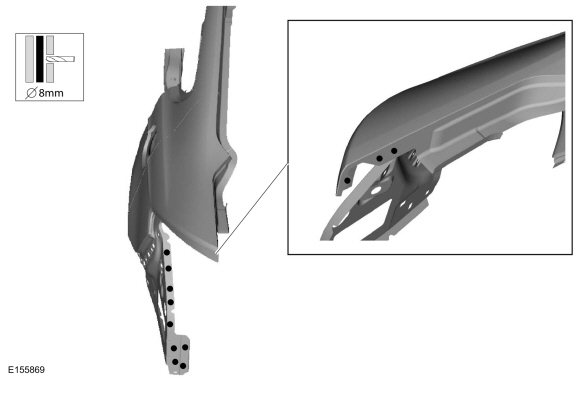
Drill plug weld holes in the replacement stiffener plate.
Use the General Equipment: 8 mm Drill Bit
-
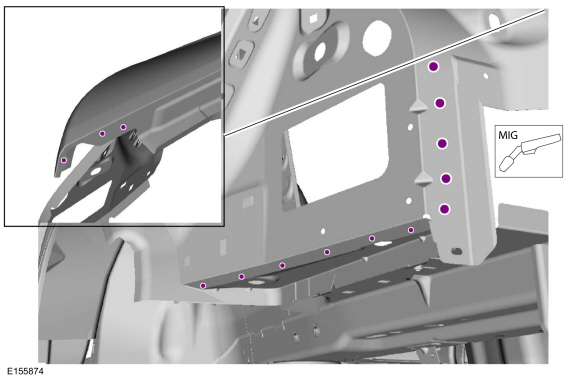
Install, properly position, clamp and weld the replacement stiffener plate.
Use the General Equipment: Locking Pliers
Use the General Equipment: MIG/MAG Welding Equipment
-
Drill plug welds holes in replacement panel.
Use the General Equipment: 8 mm Drill Bit
-
Drill plug welds holes in replacement panel.
Use the General Equipment: 8 mm Drill Bit
-
Apply adhesive.
Material: Flexible Foam Repair
/ 3M™ 08463, LORD Fusor® 121
-
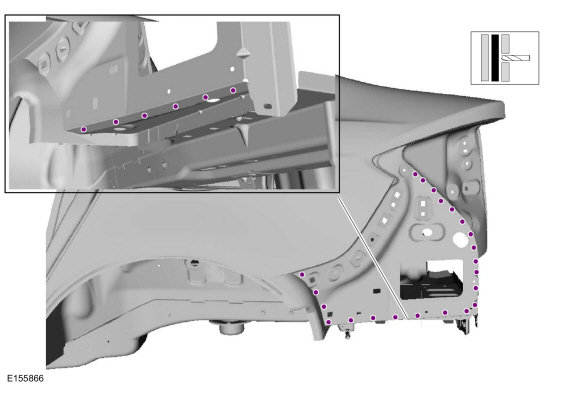
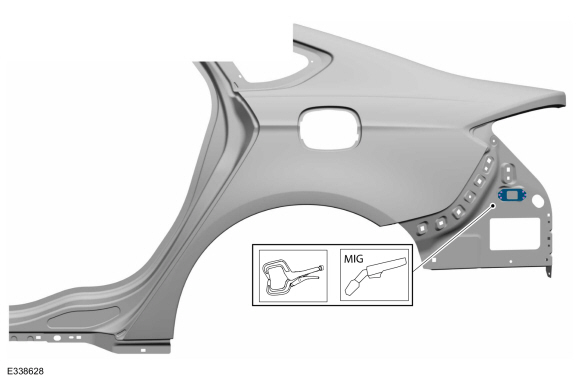
Install the quarter panel section, clamp in position and spot weld.
Use the General Equipment: Locking Pliers
Use the General Equipment: Resistance Spotwelding Equipment
-
Install the plug welds.
Use the General Equipment: MIG/MAG Welding Equipment
-
Install the plug welds.
Use the General Equipment: MIG/MAG Welding Equipment
-
Install the spot welds.
Use the General Equipment: Resistance Spotwelding Equipment
-
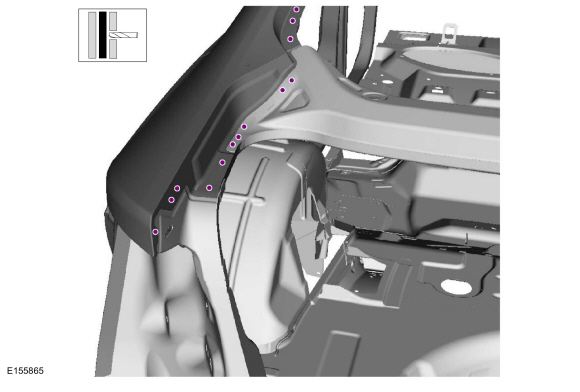
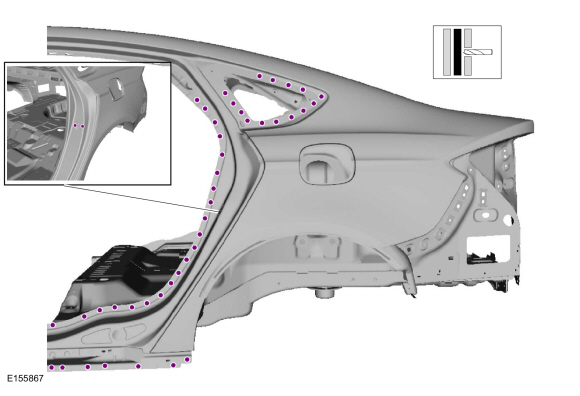
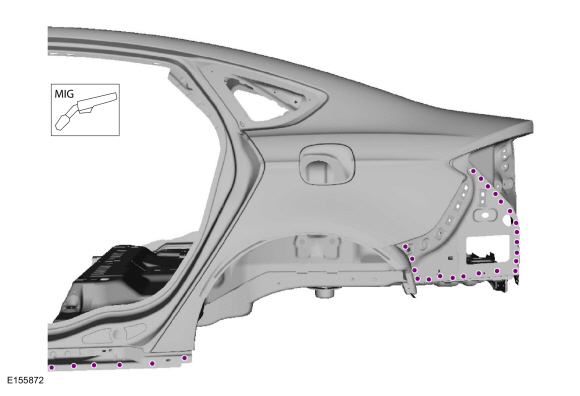
Stitch weld seams as indicated.
Use the General Equipment: MIG/MAG Welding Equipment
-
Metal finish as required using typical metal finishing techniques.
-
Sealing work: All areas must be sealed to production level.
Material: Seam Sealer
/ TA-2-B, 3M™ 08308, LORD Fusor® 803DTM
-
Refinish using a Ford approved paint system.
-
Restore corrosion protection.
Refer to: Corrosion Prevention (501-25 Body Repairs - General Information, General Procedures).
-
Reposition carpeting and wiring harness.
-
Install the following items.
Refer to: Rear Seat Cushion (501-10B Rear Seats, Removal and Installation).
Refer to: Fuel Tank Filler Pipe (310-01C Fuel Tank and Lines - 2.5L Duratec (125kW/170PS), Removal and Installation).
Refer to: Rear Lamp Assembly - 4-Door (417-01 Exterior Lighting)
.
Refer to: Rear Bumper (501-19 Bumpers)
.
Refer to: Fixed Glass (501-11 Glass, Frames and Mechanisms, General Procedures).
Refer to: Rear Door (501-03 Body Closures, Removal and Installation).
Special Tool(s) /
General Equipment
8 mm Drill Bit
MIG/MAG Welding Equipment
Spot Weld Drill Bit
Locking Pliers
Materials
Name
Specification
Seam SealerTA-2-B, 3M™ 08308, LORD Fusor® 803DTM
-
Removal
NOTICE:
Battery electric vehicle (BEV), hybrid electric vehicle
(HEV) and plug-in hybrid electric vehicle (PHEV) contain a high-voltage
battery..
Other information:
With the vehicle in NEUTRAL, position it on a hoist.
Refer to: Jacking and Lifting - Overview (100-02 Jacking and Lifting, Description and Operation).
If equipped.
Remove the underbody shield.
Remove the rear driveshaft.
Refer to: Rear Driveshaft (205-01 Driveshaft, Removal and Installation).
Loosen the clamp, remove the nuts a..
Special Tool(s) /
General Equipment
Flat Headed Screw Driver
Knife
Removal
NOTE:
The fuel filler door assembly is damaged during the removal
process and requires a new fuel filler door assembly to be installed.
Remove the fuel tank filler pipe.
Refer to: Fuel Tank Filler Pipe (310-01A Fuel Tank and Lines - 1.5L EcoBoost (118kW/160PS) – I4, Removal and Installation)...


 Rear Bumper Mounting bracket. Removal and Installation