Ford Fusion: Front Seats / Front Seat Cushion Blower Motor. Removal and Installation
Removal
All seats
-
Remove the front seat.
Refer to: Front Seat (501-10A Front Seats, Removal and Installation).
-
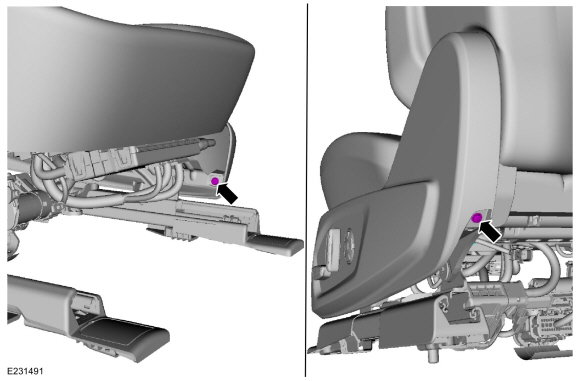
Remove the side shield screws.
 |
-
Remove the side shield.
-
Lift up on the rear of the side shield and pull outward.
-
Push the side shield forward.
-
Disconnect the electrical connector.
-
Lift up on the rear of the side shield and pull outward.
 |
-
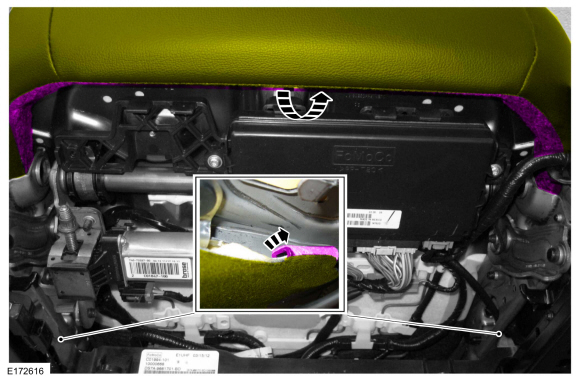
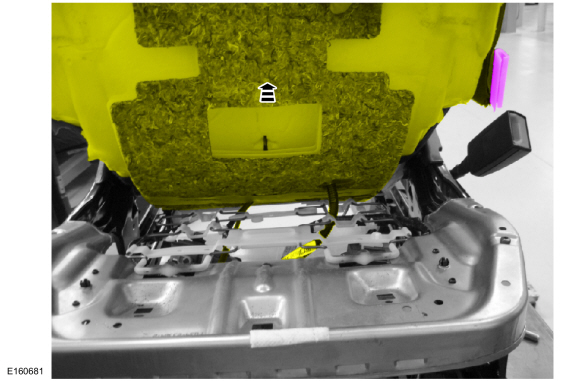
NOTE: For passenger seats equipped with an OCS service kit, the OCS will be adhered to the bottom of the seat cushion foam.
Release the J-clips and position the front of the seat cushion cover and foam assembly slightly upwards.
 |
Passenger seat
-
NOTE: Original equipment (OE) OCS shown, service kit similar.
Position the front seat cushion and cover assembly upward and remove the OCS pin-type retainers.
 |
-
Position the front of the OCS upward.
 |
All seats
-
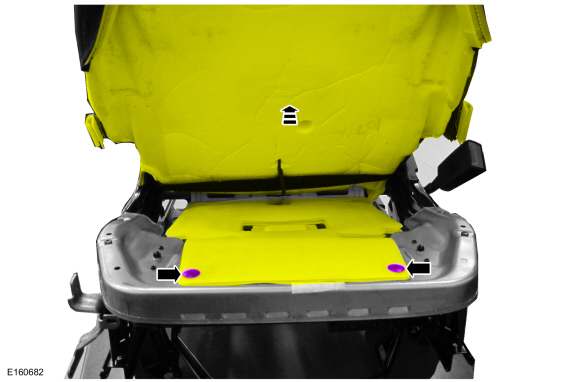
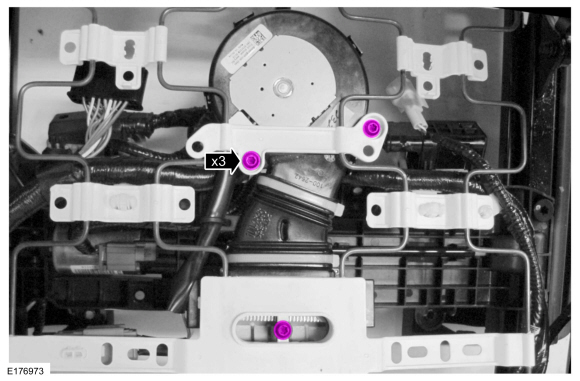
Remove the front seat cushion blower motor screws.
 |
-
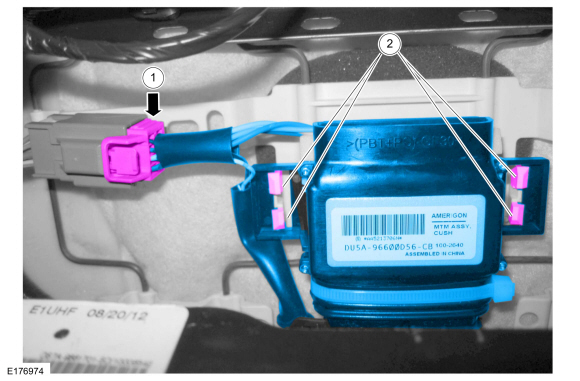
Remove the front seat cushion blower motor.
-
Disconnect the front seat cushion blower motor electrical connector.
-
Release the locking tabs.
-
Disconnect the front seat cushion blower motor electrical connector.
 |
Installation
All seats
-
To install, reverse the removal procedure.
-
Install the front seat. If the passenger seat has been serviced, do not prove out the
SRS
at this time.
Passenger seat
-
 WARNING:
Occupant Classification System (OCS) parts are
calibrated as an assembly and must only be replaced in the configuration
they are sold. Never separate parts of an assembly. Failure to follow
this instruction may result in incorrect operation of the OCS and
increases the risk of serious personal injury or death in a crash.
WARNING:
Occupant Classification System (OCS) parts are
calibrated as an assembly and must only be replaced in the configuration
they are sold. Never separate parts of an assembly. Failure to follow
this instruction may result in incorrect operation of the OCS and
increases the risk of serious personal injury or death in a crash.
 WARNING:
Make sure the front passenger seat repair is
complete, the seat and all attached components (head restraint, seat
side shield, etc.) are correctly assembled, and the seat is correctly
installed to the vehicle before using System Reset to rezero the seat
weight. Failure to follow these instructions may result in incorrect
operation of the occupant classification system (OCS) and increases the
risk of serious personal injury or death in a crash.
WARNING:
Make sure the front passenger seat repair is
complete, the seat and all attached components (head restraint, seat
side shield, etc.) are correctly assembled, and the seat is correctly
installed to the vehicle before using System Reset to rezero the seat
weight. Failure to follow these instructions may result in incorrect
operation of the occupant classification system (OCS) and increases the
risk of serious personal injury or death in a crash.
NOTICE: To prevent system failure, take the following precautions before carrying out the OCS reset.
- Make sure the voltage to the OCSM is greater than 8 volts and less than 18 volts.
- Make sure the OCS is not below 42.8 °F ( 6 °C) or above 96.7 °F ( 36 °C) when initiating the OCS reset process. If the vehicle has been exposed to extreme cold or hot temperatures, the vehicle must be exposed and kept at a temperature between 42.8 °F ( 6 °C) to 96.7 °F ( 36 °C) for a minimum of 30 minutes.
- Make sure nothing is present on the passenger seat before and during the OCS reset process.
- Prior to carrying out the OCS reset, make sure a minimum of 8 seconds has elapsed after cycling the ignition on.
-
If the first system reset attempt was successful, proceed to prove out the SRS.
-
If the first system reset attempt was not successful, carry out a thorough visual inspection of the OCS
connector and wiring for damage, pressure sensor hose for kinks and or
damage, and seat-related wiring harness and body wiring harness
terminals and connectors for damage. Repair any concerns found and
proceed to the next step.
-
Carry out a second OCS reset. Cycle the ignition after the OCS reset. If the second attempt is unsuccessful, install a new OCS service kit.
Refer to: Occupant Classification System (OCS) Sensor (501-20B Supplemental Restraint System, Removal and Installation).
-
Prove out the SRS
by turning the ignition from ON to OFF. Wait 10 seconds, then turn the
ignition back to ON and monitor the airbag warning indicator with the
airbags installed. The airbag warning indicator illuminates continuously
for approximately 6 seconds and then turns off. If a SRS fault is present, the airbag warning indicator will fail to light, remain lit continuously, or flash.
-
-
If a SRS
fault is present, the airbag warning indicator either fails to light,
remains lit continuously or flashes. The flashing may not occur until
approximately 30 seconds after the ignition has been turned from OFF to
ON. If this occurs, diagnose and repair any SRS faults before proceeding with other repairs.
-
If, after the ignition has been turned on for 30
seconds, the airbag warning indicator remains unlit with no chime or SRS message displayed in the message center, no SRS fault is present.
-
If the airbag warning indicator is inoperative and a SRS
fault exists, a chime sounds in a pattern of 5 sets of 5 beeps or a
message displays in the message center. If this occurs, diagnose and
repair the airbag warning indicator and any SRS faults before proceeding with other repairs.
-
If a SRS
fault is present, the airbag warning indicator either fails to light,
remains lit continuously or flashes. The flashing may not occur until
approximately 30 seconds after the ignition has been turned from OFF to
ON. If this occurs, diagnose and repair any SRS faults before proceeding with other repairs.
-
Using a diagnostic scan tool, clear all Continuous
Memory Diagnostic Trouble Codes (CMDTCs) from all modules.
 Front Seat Control Switch. Removal and Installation
Removal
Remove the side shield screws.
Remove the side shield.
Lift up on the rear of the side shield and pull outward...
 Front Seat Cushion Cover. Removal and Installation
Removal
Remove the front seat.
Refer to: Front Seat (501-10A Front Seats, Removal and Installation).
If equipped.
Release the lumbar knob retaining clip and remove the lumbar knob...
Other information:
Ford Fusion 2013–2020 Service Manual: Roof Opening Panel. Description and Operation
Roof Opening Panel The roof opening panel consists of the following: Air deflector Trough assembly Roof opening panel glass Roof opening panel motor/module Roof opening panel shield Roof opening panel control switch Roof opening panel drain hoses Roof opening panel blind The roof opening panel is an electronically operated glass panel that can be o..
Ford Fusion 2013–2020 Service Manual: Upper Arm. Removal and Installation
Special Tool(s) / General Equipment Vehicle/Axle Stands Removal NOTICE: Suspension fasteners are critical parts that affect the performance of vital components and systems. Failure of these fasteners may result in major service expense. Use the same or equivalent parts if replacement is necessary. Do not use a replacement part of lesser quality or substitute design. Tighten fa..
Categories
- Manuals Home
- 2nd Generation Ford Fusion Owners Manual
- 2nd Generation Ford Fusion Service Manual
- Body Control Module (BCM). Removal and Installation
- Under Hood Overview - 1.5L EcoBoost™, 2.0L EcoBoost™, 2.5L, 2.7L EcoBoost™
- Load Carrying
- New on site
- Most important about car
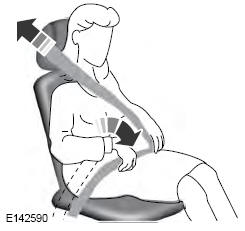
Using Seatbelts During Pregnancy
WARNING: Always ride and drive with your seatback upright and properly fasten your seatbelt. Fit the lap portion of the seatbelt snugly and low across the hips. Position the shoulder portion of the seatbelt across your chest. Pregnant women must follow this practice. See the following figure.