Ford Fusion: Information and Entertainment System - General Information - Vehicles With: SYNC 3 / Audio Unit Antenna. Removal and Installation
Ford Fusion 2013–2020 Service Manual / Electrical / Information and Entertainment Systems / Information and Entertainment System - General Information - Vehicles With: SYNC 3 / Audio Unit Antenna. Removal and Installation
Removal
NOTE: Removal steps in this procedure may contain installation details.
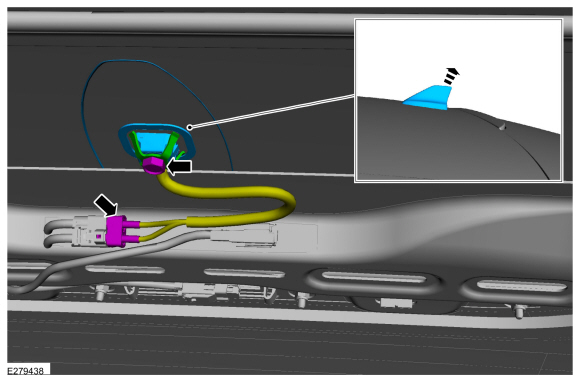
Roof mounted antenna
-
Carefully lower the rear of the headliner.
Refer to: Headliner (501-05 Interior Trim and Ornamentation, Removal and Installation).
-
-
Remove the audio unit antenna retaining bolt and retainer.
Torque: 62 lb.in (7 Nm)
-
Disconnect the electrical connectors.
-
Remove the audio unit antenna.
-
Remove the audio unit antenna retaining bolt and retainer.
 |
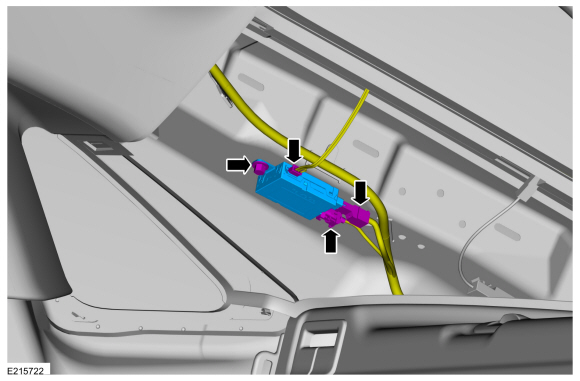
FM2 Diversity antenna
-
Remove the D-pillar trim panel.
Refer to: D-Pillar Trim Panel (501-05 Interior Trim and Ornamentation, Removal and Installation).
-
NOTE: RH side shown, LH side similar.
-
Disconnect the electrical connectors.
-
Remove the bolt and the FM2 diversity antenna.
Torque: 97 lb.in (11 Nm)
-
Disconnect the electrical connectors.
 |
Installation
Existing roof mounted antenna and FM2 Diversity antenna
-
To install, reverse the removal procedure.
Replacement roof mounted antenna
-
-
Do not remove the antenna bolt. Insert the
antenna pigtail and base mounting stud through the roof hole, gently
push down on the antenna base until an audible click is heard.
-
Connect the electrical connectors.
-
Do not remove the antenna bolt. Insert the
antenna pigtail and base mounting stud through the roof hole, gently
push down on the antenna base until an audible click is heard.
-
Install the headliner.
Refer to: Headliner (501-05 Interior Trim and Ornamentation, Removal and Installation).
 Audio Front Control Module (ACM) - Police. Removal and Installation
Removal
NOTE:
Make sure that any media is ejected from unit.
NOTE:
Removal steps in this procedure may contain installation details.
NOTE:
If installing a new module, it is necessary to
upload the module configuration information to the scan tool prior to
removing the module...
 Audio Unit Antenna Cable. Removal and Installation
Removal
NOTE:
The original equipment body antenna cable is part of the
wiring harness and cannot be removed. This procedure refers to
replacement of the body antenna cable by overlaying existing body
harness with a new body cable and securing it to the wiring harness...
Other information:
Ford Fusion 2013–2020 Service Manual: Rear Wheelhouse Outer. Removal and Installation
Special Tool(s) / General Equipment Resistance Spotwelding Equipment Air Body Saw Materials Name Specification Seam SealerTA-2-B, 3M™ 08308, LORD Fusor® 803DTM - Removal WARNING: Before beginning any service procedure in this section, refer to Safety Warnings in section 100-00 General Information...
Ford Fusion 2013–2020 Service Manual: Evaporator. Removal and Installation
Removal NOTE: Removal steps in this procedure may contain installation details. Remove the heater core. Refer to: Heater Core (412-00 Climate Control System - General Information, Removal and Installation). Remove the climate control housing seal...
Categories
- Manuals Home
- 2nd Generation Ford Fusion Owners Manual
- 2nd Generation Ford Fusion Service Manual
- Automatic Transmission - 6-Speed Automatic Transmission – 6F35
- Engine - 1.5L EcoBoost (118kW/160PS) – I4
- Garage Door Opener
- New on site
- Most important about car
Cross Traffic Alert System Sensors
The sensors are behind the rear bumper on both sides of your vehicle.
Copyright © 2026 www.fofusion2.com