Ford Fusion: Front End Body Panels / Radiator Grille Opening Panel Reinforcement. Removal and Installation
Ford Fusion 2013–2020 Service Manual / Body and Paint / Body and Paint / Front End Body Panels / Radiator Grille Opening Panel Reinforcement. Removal and Installation
Removal
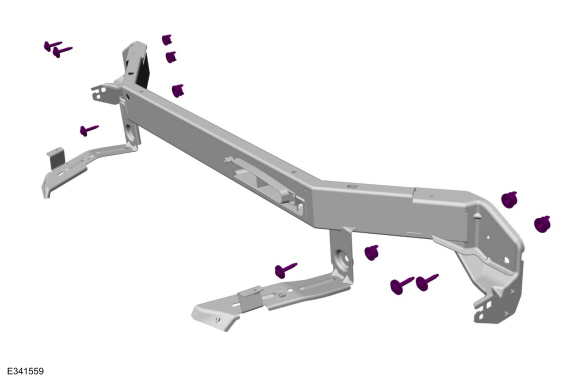
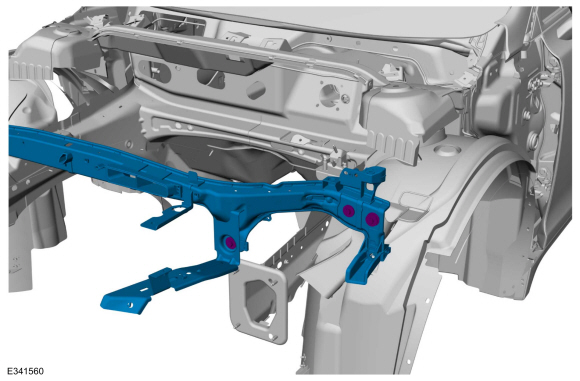
NOTE: Left hand (LH) side shown, right hand (RH) side similar.
NOTE: Engine removed for clarity.
-
Overview
 |
-
Remove the hood and prop rod.
Refer to: Hood (501-02 Front End Body Panels, Removal and Installation).
-
On Both Sides:
Remove the fender and splash shield.
-
On Both Sides:
Remove the headlamp assembly.
Refer to: Headlamp Assembly (417-01) .
-
Remove the degas bottle.
Refer to: Degas Bottle (303-03A Engine Cooling - 1.5L EcoBoost (118kW/160PS) – I4, Removal and Installation).
Refer to: Degas Bottle (303-03D) .
Refer to: Degas Bottle (303-03H) .
Refer to: Degas Bottle (303-03C Engine Cooling - 2.5L Duratec (125kW/170PS), Removal and Installation).
-
Remove the front bumper cover.
Refer to: Front Bumper Cover (501-19) .
-
Remove the active grill shutter and actuator.
Refer to: Active Grille Shutter (501-02) .
Refer to: Active Grille Shutter Actuator (501-02) .
-
Remove the radiator.
Refer to: Radiator (303-03A Engine Cooling - 1.5L EcoBoost (118kW/160PS) – I4, Removal and Installation).
Refer to: Radiator (303-03D) .
Refer to: Radiator (303-03H) .
Refer to: Radiator (303-03C Engine Cooling - 2.5L Duratec (125kW/170PS), Removal and Installation).
-
Remove the A/C condenser.
Refer to: Condenser - 1.5L EcoBoost (118kW/160PS) – I4 (412-00) .
Refer to: Condenser - 1.6L EcoBoost (132kW/180PS) – Sigma (412-00) .
Refer to: Condenser - 2.0L EcoBoost (184kW/250PS) – MI4 (412-00) .
Refer to: Condenser - 2.5L Duratec (125kW/170PS) (412-00) .
-
Position all wiring harnesses away from the working area.
-
Remove the fasteners and the radiator grill opening panel reinforcement.
 |
Installation
NOTE: Left hand (LH) side shown, right hand (RH) side similar.
NOTE: Engine removed for clarity.
-
Install and the radiator grill opening panel reinforcement and fasteners.
 |
-
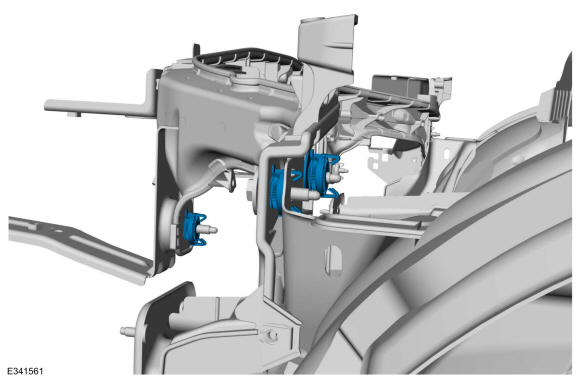
On Both Sides:
Install the adjustable retainers.
 |
-
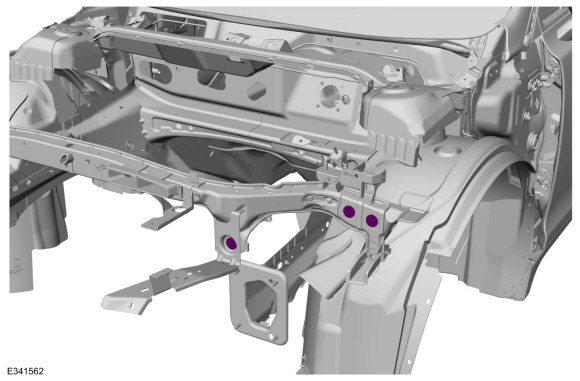
Adjust for proper spacing.
-
On Both Sides:
Tighten the fasteners.
Torque: 177 lb.in (20 Nm)
 |
-
Reposition all wiring harnesses to original location.
-
Install the A/C condenser.
Refer to: Condenser - 1.5L EcoBoost (118kW/160PS) – I4 (412-00) .
Refer to: Condenser - 1.6L EcoBoost (132kW/180PS) – Sigma (412-00) .
Refer to: Condenser - 2.0L EcoBoost (184kW/250PS) – MI4 (412-00) .
Refer to: Condenser - 2.5L Duratec (125kW/170PS) (412-00) .
-
Install the radiator.
Refer to: Radiator (303-03A Engine Cooling - 1.5L EcoBoost (118kW/160PS) – I4, Removal and Installation).
Refer to: Radiator (303-03D) .
Refer to: Radiator (303-03H) .
Refer to: Radiator (303-03C Engine Cooling - 2.5L Duratec (125kW/170PS), Removal and Installation).
-
Install the active grille shutter and actuator.
Refer to: Active Grille Shutter (501-02) .
Refer to: Active Grille Shutter Actuator (501-02) .
-
Install the degas bottle.
Refer to: Degas Bottle (303-03A Engine Cooling - 1.5L EcoBoost (118kW/160PS) – I4, Removal and Installation).
Refer to: Degas Bottle (303-03D) .
Refer to: Degas Bottle (303-03H) .
Refer to: Degas Bottle (303-03C Engine Cooling - 2.5L Duratec (125kW/170PS), Removal and Installation).
-
Install the front bumper cover.
Refer to: Front Bumper Cover (501-19) .
-
On Both Sides:
Install the fender and splash shield.
Refer to: Fender Splash Shield (501-02) .
Refer to: Fender (501-02) .
-
On Both Sides:
Install the headlamp assembly.
Refer to: Headlamp Assembly (417-01) .
-
Install and adjust the hood and prop rod.
Refer to: Hood (501-02 Front End Body Panels, Removal and Installation).
Refer to: Hood Alignment (501-03 Body Closures, General Procedures).
 Hood. Removal and Installation
Removal
NOTE:
Removal steps in this procedure may contain installation details.
Open hood.
On both sides.
Index-mark the hood hinge location to aid in hood installation...

Other information:
Ford Fusion 2013–2020 Service Manual: Transmission Support Insulator - 1.5L EcoBoost (118kW/160PS) – I4. Removal and Installation
Special Tool(s) / General Equipment 303-1502Lifting Device EngineTKIT-2012A-FLTKIT-2012A-ROW 303-290B-18Adapter for 303-290BTKIT-2012A-FLTKIT-2012A-ROW 303-F072Support Bar, Engine Materials Name Specification Motorcraft® Threadlock and SealerTA-25-B - Removal With the vehicle in NEUTRAL, position it on a hoist. Refer to: Jacking and Lifting..
Ford Fusion 2013–2020 Owners Manual: Keyless Entry
SECURICODE™ Keyless Entry Keypad The keypad is near the driver window. It illuminates when touched. Note: If you enter your entry code too fast on the keypad, the unlock function may not work. Enter your entry code again more slowly. You can use the keypad to do the following: Lock or unlock the doors. Release the luggage compartment. Program and erase user codes. Arm and disarm the a..
Categories
- Manuals Home
- 2nd Generation Ford Fusion Owners Manual
- 2nd Generation Ford Fusion Service Manual
- Load Carrying
- Engine
- Automatic Transmission - 6-Speed Automatic Transmission – 6F35
- New on site
- Most important about car
Child Safety Locks
When these locks are set, the rear doors cannot be opened from the inside.
Copyright © 2025 www.fofusion2.com