Ford Fusion: Automatic Transmission - 6-Speed Automatic Transmission – 6F35 / Transmission Support Insulator - 1.5L EcoBoost (118kW/160PS) – I4. Removal and Installation
Ford Fusion 2013–2020 Service Manual / Powertrain / Automatic Transmission / Automatic Transmission - 6-Speed Automatic Transmission – 6F35 / Transmission Support Insulator - 1.5L EcoBoost (118kW/160PS) – I4. Removal and Installation
Special Tool(s) / General Equipment
 |
303-1502 Lifting Device Engine TKIT-2012A-FL TKIT-2012A-ROW |
 |
303-290B-18 Adapter for 303-290B TKIT-2012A-FL TKIT-2012A-ROW |
 |
303-F072 Support Bar, Engine |
Materials
| Name | Specification |
|---|---|
| Motorcraft® Threadlock and Sealer TA-25-B |
- |
Removal
-
With the vehicle in NEUTRAL, position it on a hoist.
Refer to: Jacking and Lifting - Overview (100-02 Jacking and Lifting, Description and Operation).
-
Remove the following items:
-
Refer to: Air Cleaner (303-12A Intake Air Distribution and Filtering - 1.5L EcoBoost (118kW/160PS) – I4, Removal and Installation).
-
Refer to: Air Cleaner Outlet Pipe (303-12A Intake Air Distribution and Filtering - 1.5L EcoBoost (118kW/160PS) – I4, Removal and Installation).
-
Refer to: Battery Tray (414-01 Battery, Mounting and Cables, Removal and Installation).
-
Refer to: Air Cleaner (303-12A Intake Air Distribution and Filtering - 1.5L EcoBoost (118kW/160PS) – I4, Removal and Installation).
-
-
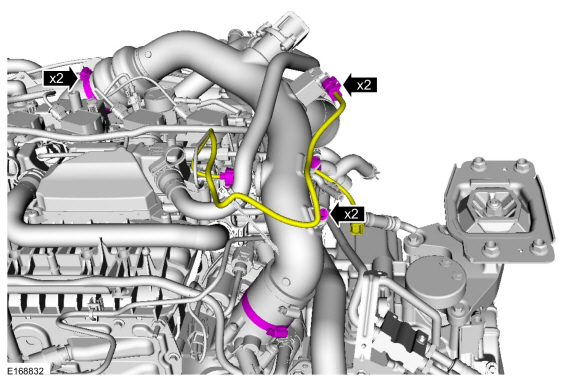
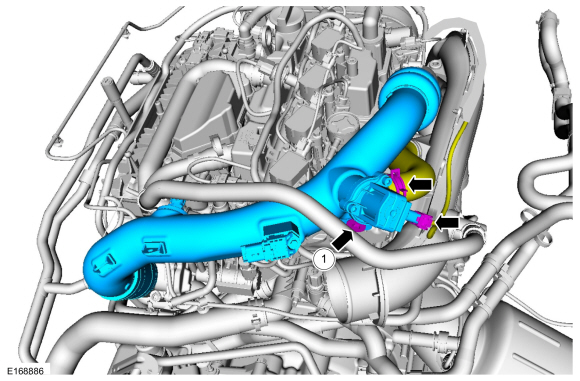
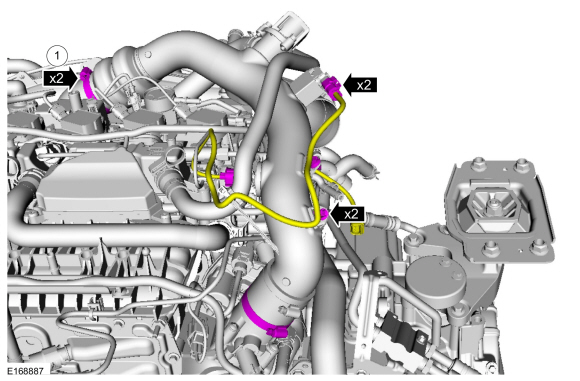
Detach wiring harness retainers, disconnect the electrical connectors.
-
Loosen the clamp of the CAC tube.
-
Detach wiring harness retainers, disconnect the electrical connectors.
 |
-
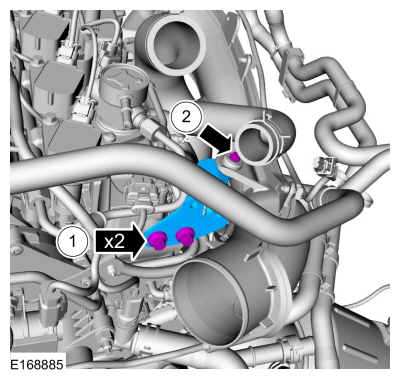
Disconnect the electrical connector, detach the clamp and remove the bolt. Remove the CAC tube.
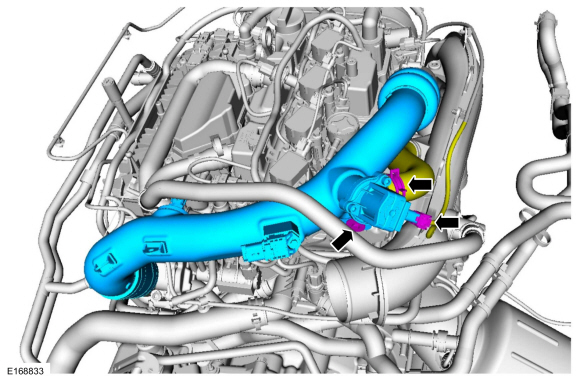 |
-
Remove the bolts and the cylinder head mounted bracket.
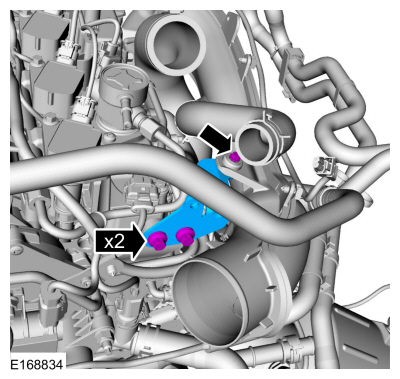 |
-
Install the special tool.
Use Special Service Tool: 303-1502 Lifting Device Engine.
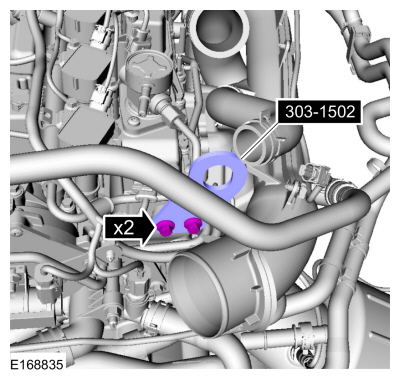 |
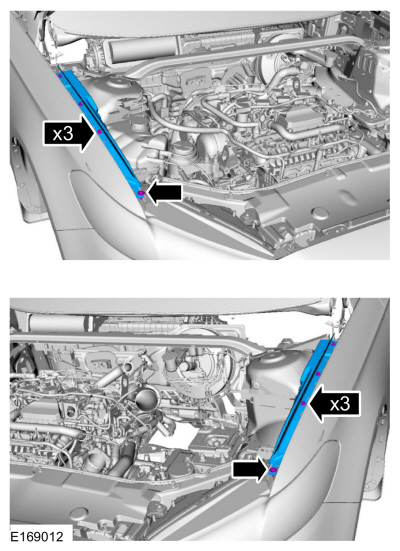
-
Remove the retainers and the RH and LH cowl filler panels.
 |
-
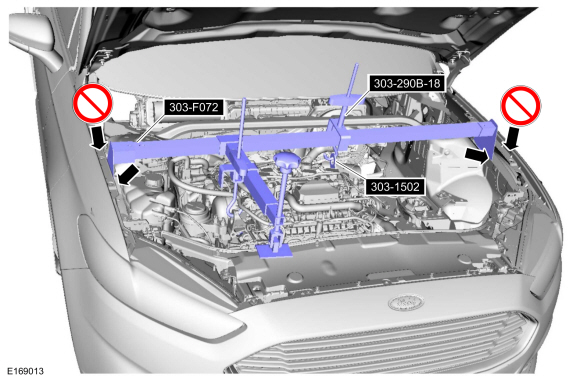
Using the special tools, support the engine.
Use Special Service Tool: 303-F072 Support Bar, Engine. , 303-290B-18 Adapter for 303-290B. , 303-1502 Lifting Device Engine.
 |
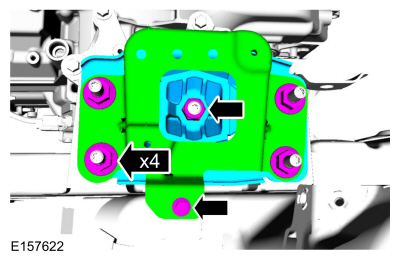
-
Remove the bolt and nuts, remove the bracket and the transmission support insulator.
 |
Installation
-
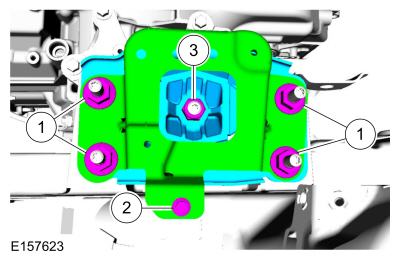
Install the transmission support insulator and bracket.
-
Install the transmission support insulator. Install the bracket and the nuts.
Material: Motorcraft® Threadlock and Sealer / TA-25-B
Torque: 59 lb.ft (80 Nm)
-
Install the transmission support insulator bracket bolt.
Torque: 18 lb.ft (25 Nm)
-
Install the nut.
Material: Motorcraft® Threadlock and Sealer / TA-25-B
Torque: 98 lb.ft (133 Nm)
-
Install the transmission support insulator. Install the bracket and the nuts.
 |
-
Install the RH and LH cowl filler panels and the retainers.
 |
-
-
Install the cylinder head mounted bracket and bolts.
Torque: 97 lb.in (11 Nm)
-
Install the bolt.
Torque: 71 lb.in (8 Nm)
-
Install the cylinder head mounted bracket and bolts.
 |
-
-
Position the CAC tube and install the bolt.
Torque: 71 lb.in (8 Nm)
-
Attach the clamp and connect the electrical connector.
-
Position the CAC tube and install the bolt.
 |
-
-
Tighten the clamps.
Torque: 44 lb.in (5 Nm)
-
Attach the wiring harness retainers and connect the electrical connectors.
-
Tighten the clamps.
 |
-
Install the following items:
-
Refer to: Battery Tray (414-01 Battery, Mounting and Cables, Removal and Installation).
-
Refer to: Air Cleaner Outlet Pipe (303-12A Intake Air Distribution and Filtering - 1.5L EcoBoost (118kW/160PS) – I4, Removal and Installation).
-
Refer to: Air Cleaner (303-12A Intake Air Distribution and Filtering - 1.5L EcoBoost (118kW/160PS) – I4, Removal and Installation).
-
Refer to: Battery Tray (414-01 Battery, Mounting and Cables, Removal and Installation).
 Transmission Range (TR) Sensor. Removal and Installation
Special Tool(s) /
General Equipment
Punch
Locking Pliers
Removal
Remove the main control cover.
Refer to: Main Control Cover - 1...
 Turbine Shaft Speed (TSS) Sensor. Removal and Installation
Removal
Remove the air cleaner.
Refer to: Air Cleaner (303-12A Intake Air Distribution and Filtering - 1.5L EcoBoost (118kW/160PS) – I4, Removal and Installation)...
Other information:
Ford Fusion 2013–2020 Service Manual: Air Conditioning (A/C) Odor Treatment - Vehicles With: R1234YF Refrigerant. General Procedures
Special Tool(s) / General Equipment A/C Odor Remover Flexible Applicator Materials Name Specification Motorcraft® A/C Cooling Coil CoatingYN-29 - Inspection NOTE: There are typically 4 types of objectionable odors found in a vehicle: chemical odors environmental odors human and other interior-generated odors microbiological odors Befor..
Ford Fusion 2013–2020 Service Manual: Rear Suspension - Component Location. Description and Operation
NOTE: AWD suspension shown, FWD similar. Item Description 1 Coil spring 2 Stabilizer and links 3 Shock absorber 4 Wheel knuckle 5 Wheel bearing and wheel hub assembly 6 Wheel studs 7 Lower arm vertical link 8 Toe link 9 Lower arm and bushing assembly 10 Upper arm 11 Suspension height sensor (If equipped with Dy..
Categories
- Manuals Home
- 2nd Generation Ford Fusion Owners Manual
- 2nd Generation Ford Fusion Service Manual
- Engine
- Starter Motor. Removal and Installation
- Automatic Transmission - 6-Speed Automatic Transmission – 6F35
- New on site
- Most important about car
Cross Traffic Alert System Sensors
The sensors are behind the rear bumper on both sides of your vehicle.
Copyright © 2026 www.fofusion2.com