Ford Fusion: Handles, Locks, Latches and Entry Systems / Hood Latch. Removal and Installation
Ford Fusion 2013–2020 Service Manual / Body and Paint / Body and Paint / Handles, Locks, Latches and Entry Systems / Hood Latch. Removal and Installation
Removal
NOTE: Removal steps in this procedure may contain installation details.
-
Remove the front bumper cover.
Refer to: Front Bumper Cover (501-19 Bumpers, Removal and Installation).
Left Hand (LH)
-
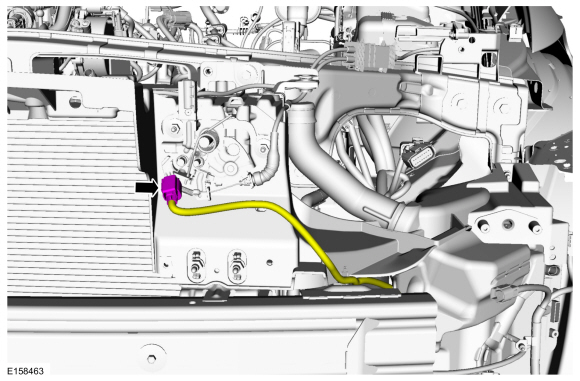
Disconnect the hood ajar switch electrical connector and position aside the wiring harness.
 |
-
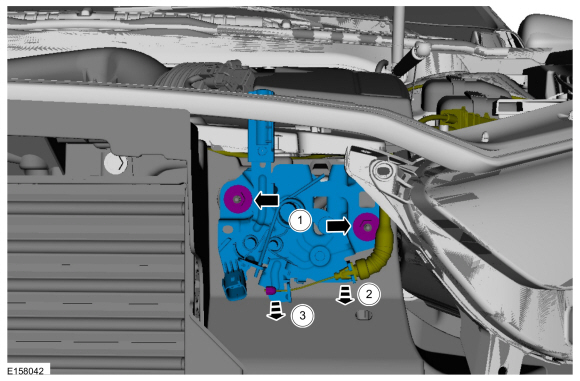
Remove the hood latch.
-
Remove the nuts.
Torque: 80 lb.in (9 Nm)
-
Detach the left front hood latch release cable from the left front hood latch.
-
Remove the left front hood latch release cable
from the left front hood latch and remove the left front hood latch.
-
Remove the nuts.
 |
Right Hand (RH)
-
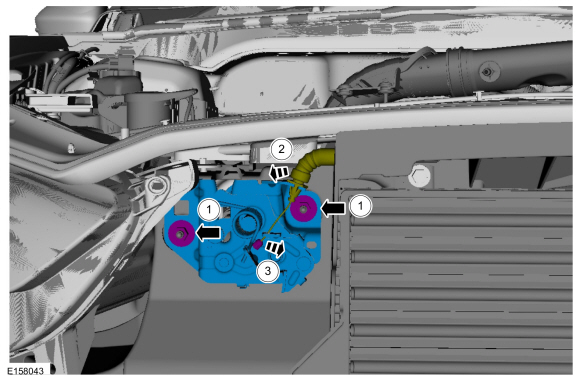
Remove the hood latch.
-
Remove the nuts.
Torque: 80 lb.in (9 Nm)
-
Detach the right front hood latch release cable from the right front hood latch.
-
Remove the right front hood latch release cable
from the right front hood latch and remove the right front hood latch.
-
Remove the nuts.
 |
Installation
-
To install, reverse the removal procedure.
 Hood Latch Release Cable. Removal and Installation
Removal
NOTE:
Removal steps in this procedure may contain installation details.
Left front cable
Remove the front bumper cover.
Refer to: Front Bumper Cover (501-19 Bumpers)
...
 Hood Latch Release Handle. Removal and Installation
Removal
Remove the hood latch release handle access cover.
NOTE:
Insert a 10mm 1/4 inch drive socket to release the clips...
Other information:
Ford Fusion 2013–2020 Owners Manual: Navigation
Note: For more information, refer to our website. Select the navigation option on the feature bar. Map view menu. Zoom out. Zoom in. Route guidance menu. Destination entry menu. Setting a Destination Destination Entry Menu Setting a Destination Using the Text Entry Screen Text entry field...
Ford Fusion 2013–2020 Service Manual: B-Pillar Trim Panel. Removal and Installation
Removal NOTE: RH side shown, LH side similar. NOTE: Removal steps in this procedure may contain installation details. Position the front seat in the full forward position. Position the front door weatherstrip aside, release the clips and remove the front door scuff plate trim panel...
Categories
- Manuals Home
- 2nd Generation Ford Fusion Owners Manual
- 2nd Generation Ford Fusion Service Manual
- Automatic Transmission Fluid Check - 1.5L EcoBoost™/2.0L EcoBoost™/2.5L. Automatic Transmission Fluid Check - 2.7L EcoBoost™
- Under Hood Overview - 1.5L EcoBoost™, 2.0L EcoBoost™, 2.5L, 2.7L EcoBoost™
- Memory Function
- New on site
- Most important about car
Cross Traffic Alert System Sensors
The sensors are behind the rear bumper on both sides of your vehicle.
Copyright © 2026 www.fofusion2.com