Ford Fusion: Evaporative Emissions - 1.5L EcoBoost (118kW/160PS) – I4 / Evaporative Emission Canister Purge Valve. Removal and Installation
Ford Fusion 2013–2020 Service Manual / Powertrain / Engine / Evaporative Emissions - 1.5L EcoBoost (118kW/160PS) – I4 / Evaporative Emission Canister Purge Valve. Removal and Installation
Removal
NOTE: Removal steps in this procedure may contain installation details.
-
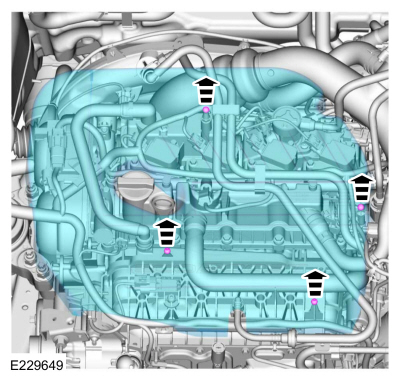
Remove the engine appearance cover.
 |
-
Remove the air cleaner outlet pipe.
Refer to: Air Cleaner Outlet Pipe (303-12A Intake Air Distribution and Filtering - 1.5L EcoBoost (118kW/160PS) – I4, Removal and Installation).
-
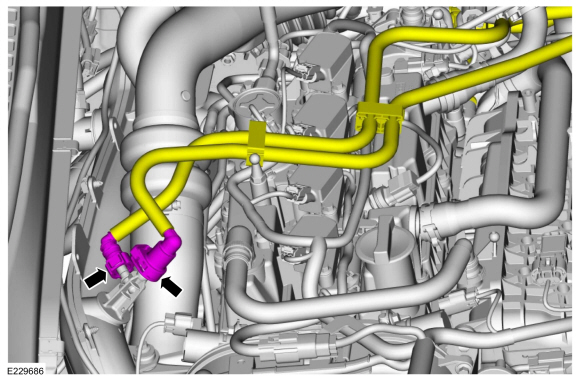
Disconnect the EVAP canister purge valve quick connect couplings from the TC inlet pipe.
Refer to: Quick Release Coupling (310-00A Fuel System - General Information - 1.5L EcoBoost (118kW/160PS) – I4, General Procedures).
 |
-
-
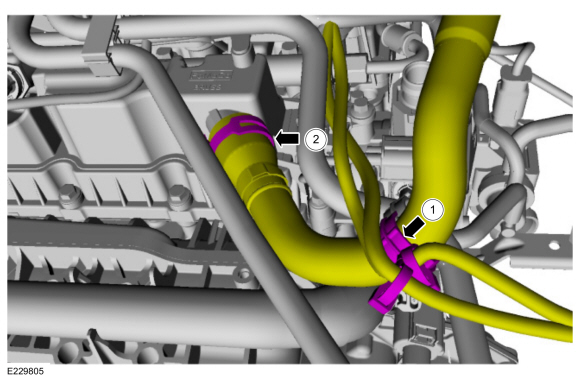
Release the wiring routing clip.
-
Release the hose clamp and position the hose aside.
-
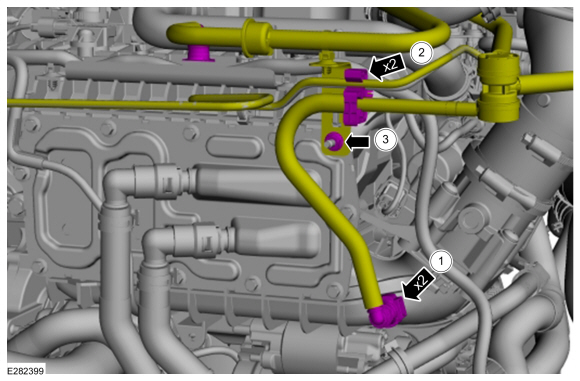
Release the wiring routing clip.
 |
-
-
Disconnect the EVAP purge valve quick connect couplings.
Refer to: Quick Release Coupling (310-00A Fuel System - General Information - 1.5L EcoBoost (118kW/160PS) – I4, General Procedures).
-
Detach the EVAP purge valve and degas bottle hoses from the routing clip.
-
Remove the bracket nut.
Torque: 97 lb.in (11 Nm)
-
Disconnect the EVAP purge valve quick connect couplings.
 |
-
-
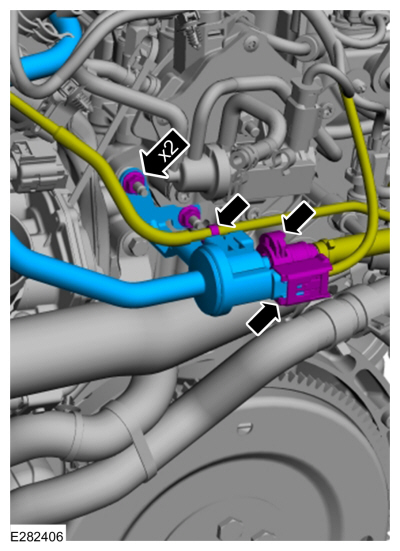
Disconnect the EVAP purge valve electrical connector.
-
Disconnect the EVAP purge valve quick connect coupling and detach the retainer.
Refer to: Quick Release Coupling (310-00A Fuel System - General Information - 1.5L EcoBoost (118kW/160PS) – I4, General Procedures).
-
Remove the fasteners and EVAP purge valve.
Torque: 97 lb.in (11 Nm)
-
Disconnect the EVAP purge valve electrical connector.
 |
Installation
-
To install, reverse the removal procedure.
 Evaporative Emission Canister. Removal and Installation
Removal
NOTE:
Removal steps in this procedure may contain installation details.
With the vehicle in NEUTRAL, position it on a hoist.
Refer to: Jacking and Lifting - Overview (100-02 Jacking and Lifting, Description and Operation)...
 Evaporative Emission Canister Vent Solenoid. Removal and Installation
Removal
NOTE:
Removal steps in this procedure may contain installation details.
Remove the EVAP canister.
Refer to: Evaporative Emission Canister (303-13A Evaporative Emissions - 1...
Other information:
Ford Fusion 2013–2020 Service Manual: Front Fog Lamp Adjustment. General Procedures
Activation NOTE: Horizontal aim is not required for this vehicle and is not adjustable. Consult your state vehicle inspection center for recommended tolerance ranges for visual aiming. Before starting the fog lamp assembly adjustment: Check the tire inflation...
Ford Fusion 2013–2020 Service Manual: Front Seats. Diagnosis and Testing
DTC Chart: DDM Diagnostics in this manual assume a certain skill level and knowledge of Ford-specific diagnostic practices. REFER to: Diagnostic Methods (100-00 General Information, Description and Operation). DDM DTC Chart DTC Description Action B1C03:23 Memory #1 Switch: Signal Stuck Low GO to Pinpoi..
Categories
- Manuals Home
- 2nd Generation Ford Fusion Owners Manual
- 2nd Generation Ford Fusion Service Manual
- Traction Control
- Body Control Module (BCM). Removal and Installation
- Memory Function
- New on site
- Most important about car
Direction Indicators. Interior Lamps
Direction Indicators
Push the lever up or down to use the direction indicators.
Copyright © 2026 www.fofusion2.com