Ford Fusion: Roof Opening Panel / Trough Assembly. Removal and Installation
Ford Fusion 2013–2020 Service Manual / Body and Paint / Body and Paint / Roof Opening Panel / Trough Assembly. Removal and Installation
Removal
NOTE: Removal steps in this procedure may contain installation details.
-
Remove the roof opening panel frame.
Refer to: Roof Opening Panel Frame (501-17 Roof Opening Panel, Removal and Installation).
-
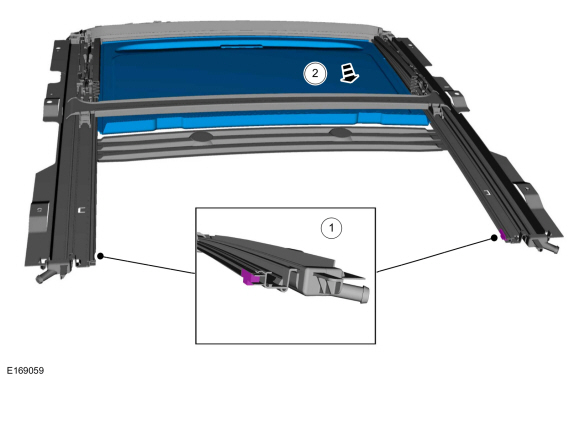
Remove the roof opening panel shield.
-
Remove the retainers.
-
Slide the roof opening panel shield rearward and
remove the roof opening panel shield out of the guide track.
-
Remove the retainers.
 |
-
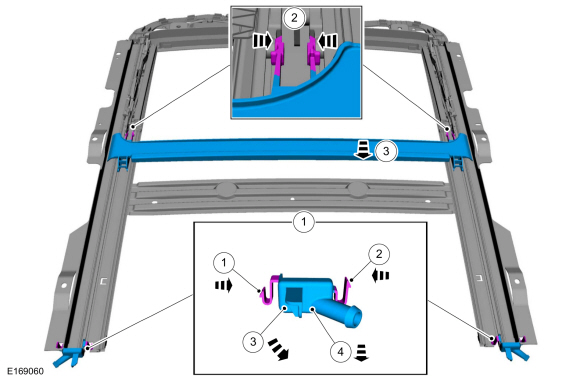
NOTE: Make sure the foam seal between the drain cup and the track is completely removed with the cup and a new foam seal is positioned when installing.
Remove the trough assembly.
-
Remove the drain cup by pushing the tabs in,
rotating the drain cup down toward the outside of the vehicle and down.
-
Push the trough assembly retaining tabs on the guide to release the trough assembly from the guide.
-
Carefully remove the trough assembly.
-
Remove the drain cup by pushing the tabs in,
rotating the drain cup down toward the outside of the vehicle and down.
 |
Installation
-
To install, reverse the removal procedure.
 Roof Opening Panel Shield. Removal and Installation
Removal
NOTE:
Removal steps in this procedure may contain installation details.
On both sides, remove the A-pillar trim panel.
Refer to: A-Pillar Trim Panel (501-05 Interior Trim and Ornamentation, Removal and Installation)...
 Bumpers
..
Other information:
Ford Fusion 2013–2020 Service Manual: Airbag and Seatbelt Pretensioner Supplemental Restraint System (SRS) - Overview. Description and Operation
Overview The RCM continually receives and monitors inputs from the OCSM, BECMB and various other hard-wired switches and sensors. If the RCM detects a sudden vehicle deceleration and/or lateral deceleration based on the information received from the various sensors, and determines that deployment is necessary, the RCM applies voltage and current to deploy the appropriate SRS components. The S..
Ford Fusion 2013–2020 Service Manual: Rear Drive Halfshafts. Diagnosis and Testing
Preliminary Inspection Visually inspect the CV joints, housing, boots, and clamps for obvious signs of mechanical damage. If an obvious cause for an observed or reported concern is found, correct the cause (if possible) before proceeding to the next step If the cause is not visually evident, verify the symptom and REFER to Symptom Chart: NVH. Symptom Chart(s) Diagn..
Categories
- Manuals Home
- 2nd Generation Ford Fusion Owners Manual
- 2nd Generation Ford Fusion Service Manual
- Electronic Parking Brake (EPB) Service Mode Activation and Deactivation. General Procedures
- Body Control Module (BCM). Removal and Installation
- Electrical
- New on site
- Most important about car
Child Safety Locks
When these locks are set, the rear doors cannot be opened from the inside.
Copyright © 2026 www.fofusion2.com