Ford Fusion: Front Seats / Front Seat Track Motor. Removal and Installation
Special Tool(s) /
General Equipment
Removal
 WARNING:
The following procedure prescribes critical repair steps
required for correct restraint system operation during a crash. Follow
all notes and steps carefully. Failure to follow step instructions may
result in incorrect operation of the restraint system and increases the
risk of serious personal injury or death in a crash.
All seats
-
 WARNING:
Turn the ignition OFF and wait one minute to
deplete the backup power supply. Ignition must remain OFF until repair
is complete. Failure to follow this instruction may result in serious
personal injury or death in the event of an accidental deployment.
Turn the ignition off and wait at least one minute.
-
-
If equipped.
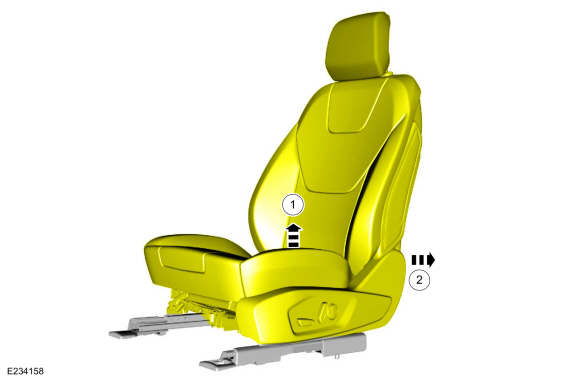
Move the front seat to the full upward position.
-
Move the front seat to the full rearward position.
-
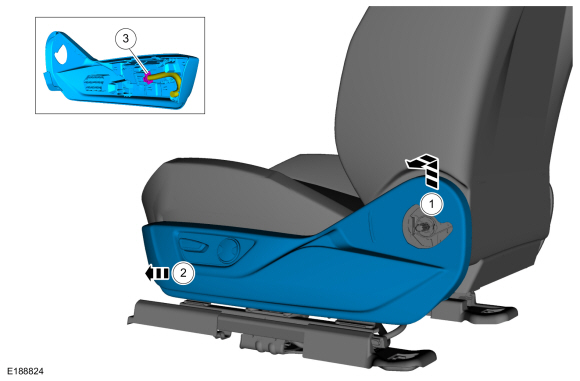
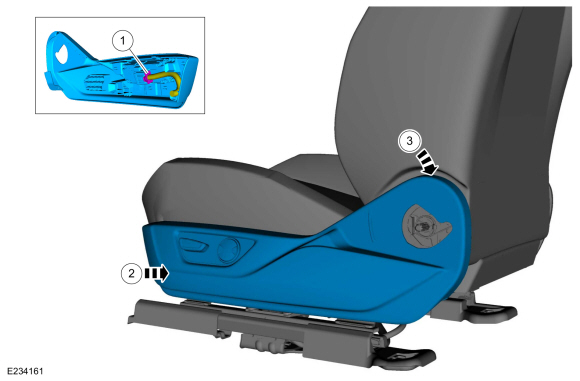
Remove the side shield screws and position aside the side shield.
-
Remove the side shield.
-
Lift up on the rear of the side shield and pull outward.
-
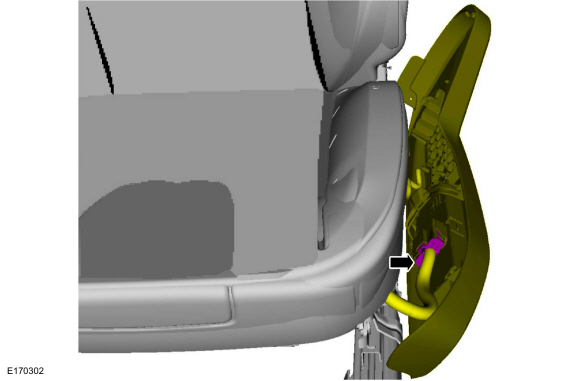
Push the side shield forward.
-
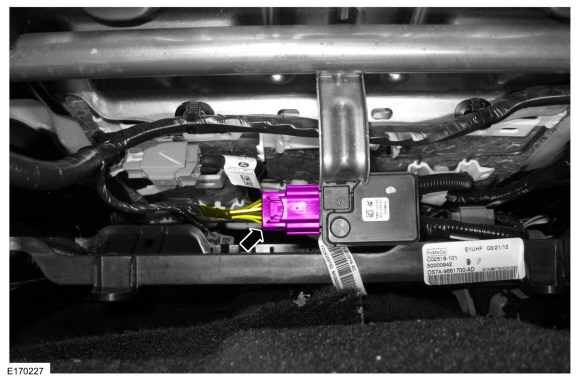
Disconnect the electrical connector.
Passenger seat
-
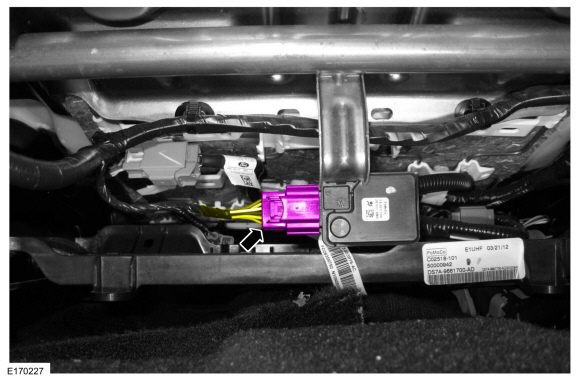
Disconnect the OCS electrical connector.
All seats
-
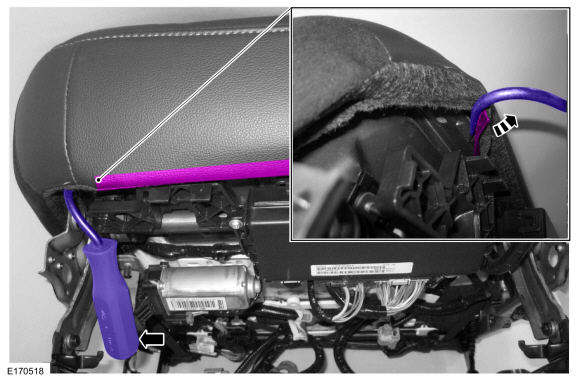
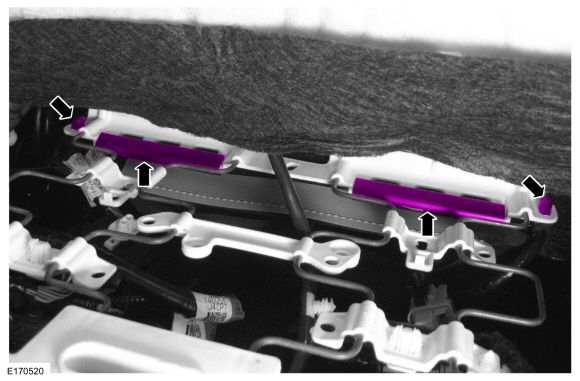
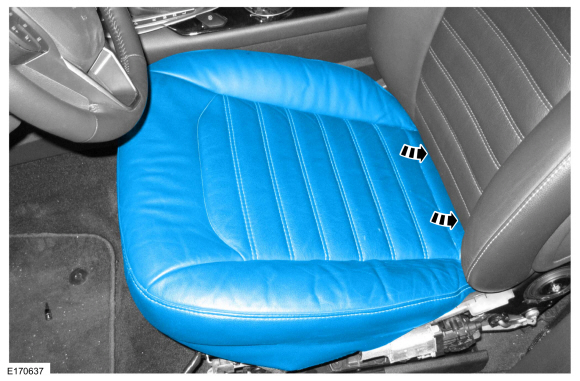
Release the cushion cover front J-clip.
Use the General Equipment: Pick Hook
-
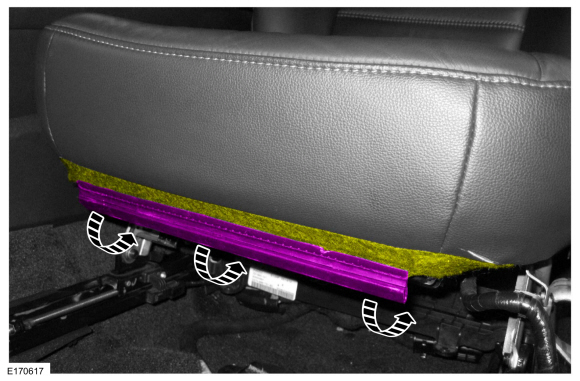
Invert the front of the cushion cover.
-
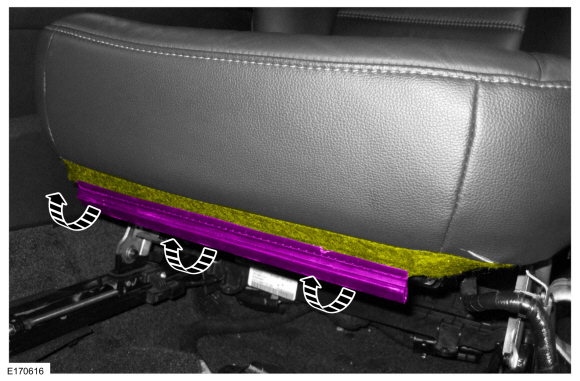
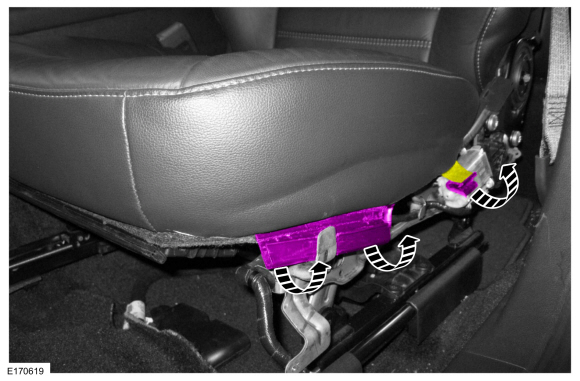
On both sides.
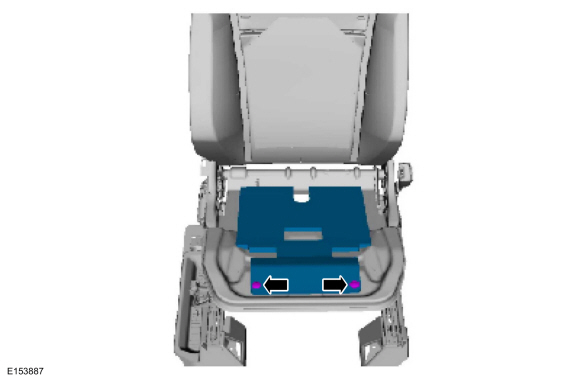
Release the cushion cover J-clips.
-
NOTICE:
If equipped with heated seat or an OCS service kit, do not lift the seat cushion to far or damage to the cushion heater mat pigtail (if equipped) or the OCS service kit parts (if equipped) can occur.
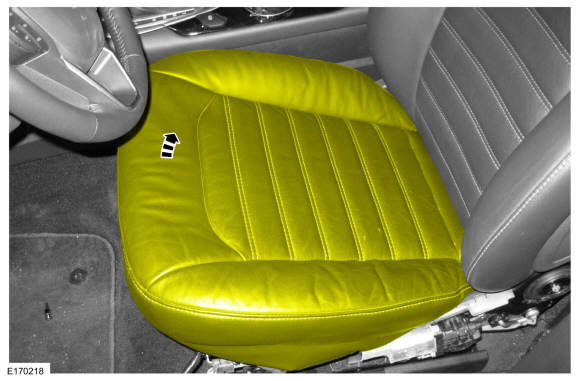
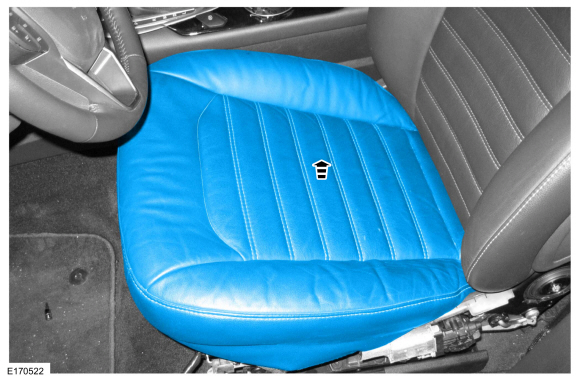
Position the front seat cushion upward.
Passenger seat
-
NOTE:
Original equipment OCS shown, OCS service kit similar.
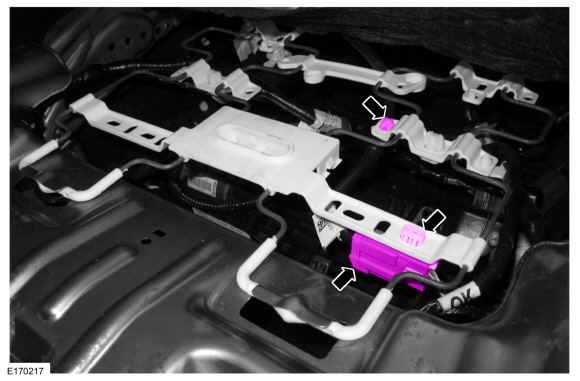
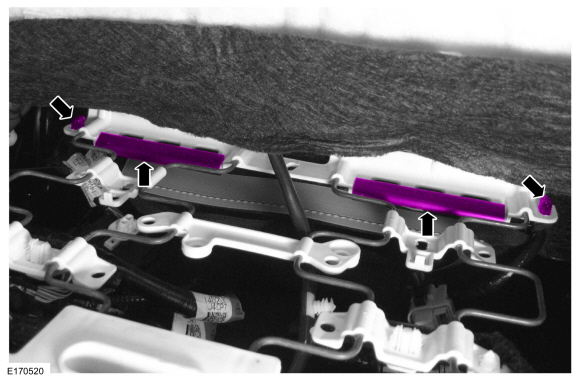
Remove the OCS pin-type retainers and position the OCS bladder upward.
-
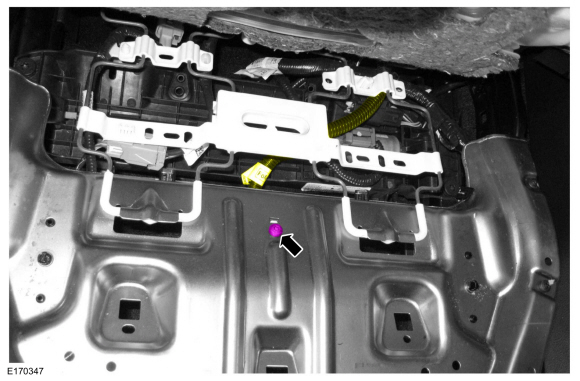
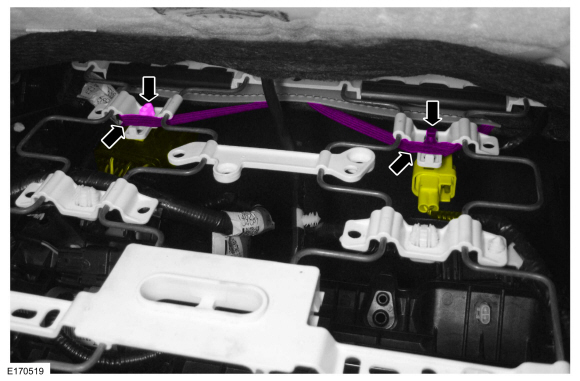
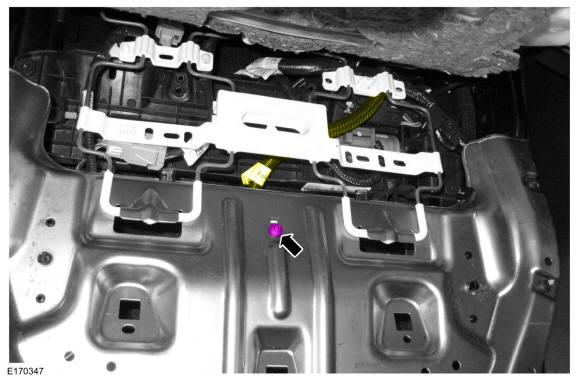
Remove the OCS bracket screw and position aside the electrical wiring harness.
-
NOTE:
Note the location of the OCS hose as it passes through the seat cushion support to ensure proper installation.
If equipped with OE (original equipment) OCS.
Remove the OCS sensor.
Heated seats
-
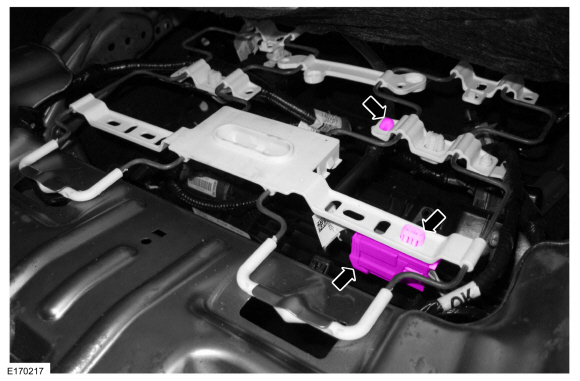
Release the retainers and disconnect the electrical connector.
All seats
-
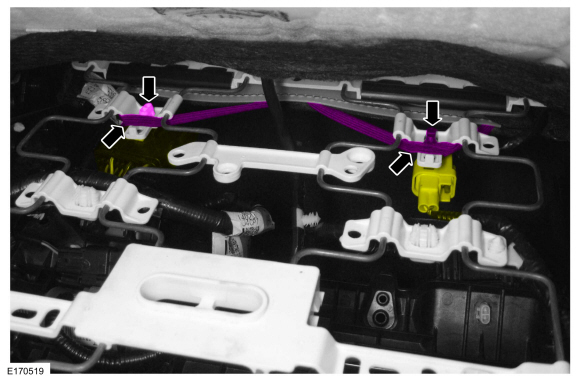
Detach the backrest cover strap and position aside the electrical connectors.
-
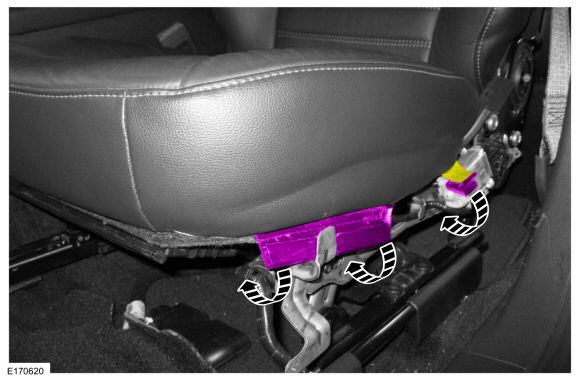
Release the cushion cover J-clips and wiring harness retainers.
-
Remove the front seat cushion cover.
-
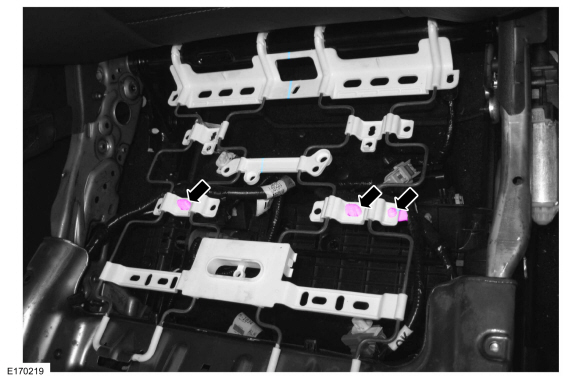
Release the retainers.
-
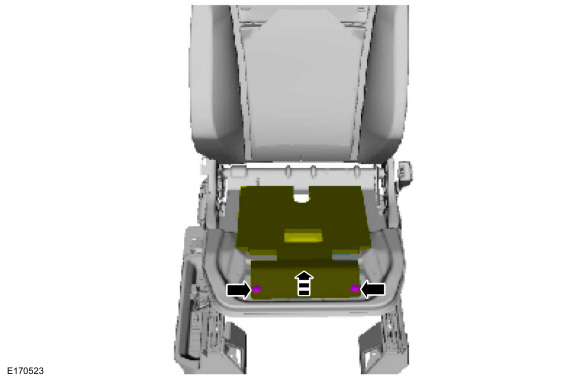
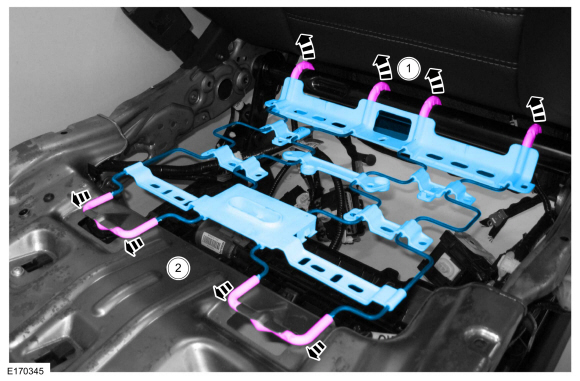
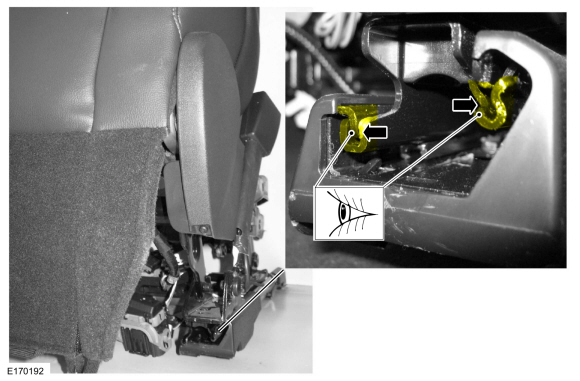
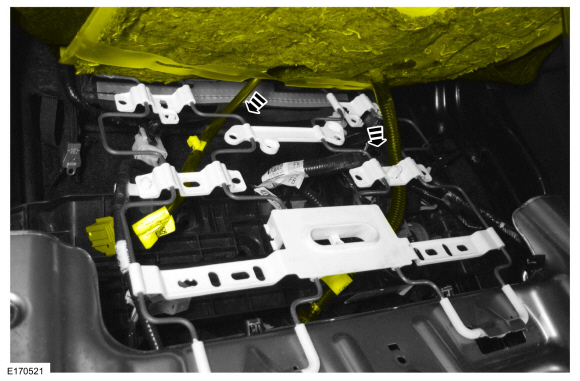
Release the hooks and remove the front seat cushion support assembly.
-
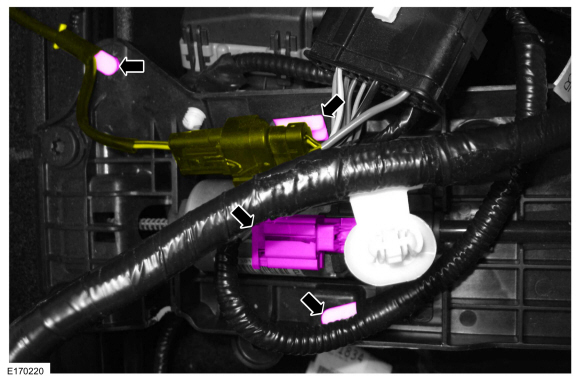
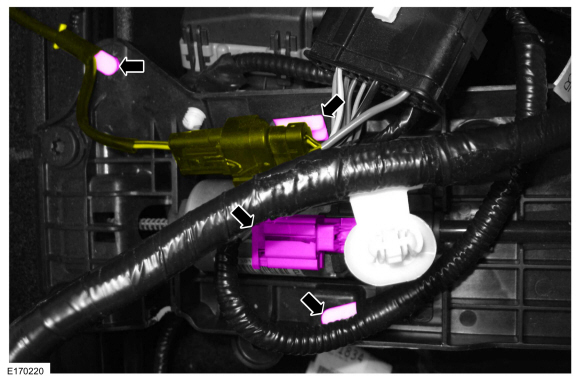
Disconnect the front seat track motor electrical
connector, release the retainers and position the wire harness aside.
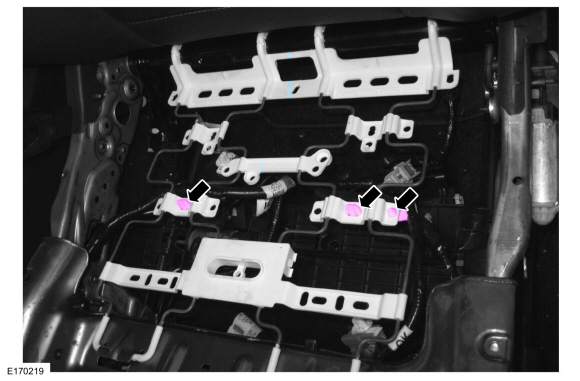
-
Release the retainers and position the wire harness aside.
-
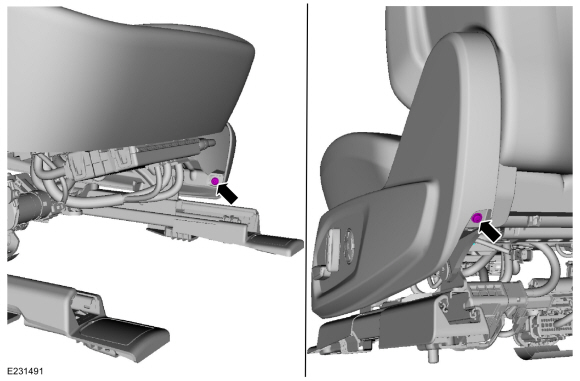
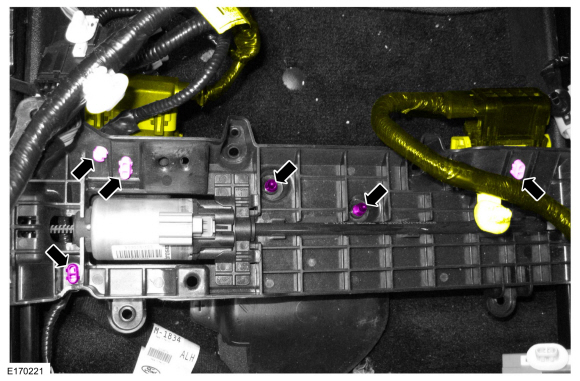
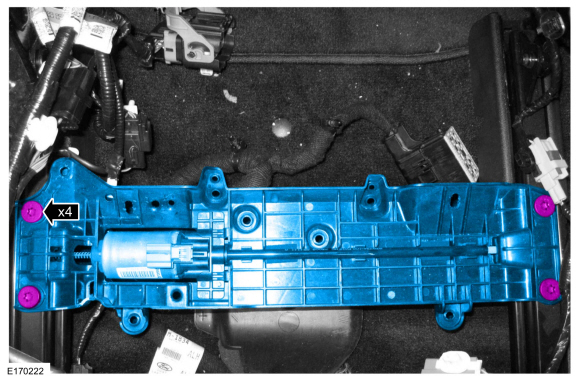
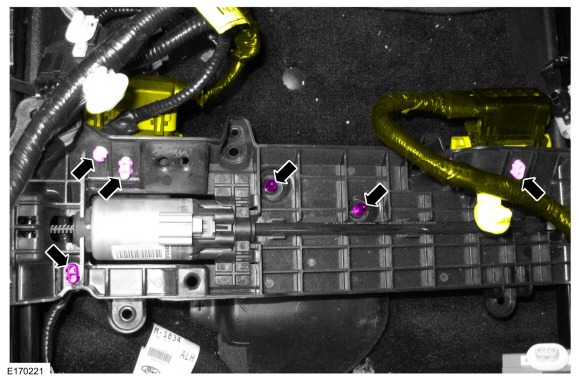
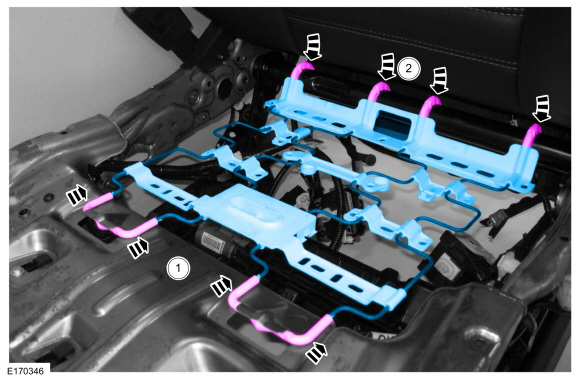
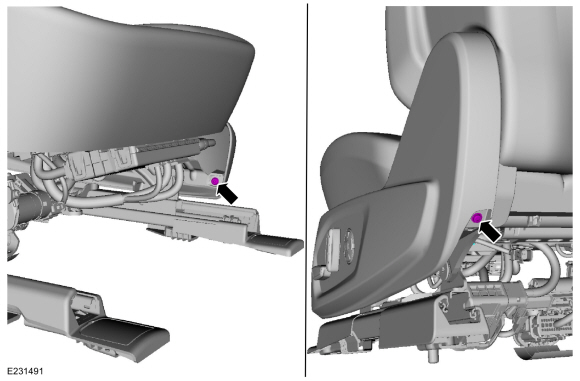
Remove the bolts and the front seat track motor and bracket assembly.
Installation
All seats
-
NOTE:
Use the bolts from the old motor and bracket assembly.
On both sides.
Install the front seat track motor bolts.
Torque:
21 lb.ft (28 Nm)
-
NOTICE:
When using a drill to move the seat track, do
not move the seat track to its forward or rearward end of travel stops,
otherwise a new seat track must be installed.
NOTE:
Be sure to drive the seat track evenly or the track will bind during movement.
NOTE:
Rotate the cables using 2 drills operating at
similar speeds to most efficiently position the seat track.
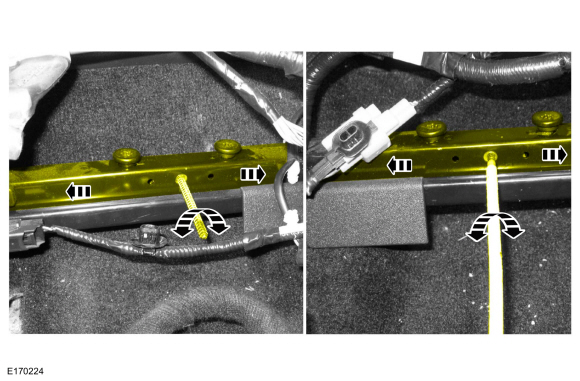
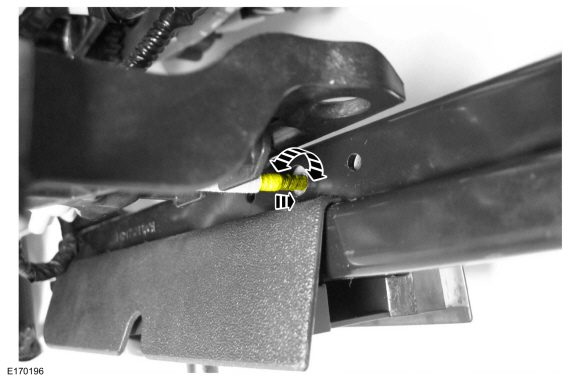
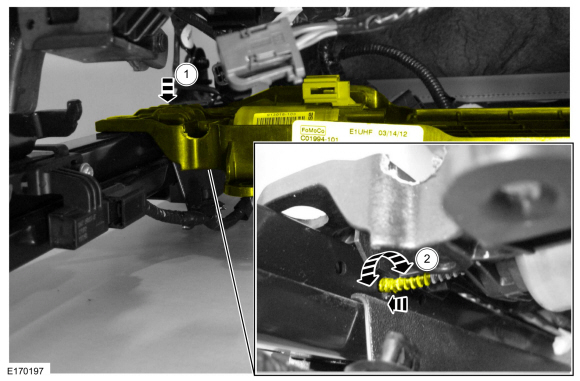
Insert the original seat track motor cables and
drive the gearbox and seat track uniformly until the rear edge of the
upper and lower seat tracks are aligned.
Use the General Equipment: Electric Drill
-
The rear edges of the upper and lower seat track rails must align with each other on both sides.
-
On both sides.
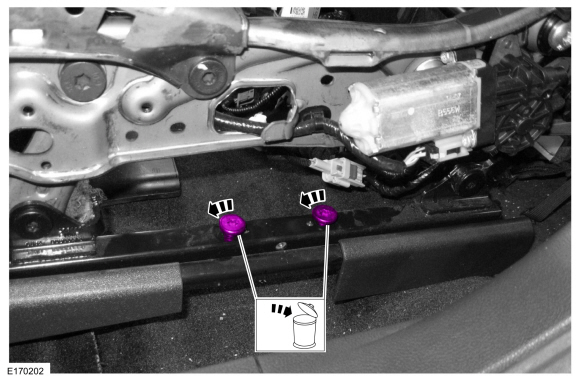
Remove and discard the front seat track motor bolts.
All seats
-
NOTE:
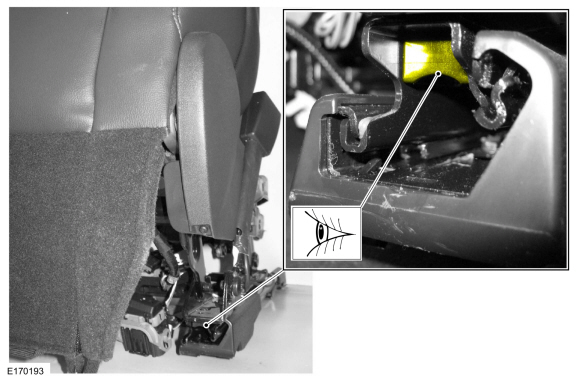
Install a new seat track if the block is not in place.
Verify the block is in place at the rear of the inboard seat track rail.
-
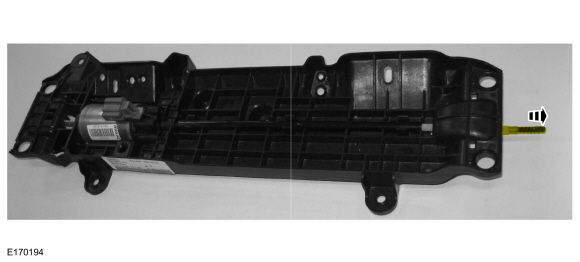
Pull the long cable on the new motor assembly out of the sheathing, as shown, to aid installation.
-
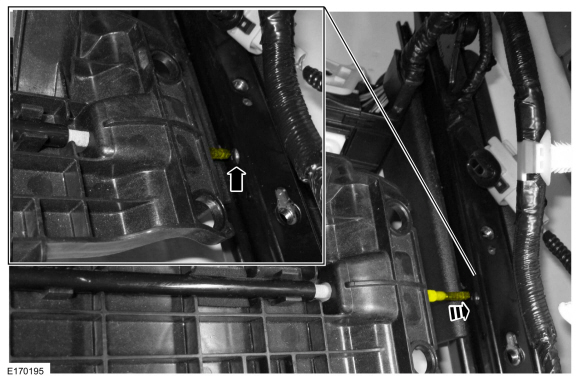
Insert the long drive cable into the seat track gearbox.
-
Rotate the long drive cable to verify engagement to the seat track gearbox.
-
NOTICE:
Do not severely bend the short cable during installation or damage to the cable will occur.
-
Position the seat track motor while inserting the short cable into the seat track gearbox.
-
Rotate the short drive cable to verify engagement to the seat track gearbox.
-
NOTICE:
Do not cross-thread the bolts, they are load
bearing. If the bolts are cross-threaded, a new seat track must be
installed.
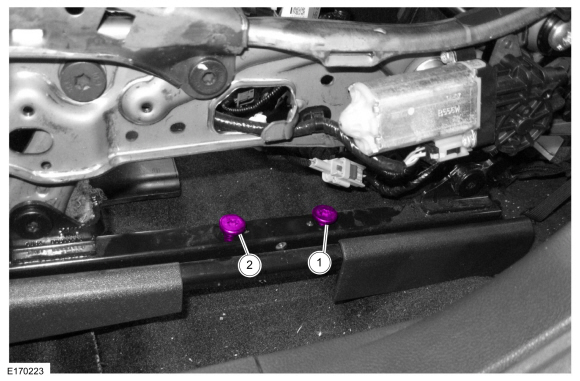
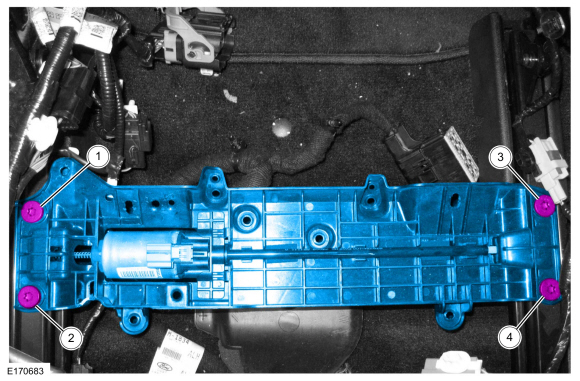
Install the new front seat track motor bolts in the sequence shown.
Torque:
21 lb.ft (28 Nm)
-
Reposition the wire harness and engage the retainers.
-
Connect the front seat track motor electrical
connector, reposition the wire harness and engage the retainer.
-
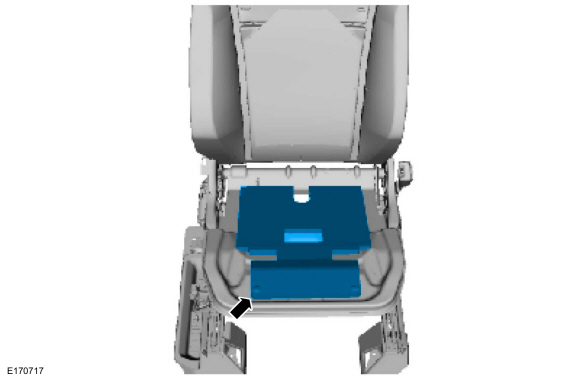
Attach the hooks and install the front seat cushion support assembly.
-
Engage the retainers.
-
NOTICE:
Inspect the OCS bladder, seat cushion pan and support assembly for any foreign objects before installing the OCS
to the seat cushion pan. Remove any foreign objects. Failure to follow
these instructions may result in incorrect operation of the OCS and may cause system failure.
NOTE:
Passenger seat with OCS service kit shown, other seats similar.
Feed the cushion heater mat pigtail (if equipped) and OCS hose (passenger seat only) between the seat cushion support wires.
-
NOTE:
Reclining the backrest will aid in positioning the cushion foam pad and cover through the opening.
Install the front seat cushion cover.
-
Attach the cushion cover J-clips and engage the wire harness retainers.
-
Attach the backrest cover straps and connect the electrical connectors.
Heated seats
-
Connect the electrical connector and engage the retainers.
Passenger seat
-
Position the electrical wiring harness and install the OCS bracket screw.
Torque:
27 lb.in (3 Nm)
-
Connect the passenger seat OCS electrical connector.
-
NOTE:
Original equipment OCS shown, OCS service kit similar.
Install the OCS sensor and the pin-type retainers.
All seats
-
Attach the cushion cover J-clip.
-
On both sides.
Attach the cushion cover J-clips.
-
Connect the seat control switch electrical connector.
-
-
Connect the electrical connector.
-
Position the cushion side shield onto the seat track and slide rearward to engage into the bracket.
-
Position the side shield to the recliner and engage the retainers.
-
Install the front seat cushion side shield screws.
-
On a driver seat with memory, operate the seat track
horizontal motor in all directions through the full range of travel to
set the soft stops and avoid a premature stopping point occurrence after
the vehicle is returned to the customer.
Passenger seat
-
 WARNING:
Occupant Classification System (OCS) parts are
calibrated as an assembly and must only be replaced in the configuration
they are sold. Never separate parts of an assembly. Failure to follow
this instruction may result in incorrect operation of the OCS and
increases the risk of serious personal injury or death in a crash.
 WARNING:
Make sure the front passenger seat repair is
complete, the seat and all attached components (head restraint, seat
side shield, etc.) are correctly assembled, and the seat is correctly
installed to the vehicle before using System Reset to rezero the seat
weight. Failure to follow these instructions may result in incorrect
operation of the occupant classification system (OCS) and increases the
risk of serious personal injury or death in a crash.
NOTICE:
To prevent system failure, take the following precautions before carrying out the OCS reset.
-
Make sure the voltage to the OCSM is greater than 8 volts and less than 18 volts.
-
Make sure the OCS is not below
42.8
°F (
6
°C) or above
96.7
°F (
36
°C) when initiating the OCS
reset process. If the vehicle has been exposed to extreme cold or hot
temperatures, the vehicle must be exposed and kept at a temperature
between
42.8
°F (
6
°C) to
96.7
°F (
36
°C) for a minimum of 30 minutes.
-
Make sure nothing is present on the passenger seat before and during the OCS reset process.
-
Prior to carrying out the OCS reset, make sure a minimum of 8 seconds has elapsed after cycling the ignition on.
Using a diagnostic scan tool, carry out the OCS reset. Cycle the ignition after the OCS reset.
-
If the first system reset attempt was successful, proceed to prove out the SRS.
-
If the first system reset attempt was not successful, carry out a thorough visual inspection of the OCS
connector and wiring for damage, pressure sensor hose for kinks and or
damage, and seat-related wiring harness and body wiring harness
terminals and connectors for damage. Repair any concerns found and
proceed to the next step.
-
Carry out a second OCS reset. If the second attempt is unsuccessful, install a new OCS service kit.
Refer to: Occupant Classification System (OCS) Sensor (501-20B Supplemental Restraint System, Removal and Installation).
-
Prove out the SRS
by turning the ignition from ON to OFF. Wait 10 seconds, then turn the
ignition back to ON and monitor the airbag warning indicator with the
airbags installed. The airbag warning indicator illuminates continuously
for approximately 6 seconds and then turns off. If a SRS fault is present, the airbag warning indicator will fail to light, remain lit continuously, or flash.
-
-
If a SRS
fault is present, the airbag warning indicator either fails to light,
remains lit continuously or flashes. The flashing may not occur until
approximately 30 seconds after the ignition has been turned from OFF to
ON. If this occurs, diagnose and repair any SRS faults before proceeding with other repairs.
-
If, after the ignition has been turned on for 30
seconds, the airbag warning indicator remains unlit with no chime or SRS message displayed in the message center, no SRS fault is present.
-
If the airbag warning indicator is inoperative and a SRS
fault exists, a chime sounds in a pattern of 5 sets of 5 beeps or a
message displays in the message center. If this occurs, diagnose and
repair the airbag warning indicator and any SRS faults before proceeding with other repairs.
-
Using a diagnostic scan tool, clear all Continuous
Memory Diagnostic Trouble Codes (CMDTCs) from all modules.
Removal
NOTE:
Note the wire harness routing for installation purposes.
Remove the front seat backrest.
Refer to: Front Seat Backrest (501-10A Front Seats, Removal and Installation)...
Other information:
SYNC supports digital media sources
including: iPod, Bluetooth devices, and
most USB drives. SYNC also supports
audio formats, such as MP3, WMA, WAV
and ACC.
Media Sources
The AUX or MEDIA button allows you to
view and select available media sources.
Press the AUX or MEDIA button to view
your sources. Use the directional arrows
and OK button to select your source. You
can also use the ste..
System Diagram
Item
Description
1
GWM
2
GSM
3
Overrride Switch
4
TRCM
5
PCM
6
BCM
7
Driver Door Module
8
IPC
9
RCM
Network Message Chart
Broadcast Message
Originating Module
Message Purpose
Brake switch position
GSM
Input from brake switch necessary to change gears.
Gear data
GSM
Messag..
 WARNING:
The following procedure prescribes critical repair steps
required for correct restraint system operation during a crash. Follow
all notes and steps carefully. Failure to follow step instructions may
result in incorrect operation of the restraint system and increases the
risk of serious personal injury or death in a crash.
 WARNING:
Turn the ignition OFF and wait one minute to
deplete the backup power supply. Ignition must remain OFF until repair
is complete. Failure to follow this instruction may result in serious
personal injury or death in the event of an accidental deployment.
 WARNING:
Occupant Classification System (OCS) parts are
calibrated as an assembly and must only be replaced in the configuration
they are sold. Never separate parts of an assembly. Failure to follow
this instruction may result in incorrect operation of the OCS and
increases the risk of serious personal injury or death in a crash.
 WARNING:
Make sure the front passenger seat repair is
complete, the seat and all attached components (head restraint, seat
side shield, etc.) are correctly assembled, and the seat is correctly
installed to the vehicle before using System Reset to rezero the seat
weight. Failure to follow these instructions may result in incorrect
operation of the occupant classification system (OCS) and increases the
risk of serious personal injury or death in a crash.
 Front Seat Track. Removal and Installation
 Rear Seats