
Ford Fusion: Power Steering / Steering Gear. Removal and Installation
Ford Fusion 2013–2020 Service Manual / Chassis / Steering System / Power Steering / Steering Gear. Removal and Installation
Removal
NOTE: Removal steps in this procedure may contain installation details.
-
If installing a new steering gear, upload the PSCM configuration to the scan tool.
Refer to: Module Configuration - System Operation and Component Description (418-01 Module Configuration, Description and Operation).
-
Remove the front subframe.
Refer to: Front Subframe - 2.7L EcoBoost (238kW/324PS) (502-00 Uni-Body, Subframe and Mounting System, Removal and Installation).
-
Remove the steering gear boot.
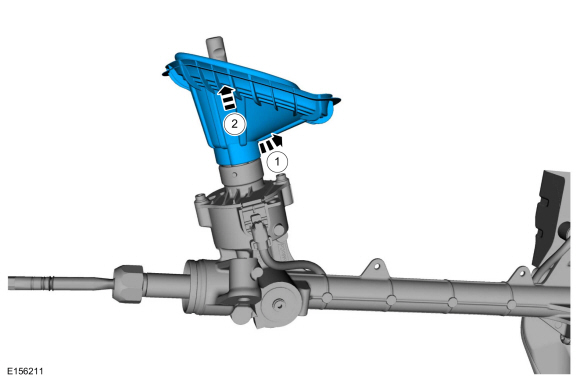 |
-
Remove and discard the steering gear mounting bolts.
Torque: 148 lb.ft ( 200 Nm)
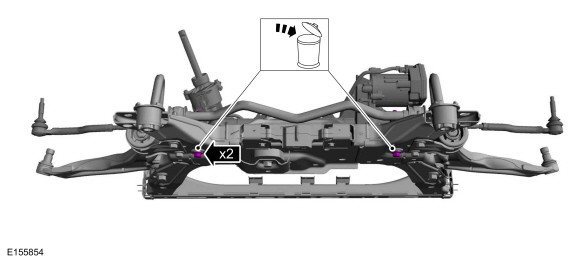 |
-
Position aside the front stabilizer bar. Remove the steering gear.
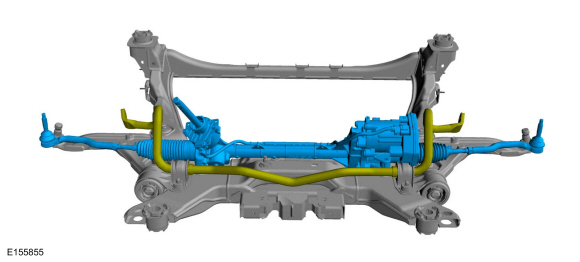 |
Installation
-
NOTICE: Make sure the boot is properly installed before installing the steering gear into the vehicle. If the boot is not properly installed it can cause high friction with the input shaft, which may cause internal damage to the steering gear.
To install, reverse the removal procedure.
Check and install the steering gear boot on steering gear as shown.
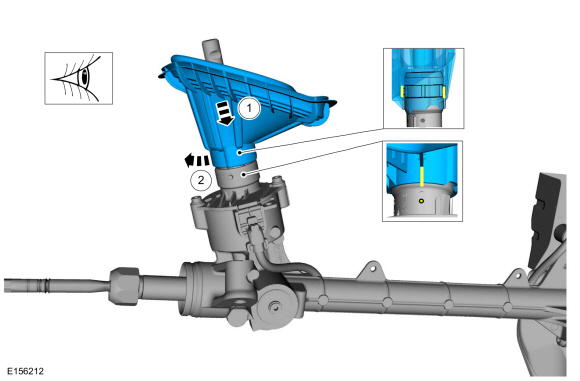 |
-
If a new steering gear was installed, download the PSCM configuration from the scan tool to the new PSCM.
Refer to: Module Configuration - System Operation and Component Description (418-01 Module Configuration, Description and Operation).

 Tie Rod. Removal and Installation
Special Tool(s) /
General Equipment
Tie Rod End Remover
Tie Rod Remover and Installer
Boot Clamp Pliers
Materials
Name
Specification
Motorcraft® Premium Long-Life GreaseXG-1-E1
ESA-M1C75-B
Removal
NOTICE:
When servicing inner tie rods, install a new bellows boot
and clamps...
Other information:
Ford Fusion 2013–2020 Service Manual: Catalytic Converter. Removal and Installation
Removal With the vehicle in NEUTRAL, position it on a hoist. Refer to: Jacking and Lifting - Overview (100-02 Jacking and Lifting, Description and Operation). Remove the battery. Refer to: Battery (414-01 Battery, Mounting and Cables, Removal and Installation)...
Ford Fusion 2013–2020 Service Manual: Finish Panel Repair. General Procedures
Repair NOTE: Mouldings located on the front and rear window frames may experience minor scratches from vehicle shipment or car wash racks. The imperfections may be repaired instead of replacing components by following the steps below. NOTE: Scratches deep enough to cause a thumb nail to catch cannot be repaired and the component must be replaced...
Categories
- Manuals Home
- 2nd Generation Ford Fusion Owners Manual
- 2nd Generation Ford Fusion Service Manual
- Pre-Collision Assist (IF EQUIPPED)
- Cylinder Head Temperature (CHT) Sensor. Removal and Installation
- Under Hood Overview - 1.5L EcoBoost™, 2.0L EcoBoost™, 2.5L, 2.7L EcoBoost™
- New on site
- Most important about car
Cross Traffic Alert System Sensors
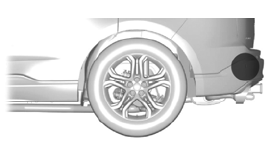
The sensors are behind the rear bumper on both sides of your vehicle.

Copyright © 2026 www.fofusion2.com