Ford Fusion: Side Panel Sheet Metal Repairs / A-Pillar Outer Panel Section and Reinforcement. Removal and Installation
Special Tool(s) / General Equipment
| Resistance Spotwelding Equipment | |
| Hot Air Gun | |
| 8 mm Drill Bit | |
| MIG/MAG Welding Equipment | |
| Spot Weld Drill Bit | |
| Locking Pliers |
Materials
| Name | Specification |
|---|---|
| Seam Sealer TA-2-B, 3M™ 08308, LORD Fusor® 803DTM |
- |
| Flexible Foam Repair 3M™ 08463, LORD Fusor® 121 |
- |
Removal
-
Refer to: Health and Safety Precautions (100-00 General Information, Description and Operation). WARNING:
Before beginning any service procedure in this
section, refer to Safety Warnings in section 100-00 General Information.
Failure to follow this instruction may result in serious personal
injury.
WARNING:
Before beginning any service procedure in this
section, refer to Safety Warnings in section 100-00 General Information.
Failure to follow this instruction may result in serious personal
injury.
-
Reposition the carpeting and the wiring harness away from the repair area.
-
Remove the A-pillar outer panel.
Refer to: A-Pillar Outer Panel (501-29 Side Panel Sheet Metal Repairs, Removal and Installation).
-
Refer to the following:
Refer to: Vehicle Specific Body Construction (501-26 Body Repairs - Vehicle Specific Information and Tolerance Checks, Description and Operation).
-
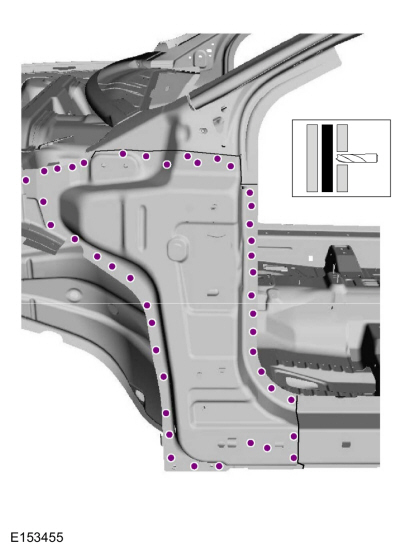
Drill out the A-pillar reinforcement spot welds.
Use the General Equipment: Spot Weld Drill Bit
 |
-
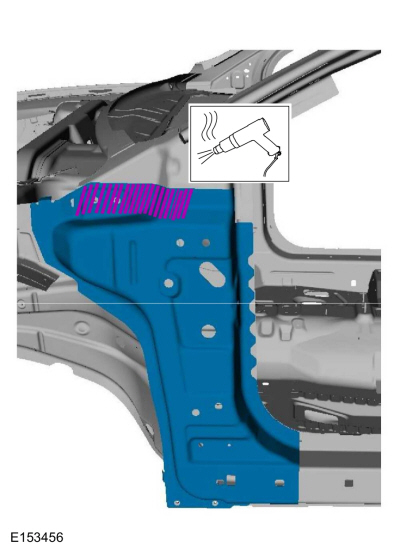
Break the adhesive bond and remove the A-pillar reinforcement.
Use the General Equipment: Hot Air Gun
 |
Installation
-
Refer to: Health and Safety Precautions (100-00 General Information, Description and Operation). WARNING:
Before beginning any service procedure in this
section, refer to Safety Warnings in section 100-00 General Information.
Failure to follow this instruction may result in serious personal
injury.
WARNING:
Before beginning any service procedure in this
section, refer to Safety Warnings in section 100-00 General Information.
Failure to follow this instruction may result in serious personal
injury.
-
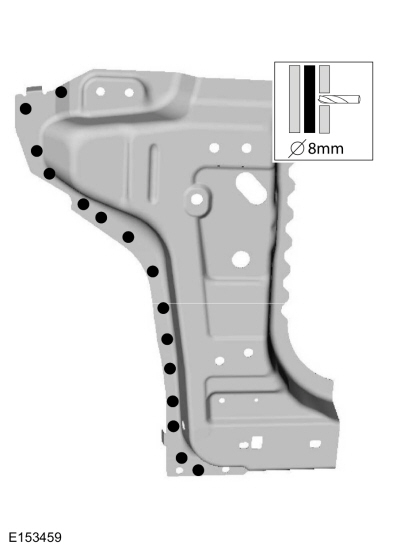
Drill plug weld holes in the new A-pillar reinforcement.
Use the General Equipment: 8 mm Drill Bit
 |
-
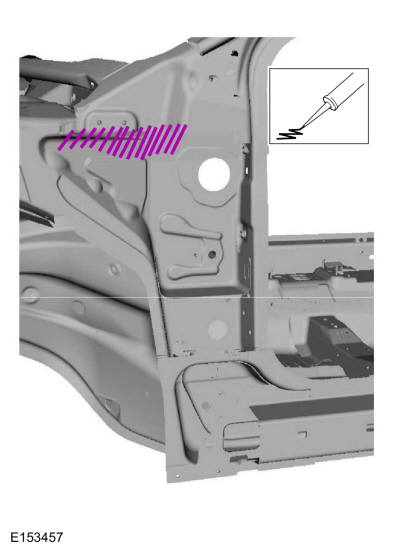
Apply foam as indicated.
Material: Flexible Foam Repair / 3M™ 08463, LORD Fusor® 121
 |
-
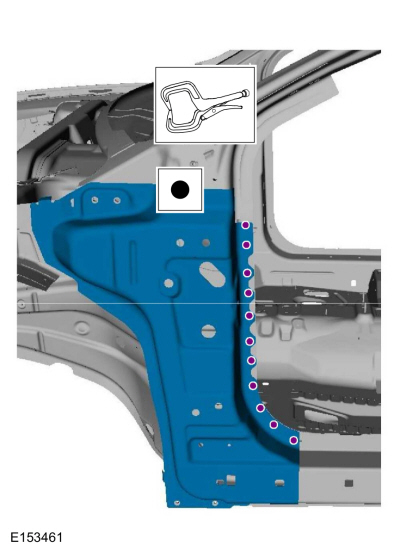
Install, clamp and plug weld the new A-pillar reinforcement.
Use the General Equipment: MIG/MAG Welding Equipment
Use the General Equipment: Locking Pliers
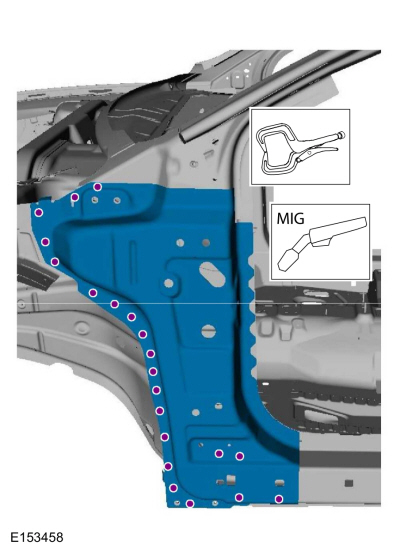 |
-
Clamp and spot weld the new A-pillar reinforcement.
Use the General Equipment: Resistance Spotwelding Equipment
Use the General Equipment: Locking Pliers
 |
-
Finish the repair area using typical metal finishing procedures.
-
Sealing work: All ares must be sealed to production level.
Material: Seam Sealer / TA-2-B, 3M™ 08308, LORD Fusor® 803DTM
-
Refinish using a Ford Motor Company approved paint system.
-
Install the A-pillar outer panel.
Refer to: A-Pillar Outer Panel (501-29 Side Panel Sheet Metal Repairs, Removal and Installation).
-
Restore corrosion protection.
Refer to: Corrosion Prevention (501-25 Body Repairs - General Information, General Procedures).

 Front Door Skin Panel. Removal and Installation
Special Tool(s) /
General Equipment
Grinder
Knife
MIG/MAG Welding Equipment
Materials
Name
Specification
Metal Bonding AdhesiveTA-1, TA-1-B, 3M™ 08115, LORD Fusor® 108B
-
Seam SealerTA-2-B, 3M™ 08308, LORD Fusor® 803DTM
-
Flexible Foam Repair3M™ 08463, LORD Fusor® 121
-
Removal
NOTE:
Left Hand (LH) side shown, Right..
Other information:
Ford Fusion 2013–2020 Service Manual: Air Conditioning (A/C) System Leak Test Using Forming Gas. General Procedures
Special Tool(s) / General Equipment Forming Gas Pressure Gauge and Leak Detector Materials Name Specification Forming Gas - Leak detection All vehicles NOTE: Use a Rotunda-approved Tracer Gas A/C System Dealership Leak Detection Service Kit that meets SAE J2790. Recover the refrigerant. Refer to the appropriate Recovery procedure in Group 412. ..
Ford Fusion 2013–2020 Service Manual: Pinpoint Test - DTC: N. Diagnosis and Testing
B0082:11, B0082:12, B0082:13 and B0082:1A Refer to Wiring Diagrams Cell 46 for schematic and connector information. Normal Operation and Fault Conditions The RCM continuously monitors the passenger seatbelt load limiter circuits for the following faults: Resistance out of range Unexpected voltage Short to ground Faulted passenger seatbelt load limiter If a faul..
Categories
- Manuals Home
- 2nd Generation Ford Fusion Owners Manual
- 2nd Generation Ford Fusion Service Manual
- Intake Manifold. Removal and Installation
- Powertrain
- Front Controls Interface Module (FCIM). Removal and Installation
- New on site
- Most important about car
Understanding Your Tire Pressure Monitoring System

The tire pressure monitoring system measures pressure in your road tires and sends the tire pressure readings to your vehicle. You can view the tire pressure readings through the information display. The low tire pressure warning light will turn on if the tire pressure is significantly low. Once the light is illuminated, your tires are under-inflated and need to be inflated to the manufacturer’s recommended tire pressure. Even if the light turns on and a short time later turns off, your tire pressure still needs to be checked.