Ford Fusion: Rear End Sheet Metal Repairs / Rear Floor Panel Section. Removal and Installation
Ford Fusion 2013–2020 Service Manual / Body and Paint / Body and Paint / Rear End Sheet Metal Repairs / Rear Floor Panel Section. Removal and Installation
Special Tool(s) / General Equipment
| Spherical Cutter | |
| Plasma Cutter | |
| Air Body Saw | |
| 8 mm Drill Bit | |
| MIG/MAG Welding Equipment | |
| Spot Weld Drill Bit | |
| Locking Pliers |
Materials
| Name | Specification |
|---|---|
| Seam Sealer TA-2-B, 3M™ 08308, LORD Fusor® 803DTM |
- |
Removal
-
Follow the health and safety precautions. WARNING:
Before beginning any service procedure in this
section, refer to Safety Warnings in section 100-00 General Information.
Failure to follow this instruction may result in serious personal
injury.
WARNING:
Before beginning any service procedure in this
section, refer to Safety Warnings in section 100-00 General Information.
Failure to follow this instruction may result in serious personal
injury.
Refer to: Health and Safety Precautions (100-00 General Information, Description and Operation).
-
If required, dimensionally restore the vehicle to a pre-accident condition.
Refer to: Vehicle Specific Body Construction (501-26 Body Repairs - Vehicle Specific Information and Tolerance Checks, Description and Operation).
-
Remove the following items.
Refer to: Back Panel and Reinforcement (501-30 Rear End Sheet Metal Repairs, Removal and Installation).
-
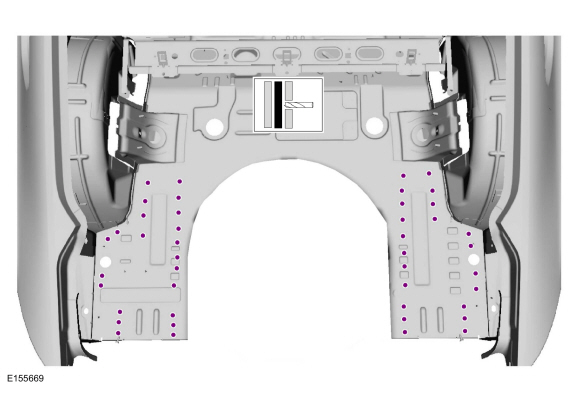
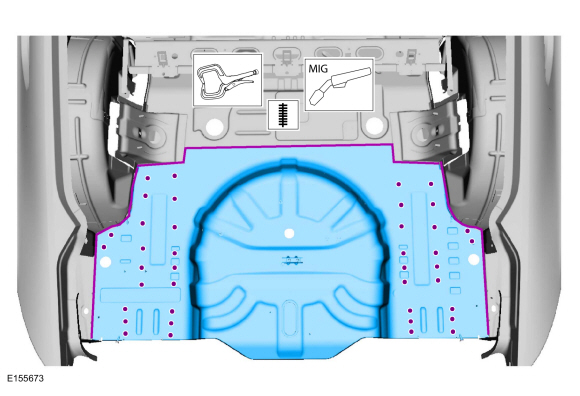
Carefully cut the rear floor panel only as indicated and remove.
Use the General Equipment: Air Body Saw
Use the General Equipment: Plasma Cutter
 |
-
Drill out the spot welds.
Use the General Equipment: Spot Weld Drill Bit
 |
-
Carefully measure and mark the cut section panel as necessary.
 |
-
NOTE: Leave minimum 25.4 mm of existing floor panel along sides of floor for overlap flange.
Carefully cut the rear floor panel and remove.
Use the General Equipment: Plasma Cutter
Use the General Equipment: Spherical Cutter
 |
Installation
-
Follow the health and safety precautions. WARNING:
Before beginning any service procedure in this
section, refer to Safety Warnings in section 100-00 General Information.
Failure to follow this instruction may result in serious personal
injury.
WARNING:
Before beginning any service procedure in this
section, refer to Safety Warnings in section 100-00 General Information.
Failure to follow this instruction may result in serious personal
injury.
Refer to: Health and Safety Precautions (100-00 General Information, Description and Operation).
-
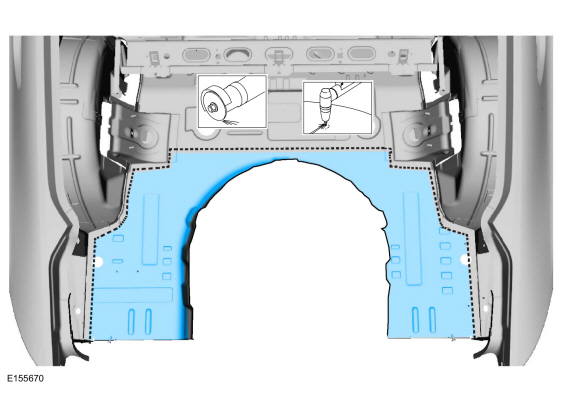
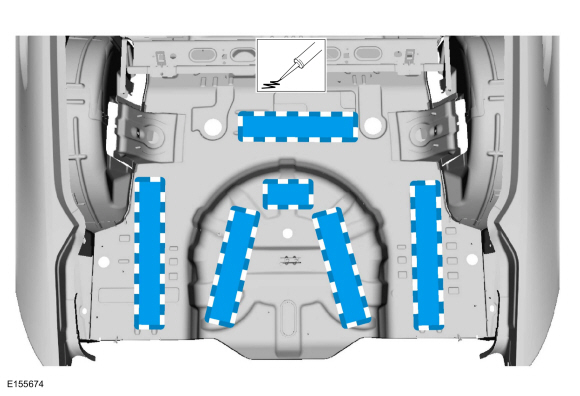
Carefully cut the sectioning piece from service part.
Use the General Equipment: Air Body Saw
 |
-
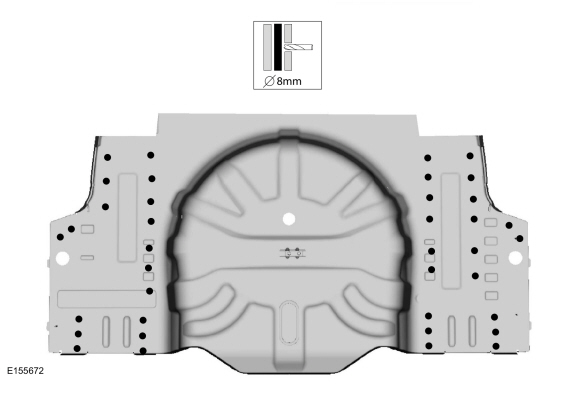
Drill plug welds holes in replacement panel.
Use the General Equipment: 8 mm Drill Bit
 |
-
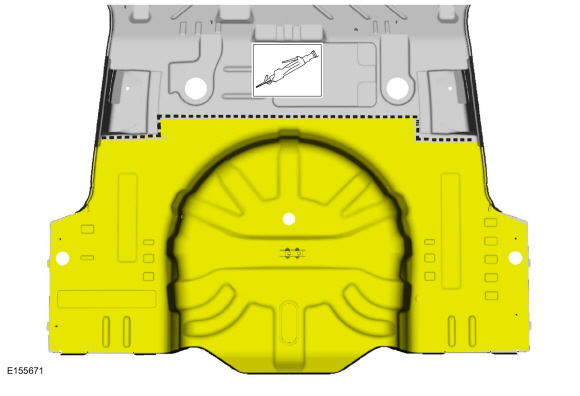
Install the rear floor panel section clamp in position and stitch weld seams and plug weld.
Use the General Equipment: Locking Pliers
Use the General Equipment: MIG/MAG Welding Equipment
 |
-
Metal finish as required using typical metal finishing techniques.
-
Install butyl mastic NVH pads (obtain locally) in original locations.
 |
-
Install the back panel and reinforcement.
Refer to: Back Panel and Reinforcement (501-30 Rear End Sheet Metal Repairs, Removal and Installation).
-
Seam sealing: All seams must be sealed to production level.
Material: Seam Sealer / TA-2-B, 3M™ 08308, LORD Fusor® 803DTM
-
Refinish using a Ford approved paint system.
-
Restore corrosion protection.
Refer to: Corrosion Prevention (501-25 Body Repairs - General Information, General Procedures).
-
Install the following items.
Refer to: Back Panel and Reinforcement (501-30 Rear End Sheet Metal Repairs, Removal and Installation).
 Rear Floor Panel Reinforcement. Removal and Installation
Special Tool(s) /
General Equipment
8 mm Drill Bit
MIG/MAG Welding Equipment
Spot Weld Drill Bit
Locking Pliers
Removal
NOTICE:
Battery electric vehicle (BEV), hybrid electric vehicle
(HEV) and plug-in hybrid electric vehicle (PHEV) contain a high-voltage
battery...
 Rear Lamp Mounting Panel. Removal and Installation
Special Tool(s) /
General Equipment
Hot Air Gun
8 mm Drill Bit
MIG/MAG Welding Equipment
Spot Weld Drill Bit
Materials
Name
Specification
Seam SealerTA-2-B, 3M™ 08308, LORD Fusor® 803DTM
-
Removal
WARNING:
Before beginning any service procedure in this
section, refer to Safety Warnings in section 100-00 General Information...
Other information:
Ford Fusion 2013–2020 Service Manual: Catalyst Monitor Sensor. Removal and Installation
Special Tool(s) / General Equipment 303-476 (T94P-9472-A) Socket, Exhaust Gas Oxygen SensorTKIT-1994-LM/MTKIT-1994-FTKIT-1994-FLM/FM Materials Name Specification Motorcraft® High Temperature Nickel Anti-Seize LubricantXL-2 - Motorcraft® Penetrating and Lock LubricantXL-1 - Removal Disconnect the catalyst monitor sensor electrical co..
Ford Fusion 2013–2020 Service Manual: Noise, Vibration and Harshness (NVH). Diagnosis and Testing
Special Tool(s) MASTERTECH MTS-4000 ANALYZER257-00018 EngineEAR107-R2100Chassis EarsJSP97170 Squeak And Rattle Kit164-R4900 Marksman Ultrasonic Leak DetectorTRATP-9370 Diagnostic Theory The shortest route to an accurate diagnosis results from: System knowledge, including comparison with a known good system. System history, i..
Categories
- Manuals Home
- 2nd Generation Ford Fusion Owners Manual
- 2nd Generation Ford Fusion Service Manual
- Under Hood Overview - 1.5L EcoBoost™, 2.0L EcoBoost™, 2.5L, 2.7L EcoBoost™
- Traction Control
- Automatic Transmission Fluid Check - 1.5L EcoBoost™/2.0L EcoBoost™/2.5L. Automatic Transmission Fluid Check - 2.7L EcoBoost™
- New on site
- Most important about car
Power Door Locks
The power door lock control is on the driver and front passenger door panels.

Copyright © 2026 www.fofusion2.com