Ford Fusion: Power Transfer Unit - 6-Speed Automatic Transmission – 6F35 / Power Transfer Unit. Diagnosis and Testing
Principles of Operation
The AWD system may be referred to as a 4WD system in other service information and owner literature or messages located on the message center.
The power transfer unit is a gearbox that is attached to the transmission. The RH intermediate shaft passes through the power transfer unit and engages the differential side gear as in normal FWD applications. The power transfer unit directs power to the rear driveshaft through a helical gear spline coupled to the transmission differential case, hypoid/helical ring gear assembly and pinion set. The power transfer unit is sealed from the transmission and has its own oil sump.
Serviceable components of the power transfer unit are limited to the output shaft seal and output flange deflector, intermediate shaft seal, input shaft seal, cover seal and the power transfer unit-transmission compression seal. The internal components are not serviced. If any of the geared components, bearings, case cover or internal shafts are worn or damaged, a new power transfer unit must be installed.
Heat Protection Power Transfer Unit
During off-road operation or heavy trailer towing the AWD system may implement a heat protection mode to protect the power transfer unit from damage. The AWD system will reduce commanded torque to half as the temperature approaches its limit. Once the temperature limit is reached, then 2WD only is commanded.
For concerns with the AWD system or ATC,
REFER to: Four-Wheel Drive Systems (308-07A Four-Wheel Drive Systems, Diagnosis and Testing).
Inspection and Verification
-
Verify the customer concern.
-
Visually inspect for obvious signs of mechanical damage.
Visual Inspection Chart
| Mechanical |
|---|
|
-
If an obvious cause for an observed or reported concern is
found, correct the cause (if possible) before proceeding to the next
step
-
If the cause is not visually evident, verify the symptom and refer to the Symptom Chart.
Symptom Chart
Diagnostics in this manual assume a certain skill level and knowledge of Ford-specific diagnostic practices.
REFER to: Diagnostic Methods (100-00 General Information, Description and Operation).
In most circumstances the PCM sets a DTC to help guide with diagnostics. Refer to the DTC Chart before using the Symptom Chart. The Condition column lists the vehicle condition. The Possible Sources column lists a detailed vehicle condition. The Action column lists the action to be performed to determine the cause of the condition. Each action lists the components that can cause the system and the individual components in that system. The components are listed in order of disassembly. Use the list of components and the required action to focus on disassembly inspections for the root cause of the concern.
| Symptom | Possible Sources | Action |
|---|---|---|
|
|
|
|
|
|
|
|
|
|
|
|
|
|
|
|
|
|
|
|
|
NOTE: Inspection of the seal's mating journal should be performed every time a seal is replaced. The mating part/journal should be replaced if it has any of the following conditions: Radial wear groove that is felt by running a finger nail across where the seal lip runs. Scratches, pitting, galling, nicks or other shaft damage under or near where the seal lip runs. Discoloration or coked oil on the shaft where the seal lip runs. Shaft corrosion under or near where the seal lip runs. Sharp edges or burrs on the shaft lead in chamfer. NEVER use emery cloth on journal finishes, replace the part.
Analysis of Leakage
The power transfer unit may leak different color fluids, automatic transmission fluid and a brown/black gear lube for power transfer unit fluid. The power transfer unit seals prevent these types of fluids from leaking. Its important to note the color of fluid leaking to determine the most appropriate service procedure.
NOTE: Remove and replace leaking seals using the information found in the appropriate procedure. The specified tools called out in this procedure allows seal replacement without causing damage to the power transfer unit casing/drive gear.
NOTE: Replace the intermediate shaft seal any time the intermediate shaft is removed.
Power Transfer Unit Leaks From the RH Side
If
the leak is automatic transmission fluid, the power transfer unit
intermediate shaft seal needs to be replaced. This is outside on the RH side of the power transfer unit.
REFER to: Intermediate Shaft Seal (308-07B Power Transfer Unit - 6-Speed Automatic Transmission – 6F35, Removal and Installation).
If the leak is brown/black gear lube at the case to cover seam, the power transfer unit larger cover seal needs to be replaced. This is located on the power transfer unit cover.
Power Transfer Unit Leaks From the LH Side
If the leak is automatic transmission fluid, the compression seal needs to be replaced.
REFER to: Power Transfer Unit (308-07B Power Transfer Unit - 6-Speed Automatic Transmission – 6F35, Removal).
REFER to: Intermediate Shaft Seal (308-07B Power Transfer Unit - 6-Speed Automatic Transmission – 6F35, Removal and Installation).
Power Transfer Unit Leaks From the Rear
If the leak is brown/black fluid, the Pinion Flange Seal/Rear Seal needs to be replaced.
REFER to: Power Transfer Unit Rear Seal (308-07B Power Transfer Unit - 6-Speed Automatic Transmission – 6F35, Removal and Installation).
Power Transfer Unit Leaks From the Top Vent
If equipped with a vent hose, check for a missing or disconnected hose
REFER to: Power Transfer Unit Vent (308-07B Power Transfer Unit - 6-Speed Automatic Transmission – 6F35, Removal and Installation).
If the PTU vent hose is present and attached correctly, check the PTU
fluid level. If the PTU fluid is overfilled, replace the intermediate
shaft seal, LH input shaft seal and the RH input shaft seal.
REFER to: Power Transfer Unit Input Shaft Seal (308-07B Power Transfer Unit - 6-Speed Automatic Transmission – 6F35, Removal and Installation).
REFER to: Intermediate Shaft Seal (308-07B Power Transfer Unit - 6-Speed Automatic Transmission – 6F35, Removal and Installation).
 Power Transfer Unit - Overview. Description and Operation
The AWD system consists of the following:
Power Transfer Unit (PTU)
Rear driveshaft
AWD control module
Rear axle with coupling device
The
Power Transfer Unit (PTU) is a gearbox that attaches to the
transmission...
 Power Transfer Unit Draining and Filling. General Procedures
Materials
Name
Specification
Motorcraft® SAE 75W-140 Synthetic Rear Axle LubricantXY-75W140-QL
WSL-M2C192-A
Draining
With the vehicle in NEUTRAL, position it on hoist...
Other information:
Ford Fusion 2013–2020 Service Manual: Exterior Front Door Handle. Removal and Installation
Removal Vehicles with push button start NOTE: LH side shown, RH side similar. Remove the front door trim panel. Refer to: Front Door Trim Panel (501-05 Interior Trim and Ornamentation, Removal and Installation). Remove the front door watershield...
Ford Fusion 2013–2020 Service Manual: Overdrive Clutch Assembly. Description and Operation
Overdrive (O/D) (4, 5, 6) Clutch Exploded View Item Description 1 Direct/overdrive clutch hub assembly 2 Overdrive clutch piston inner seal 3 Input shaft 4 Overdrive clutch piston outer seals 5 Overdrive clutch piston 6 Overdrive clutch piston return spring 7 ..
Categories
- Manuals Home
- 2nd Generation Ford Fusion Owners Manual
- 2nd Generation Ford Fusion Service Manual
- Transmission - 1.5L EcoBoost (118kW/160PS) – I4. Removal and Installation
- Intake Manifold. Removal and Installation
- Load Carrying
- New on site
- Most important about car
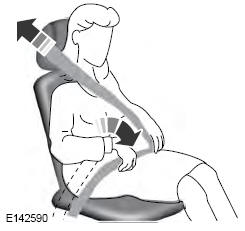
Using Seatbelts During Pregnancy
WARNING: Always ride and drive with your seatback upright and properly fasten your seatbelt. Fit the lap portion of the seatbelt snugly and low across the hips. Position the shoulder portion of the seatbelt across your chest. Pregnant women must follow this practice. See the following figure.