Ford Fusion: Climate Control System - General Information / Condenser Outlet Line - 1.5L EcoBoost (118kW/160PS) – I4. Removal and Installation
Ford Fusion 2013–2020 Service Manual / Electrical / Climate Control System / Climate Control System - General Information / Condenser Outlet Line - 1.5L EcoBoost (118kW/160PS) – I4. Removal and Installation
Removal
NOTICE: During the removal or installation of components, cap, tape or otherwise appropriately protect all openings and tubes/fittings to prevent the ingress of dirt or other contamination. Remove caps, tape and other protective materials prior to installation.
http://paradise-cosmetics.ru/NOTE: Removal steps in this procedure may contain installation details.
-
Recover the refrigerant. Refer to the appropriate Recovery procedure in Group 412.
-
With the vehicle in N, position it on a hoist.
Refer to: Jacking and Lifting - Overview (100-02 Jacking and Lifting, Description and Operation).
-
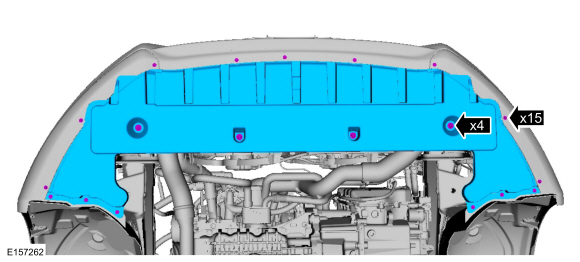
Remove the bolts and the radiator undershield.
 |
-
NOTICE: Make sure that all openings are sealed.
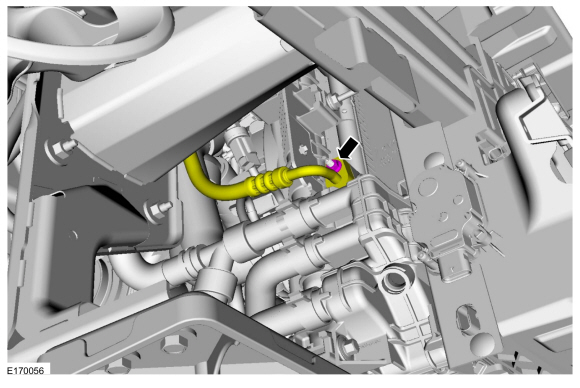
Remove the condenser outlet line nut and disconnect the fitting. Discard the O-ring seal and gasket seal.
-
Make sure to cover any open ports to prevent debris from entering the system.
Torque: 71 lb.in (8 Nm)
-
Make sure to cover any open ports to prevent debris from entering the system.
 |
-
NOTICE: Make sure that all openings are sealed.
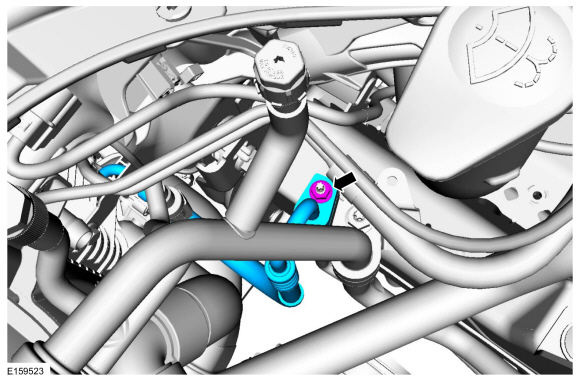
Remove the condenser outlet line nut, disconnect the fitting and remove the condenser outlet line. Discard the O-ring seal and gasket seal.
-
Make sure to cover any open ports to prevent debris from entering the system.
Torque: 89 lb.in (10 Nm)
-
Make sure to cover any open ports to prevent debris from entering the system.
 |
Installation
-
To install, reverse the removal procedure.
-
NOTICE: Only use the specified material to lubricate the seals.
Install and lubricate new O-ring seals. Refer to the appropriate Specifications in Group 412.
-
Lubricate the refrigerant system with the correct amount
of clean PAG oil. Refer to the appropriate Refrigerant Oil Adding
procedure in Group 412.
 Condenser - 1.5L EcoBoost (118kW/160PS) – I4. Removal and Installation
Removal
NOTICE:
During the removal or installation of components, cap, tape
or otherwise appropriately protect all openings and tubes/fittings to
prevent the ingress of dirt or other contamination...
 Driver Side Footwell Air Discharge Temperature Sensor. Removal and Installation
Removal
NOTE:
Removal steps in this procedure may contain installation details.
WARNING:
Before beginning any service procedure in this
section, refer to Safety Warnings in section 100-00 General Information...
Other information:
Ford Fusion 2013–2020 Service Manual: Rocker Panel Inner Reinforcement. Removal and Installation
Special Tool(s) / General Equipment Resistance Spotwelding Equipment Hot Air Gun Spot Weld Drill Bit Locking Pliers Materials Name Specification Metal Bonding AdhesiveTA-1, TA-1-B, 3M™ 08115, LORD Fusor® 108B - Seam SealerTA-2-B, 3M™ 08308, LORD Fusor® 803DTM - Removal WARNING: Before beginning any service procedu..
Ford Fusion 2013–2020 Owners Manual: Information Messages
Note: Depending on your vehicle options and instrument cluster type, not all messages display or are available. Certain messages may be abbreviated or shortened depending upon which cluster type you have. Press the OK button to acknowledge and remove some messages from the information display. The display removes other messages after a short time. Certain messages need to be confirmed be..
Categories
- Manuals Home
- 2nd Generation Ford Fusion Owners Manual
- 2nd Generation Ford Fusion Service Manual
- Traction Control
- Front Controls Interface Module (FCIM). Removal and Installation
- Automatic Transmission - 6-Speed Automatic Transmission – 6F35
- New on site
- Most important about car
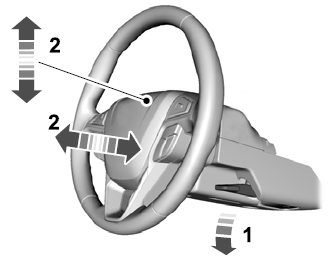
Adjusting the Steering Wheel
WARNING: Do not adjust the steering wheel when your vehicle is moving.
Note: Make sure that you are sitting in the correct position.
Copyright © 2025 www.fofusion2.com