Ford Fusion: Brake System - General Information / Brake System Pressure Bleeding. General Procedures
Special Tool(s) / General Equipment
| Brake/Clutch System Pressure Bleeder/Filler | |
| Fluid Container |
Bleeding
All vehicles
NOTICE: If the fluid is spilled on the paintwork, the affected area must be immediately washed down with cold water.
NOTE: The HCU bleeding procedure and a second brake system pressure bleed must be carried out if a new HCU has been installed.
-
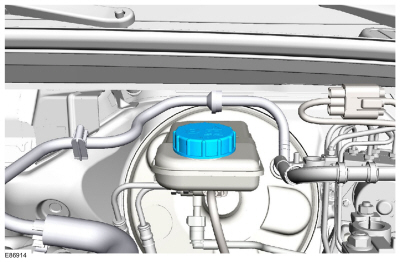
NOTE: Make sure the area around the master cylinder cap is clean and free of foreign material.
Remove the brake fluid reservoir cap.
 |
-
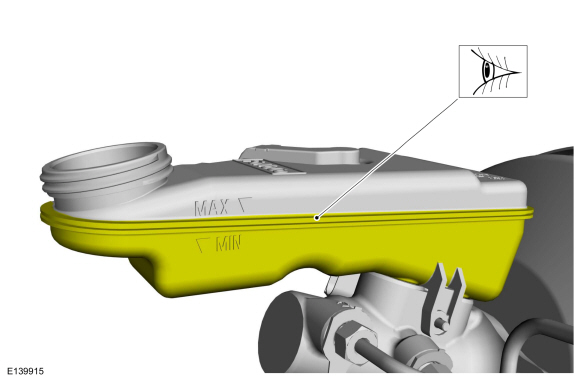
Make sure the fluid reservoir is filled with clean specified brake fluid.
Refer to: Specifications (206-00 Brake System - General Information, Specifications).
 |
-
-
NOTE: Master cylinder pressure bleeder adapter tools are available from various manufacturers of pressure bleeding equipment. Follow the instructions of the manufacturer when installing the adapter.
Install the bleeder adapter to the brake master cylinder reservoir and attach the bleeder tank hose to the fitting on the adapter.
Use the General Equipment: Brake/Clutch System Pressure Bleeder/Filler
-
NOTE: Make sure the bleeder tank contains enough clean, specified brake fluid to complete the bleeding operation.
Open the valve on the bleeder tank and apply 207-345 kPa (30-50 psi) to the brake system.
-
-
With the vehicle in NEUTRAL, position it on a hoist.
Refer to: Jacking and Lifting - Overview (100-02 Jacking and Lifting, Description and Operation).
-
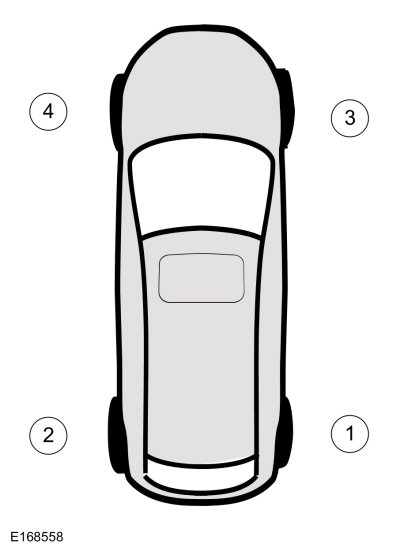
Bleeding steps must be followed in the order indicated in the graphic.
 |
-
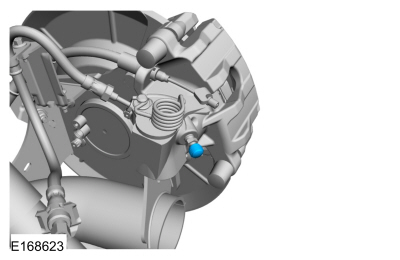
If equipped, remove the bleeder screw cap.
 |
-
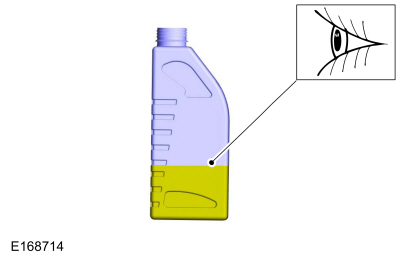
Partially fill a clean brake fluid container with clean specified brake fluid.
Refer to: Specifications (206-00 Brake System - General Information, Specifications).
Use the General Equipment: Fluid Container
 |
-
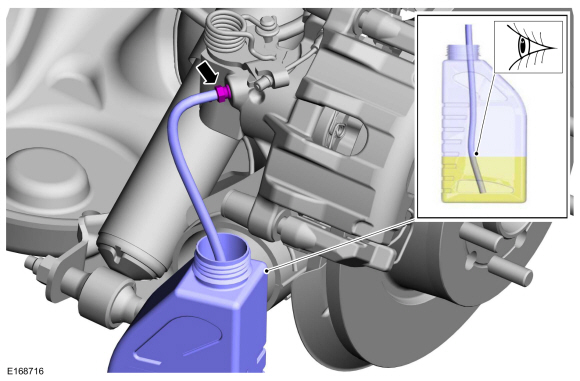
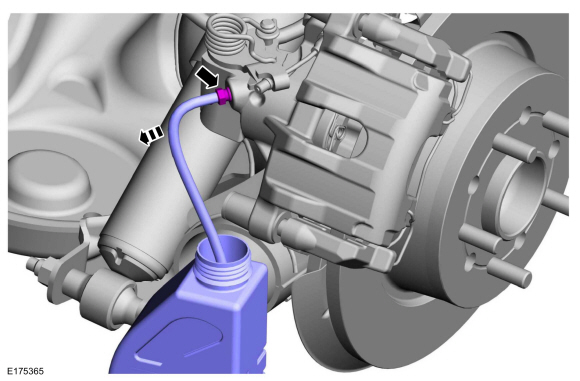
Submerge a hose into the brake fluid in the container and connect the hose to bleeder screw.
 |
-
-
Loosen the bleeder screw.
Loosen:
: 180°
-
Leave open until clear, bubble-free brake fluid flows, then tighten the bleeder screw.
-
Loosen the bleeder screw.
 |
-
-
Disconnect the hose and tighten the bleeder screw to specification.
Refer to: Specifications (206-00 Brake System - General Information, Specifications).
-
Disconnect the hose and tighten the bleeder screw to specification.
 |
-
Repeat steps 8-10 at the remaining wheel ends.
Vehicles with rear integral parking brake calipers
-
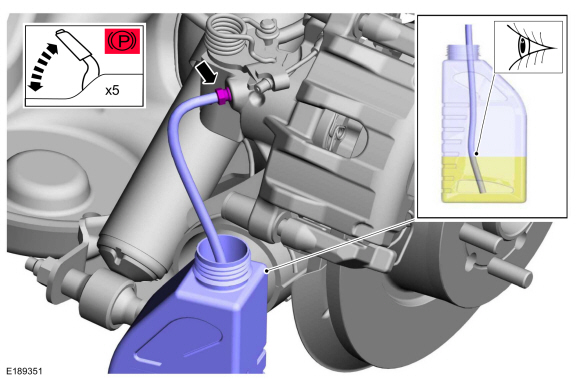
NOTE: Due to the complexity of the fluid path within the rear integral parking brake calipers, it is necessary to apply and release the parking brake during the bleed procedure.
-
Apply and release the parking brake 5 times.
-
Loosen the bleeder screw.
Loosen: 180°
-
Leave open until clear, bubble-free fluid flows and then tighten the bleeder screw to specification.
Refer to: Specifications (206-00 Brake System - General Information, Specifications).
-
Repeat as necessary.
-
Apply and release the parking brake 5 times.
 |
All vehicles
-
If equipped, install the bleeder screw cap.
 |
-
Lower the vehicle.
-
Close the bleeder tank valve and release the pressure.
Remove the General Equipment: Brake/Clutch System Pressure Bleeder/Filler
-
Fill the reservoir with clean, specified brake fluid.
Refer to: Specifications (206-00 Brake System - General Information, Specifications).
 |
-
Install the brake fluid reservoir cap.
 |
Vehicles with new hydraulic control unit (HCU) installed
NOTE: The HCU bleeding procedure and a second brake system pressure bleed must be carried out if a new HCU has been installed.
-
Using the diagnostic scan tool, follow the ABS Service Bleed instructions.
-
Repeat brake system pressure bleeding steps.
 Brake Disc Machining. General Procedures
Repair
NOTE:
On-Vehicle Brake Lathe Training Videos
Vehicle preparation.
Click here to view a video version of this procedure...
 Component Bleeding. General Procedures
Special Tool(s) /
General Equipment
Master Cylinder Bleeding Set
Bleeding
NOTICE:
If the fluid is spilled on the paintwork, the affected area must be immediately washed down with cold water...
Other information:
Ford Fusion 2013–2020 Owners Manual: Opening and Closing the Hood
Opening the Hood Inside the vehicle, pull the hood release handle located under the left-hand side of the instrument panel. Slightly lift the hood. Release the hood latch by pushing the secondary release lever to your left-hand side. Open the hood...
Ford Fusion 2013–2020 Owners Manual: Head Restraints
WARNING: Fully adjust the head restraint before you sit in or operate your vehicle. This will help minimize the risk of neck injury in the event of a crash. Do not adjust the head restraint when your vehicle is moving. WARNING: The head restraint is a safety device...
Categories
- Manuals Home
- 2nd Generation Ford Fusion Owners Manual
- 2nd Generation Ford Fusion Service Manual
- Load Carrying
- Transmission - 1.5L EcoBoost (118kW/160PS) – I4. Removal and Installation
- Under Hood Overview - 1.5L EcoBoost™, 2.0L EcoBoost™, 2.5L, 2.7L EcoBoost™
- New on site
- Most important about car
Understanding Your Tire Pressure Monitoring System

The tire pressure monitoring system measures pressure in your road tires and sends the tire pressure readings to your vehicle. You can view the tire pressure readings through the information display. The low tire pressure warning light will turn on if the tire pressure is significantly low. Once the light is illuminated, your tires are under-inflated and need to be inflated to the manufacturer’s recommended tire pressure. Even if the light turns on and a short time later turns off, your tire pressure still needs to be checked.