Ford Fusion: Body Repairs - Vehicle Specific Information and Tolerance Checks / Body Panel Sectioning. General Procedures
Special Tool(s) / General Equipment
| Resistance Spotwelding Equipment | |
| Spherical Cutter | |
| Plasma Cutter | |
| Air Body Saw | |
| MIG/MAG Welding Equipment | |
| Spot Weld Drill Bit |
Materials
| Name | Specification |
|---|---|
| Seam Sealer TA-2-B, 3M™ 08308, LORD Fusor® 803DTM |
- |
Repair
NOTICE: Do not begin to removal of the vehicle body side until the replacement panel is available for reference.
-
Follow the health and safety precautions. WARNING:
Before beginning any service procedure in this
section, REFER to Safety Warnings in section 100-00 General Information.
Failure to follow this instruction may result in serious personal
injury.
WARNING:
Before beginning any service procedure in this
section, REFER to Safety Warnings in section 100-00 General Information.
Failure to follow this instruction may result in serious personal
injury.
Refer to: Health and Safety Precautions (100-00 General Information, Description and Operation).
-
Detrim the vehicle as necessary and remove spot welds from the damaged area.
Use the General Equipment: Spot Weld Drill Bit
-
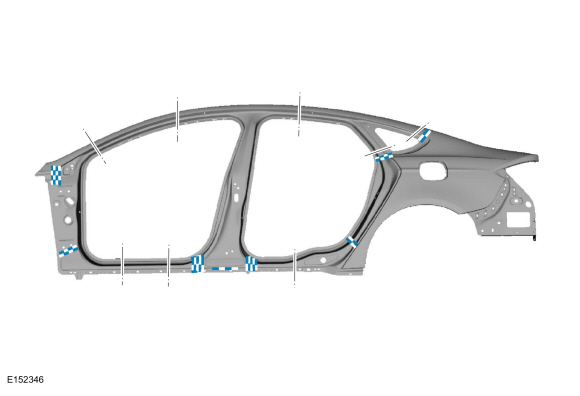
Body side replacement panels are released as 2-part panels. Only remove as much of the body side as necessary.
Refer to: Body and Frame (501-26 Body Repairs - Vehicle Specific Information and Tolerance Checks, Description and Operation).
Use the General Equipment: Air Body Saw
Use the General Equipment: Plasma Cutter
-
As a general rule, sectioning cut points should be chosen to result in the smallest repair area possible.
Use the General Equipment: Air Body Saw
Use the General Equipment: Plasma Cutter
Use the General Equipment: Spherical Cutter
 |
-
NOTE: Use resistance spotwelding equipment where possible. This will produce a higher quality repair.
NOTE: When welding overlapping surfaces or substrates, apply a high quality weld-through primer between the surfaces prior to welding.
Where possible, create a lap-joint backer plate using a portion of the old panel. This will create a stronger joint.
Use the General Equipment: Resistance Spotwelding Equipment
Use the General Equipment: MIG/MAG Welding Equipment
-
Rough finish all sectioning joints with a fibre-based
body filler, final finish sectioning joints and plug welds with a
conventional body filler.
-
Properly seal all horizontal joints to prevent moisture
intrusion. Water and moisture migrate toward horizontal joints and
corrosion tends to occur more rapidly in these areas.
Material: Seam Sealer / TA-2-B, 3M™ 08308, LORD Fusor® 803DTM
-
Proceed with the refinishing process using a Ford approved paint system and manufacturers recommendations.
-
Restore corrosion protection.
Refer to: Corrosion Prevention (501-25 Body Repairs - General Information, General Procedures).
-
Reapply vehicle trim as necessary.
 Vehicle Specific Body Construction. Description and Operation
Before cutting or welding, For additional information, refer to: Specifications (501-25 Body Repairs - General Information, Specifications).
Bumper Beams
Bumper
beams are typically constructed of HS (high-strength) or stronger class
steel...

Other information:
Ford Fusion 2013–2020 Service Manual: Specifications
Material Item Specification Fill Capacity High Temperature Nickel Anti-Seize Lubricant / XL-2 - - Motorcraft® Wheel and Tire Cleaner - ZC-37-A - - General Specifications Item Specification Tire Inflation Tires See Safety Certificat..
Ford Fusion 2013–2020 Service Manual: Audio Front Control Module (ACM). Removal and Installation
Removal NOTE: Make sure that any media is ejected from unit. NOTE: Removal steps in this procedure may contain installation details. WARNING: Before beginning any service procedure in this section, refer to Safety Warnings in section 100-00 General Information. Failure to follow this instruction may result in serious personal injury. Refer to: Health and Safety P..
Categories
- Manuals Home
- 2nd Generation Ford Fusion Owners Manual
- 2nd Generation Ford Fusion Service Manual
- Transmission - 1.5L EcoBoost (118kW/160PS) – I4. Removal and Installation
- Body Control Module (BCM). Removal and Installation
- Under Hood Overview - 1.5L EcoBoost™, 2.0L EcoBoost™, 2.5L, 2.7L EcoBoost™
- New on site
- Most important about car
Fuel Quality
Choosing the Right Fuel
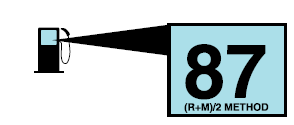
Your vehicle is designed to operate on regular unleaded gasoline with a minimum pump (R+M)/2 octane rating of 87.