Ford Fusion: Rear End Sheet Metal Repairs / Back Panel and Reinforcement. Removal and Installation
Special Tool(s) / General Equipment
| Hot Air Gun | |
| 8 mm Drill Bit | |
| MIG/MAG Welding Equipment | |
| Spot Weld Drill Bit | |
| Locking Pliers |
Materials
| Name | Specification |
|---|---|
| Metal Bonding Adhesive TA-1, TA-1-B, 3M™ 08115, LORD Fusor® 108B |
- |
| Seam Sealer TA-2-B, 3M™ 08308, LORD Fusor® 803DTM |
- |
Removal
-
Remove the following items. WARNING:
Before beginning any service procedure in this
section, refer to Safety Warnings in section 100-00 General Information.
Failure to follow this instruction may result in serious personal
injury.
WARNING:
Before beginning any service procedure in this
section, refer to Safety Warnings in section 100-00 General Information.
Failure to follow this instruction may result in serious personal
injury.
Refer to: Health and Safety Precautions (100-00 General Information, Description and Operation).
Refer to: Rear Bumper (501-19 Bumpers, Removal and Installation).
Refer to: Rear Lamp Assembly - 4-Door (417-01 Exterior Lighting, Removal and Installation).
-
Remove the luggage compartment trim.
-
Reposition the carpet and wiring harness away from the work area.
-
Drill out the spot welds.
Use the General Equipment: Spot Weld Drill Bit
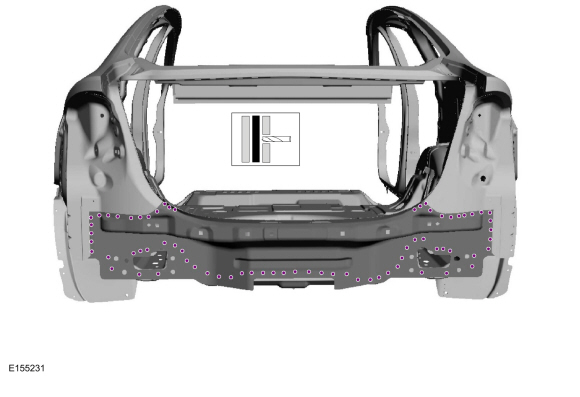 |
-
Break the adhesive bond.
Use the General Equipment: Hot Air Gun
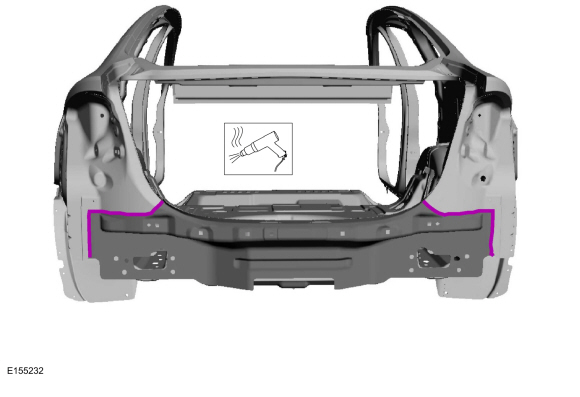 |
-
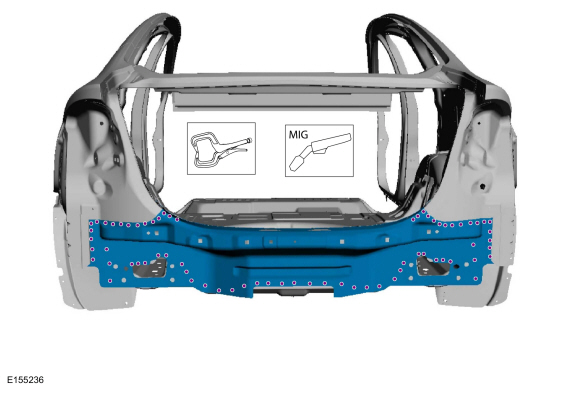
Remove the back panel and reinforcement.
 |
Installation
-
Refer to: Health and Safety Precautions (100-00 General Information, Description and Operation). WARNING:
Before beginning any service procedure in this
section, refer to Safety Warnings in section 100-00 General Information.
Failure to follow this instruction may result in serious personal
injury.
WARNING:
Before beginning any service procedure in this
section, refer to Safety Warnings in section 100-00 General Information.
Failure to follow this instruction may result in serious personal
injury.
-
Drill holes in the replacement back panel reinforcement for plug welding.
Use the General Equipment: 8 mm Drill Bit
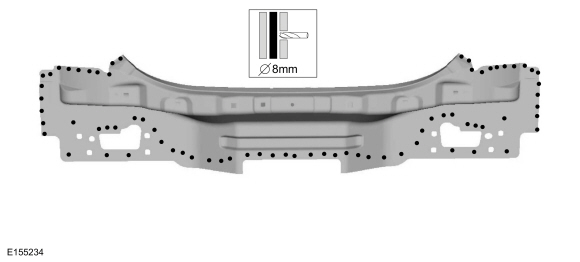 |
-
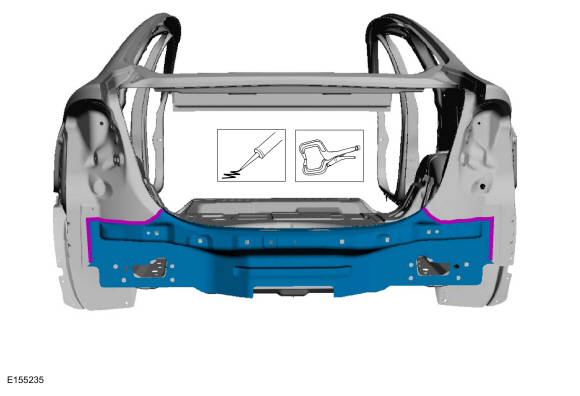
Apply the adhesive, install the back panel and reinforcement and clamp in position.
Use the General Equipment: Locking Pliers
Material: Metal Bonding Adhesive / TA-1, TA-1-B, 3M™ 08115, LORD Fusor® 108B
 |
-
Install the plug welds.
Use the General Equipment: MIG/MAG Welding Equipment
Use the General Equipment: Locking Pliers
 |
-
Finish the repair area using typical metal finishing procedures.
-
Seam sealing: All seams must be sealed to production level.
Material: Seam Sealer / TA-2-B, 3M™ 08308, LORD Fusor® 803DTM
-
Refinish using a ford approved paint system.
-
Restore corrosion protection.
Refer to: Corrosion Prevention (501-25 Body Repairs - General Information, General Procedures).
-
Reposition the wiring harness and carpet.
-
Install the following items.
Refer to: Rear Bumper (501-19 Bumpers, Removal and Installation).
Refer to: Rear Lamp Assembly - 4-Door (417-01 Exterior Lighting, Removal and Installation).

 Floor Panel Reinforcement. Removal and Installation
Special Tool(s) /
General Equipment
Scraper for Straight Edges
Hot Air Gun
8 mm Drill Bit
MIG/MAG Welding Equipment
Spot Weld Drill Bit
Locking Pliers
Materials
Name
Specification
Seam SealerTA-2-B, 3M™ 08308, LORD Fusor® 803DTM
-
Removal
NOTICE:
Battery electric vehicle (BEV), hybrid electric vehicle
(HEV) and plug-in hybrid electr..
Other information:
Ford Fusion 2013–2020 Service Manual: Starting System - Overview. Description and Operation
The starting system controls the cranking of the engine. The starter motor is enabled by the starter relay when the relay is activated by the PCM. The PCM receives inputs from the ignition switch - push button start, automatic transmission, Run/start relay and the BCM before activating the starter relay to initiate cranking of the engine. Starting System - with Remote Start The remote sta..
Ford Fusion 2013–2020 Service Manual: Cylinder Block Core Plug Replacement. General Procedures
Special Tool(s) / General Equipment 100-001 (T50T-100-A) Slide Hammer Materials Name Specification Motorcraft® Threadlock 262TA-26 WSK-M2G351-A6 Repair All core plugs NOTE: Cylinder block core plug shown, cylinder head core plug similar. Using the Slide Hammer and a commercially available body dent puller attachment or commercially available ..
Categories
- Manuals Home
- 2nd Generation Ford Fusion Owners Manual
- 2nd Generation Ford Fusion Service Manual
- Starter Motor. Removal and Installation
- Front Controls Interface Module (FCIM). Removal and Installation
- Garage Door Opener
- New on site
- Most important about car
Parallel Parking
The system detects available parallel parking spaces and steers your vehicle into the space. You control the accelerator, gearshift and brakes. The system visually and audibly guides you into a parallel parking space.
 Press the button once to search
for a parking space.
Press the button once to search
for a parking space.