Ford Fusion: Interior Trim and Ornamentation / Rear Door Trim Panel. Removal and Installation
Ford Fusion 2013–2020 Service Manual / Body and Paint / Body and Paint / Interior Trim and Ornamentation / Rear Door Trim Panel. Removal and Installation
Removal
NOTE: LH shown, RH similar.
NOTE: Removal steps in this procedure may contain installation details.
-
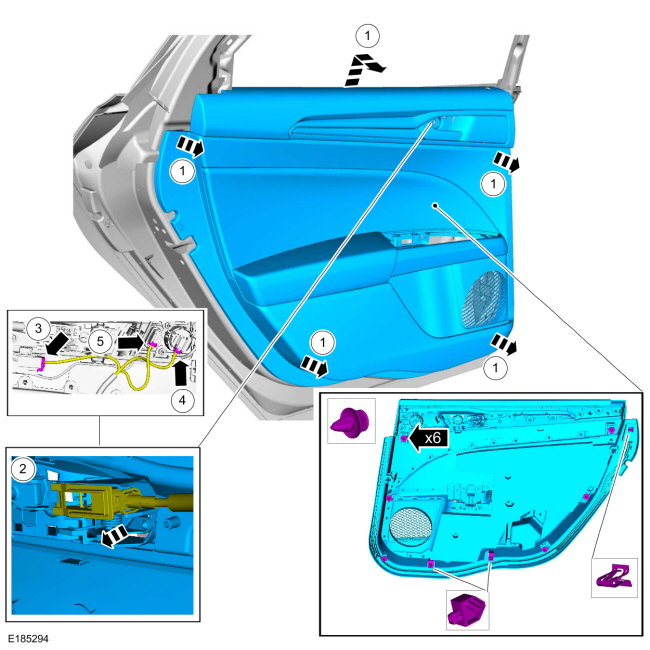
Remove the rear door window control switch.
Refer to: Rear Door Window Control Switch (501-11 Glass, Frames and Mechanisms, Removal and Installation).
-
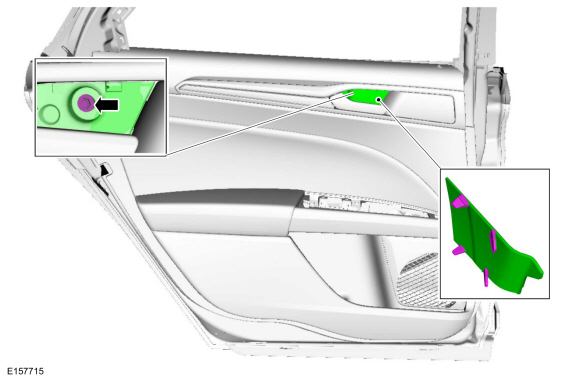
Remove the rear door trim panel retainers.
Torque: 18 lb.in (2 Nm)
 |
-
Remove the cover and the door trim panel retainer.
Torque: 44 lb.in (5 Nm)
 |
-
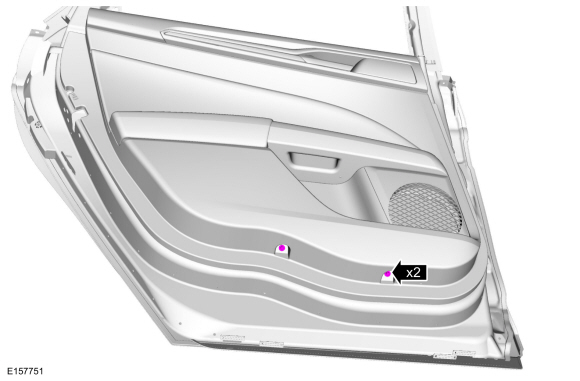
Remove the lower retainers.
Torque: 9 lb.in (1 Nm)
 |
-
Remove the rear door trim panel.
-
Release the clips.
-
Disconnect the rear door cable.
-
If equipped.
Disconnect the rear door speaker.
-
If equipped
Disconnect the ambient light electrical connector.
-
If equipped
Disconnect the rear door power lock switch and remove the rear door trim panel.
-
Release the clips.
 |
Installation
-
NOTE: Transfer parts as necessary.
To install, reverse the removal procedure.
 Front Door Trim Panel. Removal and Installation
Removal
NOTE:
LH shown, RH similar.
NOTE:
Removal steps in this procedure may contain installation details.
Release the tabs and remove the door trim panel cover...
 Headliner. Removal and Installation
Materials
Name
Specification
3M™ Super-Fast Repair Adhesive04747
-
Removal
NOTICE:
Use care to not crease the headliner during removal and installation or damage to the headliner can occur...
Other information:
Ford Fusion 2013–2020 Service Manual: Vehicle Dynamics Control Module (VDM). Removal and Installation
Removal NOTICE: Electronic modules are sensitive to static electrical charges. If exposed to these charges, damage may result. NOTE: Removal steps in this procedure may contain installation details. NOTE: The PMI process must begin with the current VDM installed...
Ford Fusion 2013–2020 Service Manual: Rear Door Check Arm. Removal and Installation
Removal NOTE: Left hand (LH) side shown, right hand (RH) side similar. Remove the door trim panel and water shield. Refer to: Rear Door Trim Panel (501-05 Interior Trim and Ornamentation, Removal and Installation). Remove the rear door...
Categories
- Manuals Home
- 2nd Generation Ford Fusion Owners Manual
- 2nd Generation Ford Fusion Service Manual
- Traction Control
- Automatic Transmission - 6-Speed Automatic Transmission – 6F35
- Garage Door Opener
- New on site
- Most important about car
Understanding Your Tire Pressure Monitoring System

The tire pressure monitoring system measures pressure in your road tires and sends the tire pressure readings to your vehicle. You can view the tire pressure readings through the information display. The low tire pressure warning light will turn on if the tire pressure is significantly low. Once the light is illuminated, your tires are under-inflated and need to be inflated to the manufacturer’s recommended tire pressure. Even if the light turns on and a short time later turns off, your tire pressure still needs to be checked.
Copyright © 2026 www.fofusion2.com