Ford Fusion: Front Disc Brake / Brake Pads - 2.7L EcoBoost (238kW/324PS). Removal and Installation
Materials
| Name | Specification |
|---|---|
| Motorcraft® DOT 4 LV High Performance Motor Vehicle Brake Fluid PM-20 |
WSS-M6C65-A2 |
| Motorcraft® Metal Brake Parts Cleaner PM-4-A, PM-4-B |
- |
Removal
NOTE: Removal steps in this procedure may contain installation details.
-
Remove the wheel and tire.
Refer to: Wheel and Tire (204-04A Wheels and Tires, Removal and Installation).
-
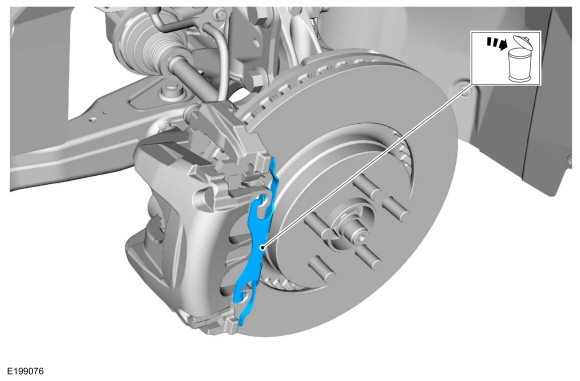
Remove and discard the brake caliper spring.
 |
-
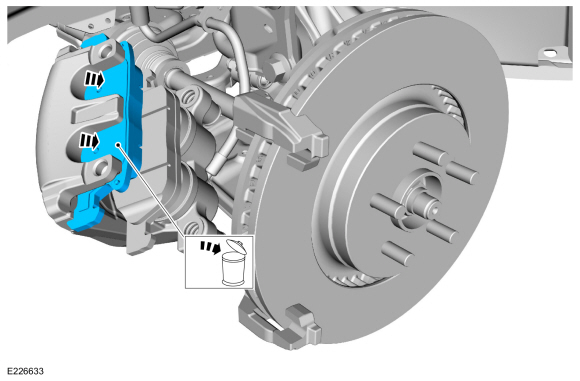
NOTICE: Do not pry in the caliper sight hole to retract the pistons as this can damage the pistons and boots.
NOTICE: Do not allow the brake caliper and anchor plate assembly to hang from the brake hose or damage to the hose can occur.
Remove the covers, the guide pins and position the brake caliper aside.
 |
-
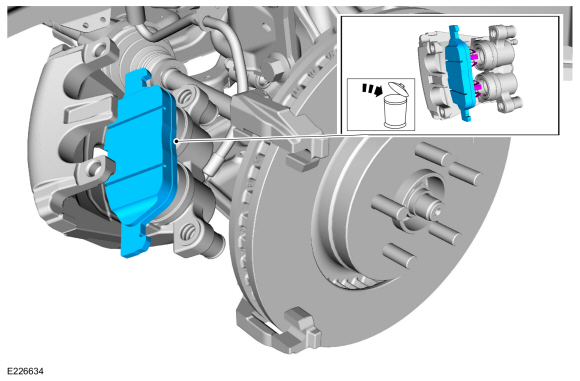
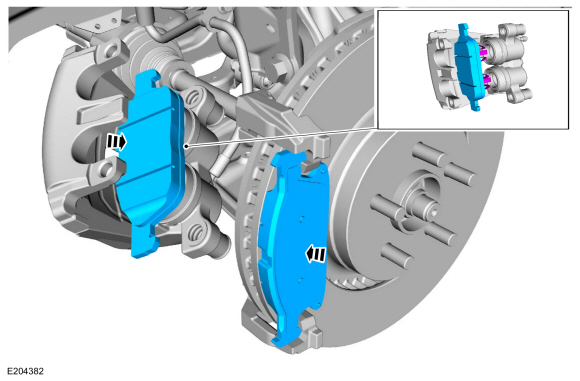
NOTICE: Brake pads with adhesive on the insulator are one-time use only. When the brake pads are separated from the brake caliper, new brake pads must be installed to prevent brake noise and shudder.
Separate the outboard brake pad from the brake caliper. Discard the brake pad.
 |
-
NOTICE: Protect the caliper pistons and boots when pushing the caliper piston into the caliper piston bores or damage to components may occur.
Use a C-clamp and a worn brake pad to compress the disc brake caliper pistons into the brake caliper bore.
 |
-
NOTICE: Brake pads with adhesive on the insulator are one-time use only. When the brake pads are separated from the brake caliper, new brake pads must be installed to prevent brake noise and shudder.
Remove and discard the inboard brake pad.
 |
Installation
-
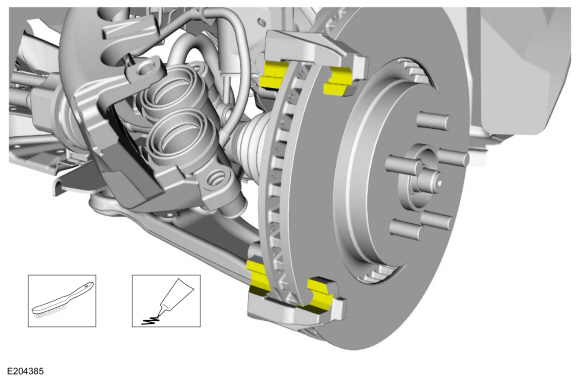
NOTE: Make sure to use the lubricant supplied with the brake pad kit.
Clean the brake pad-to-anchor plate contact surfaces and apply the lubricant supplied with the brake pad kit.
 |
-
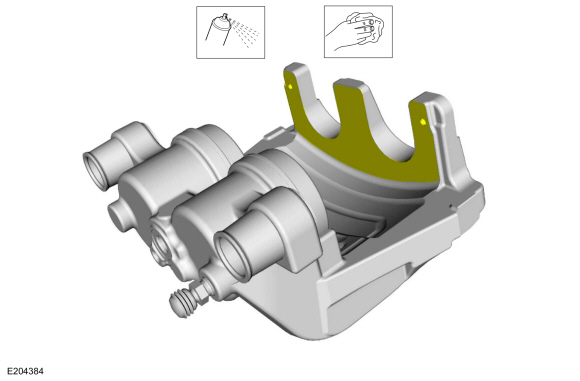
Clean all residual pad adhesive from the finger area of the brake caliper.
Material: Motorcraft® Metal Brake Parts Cleaner / PM-4-A, PM-4-B
 |
-
NOTICE: Brake pads with adhesive on the insulator are one-time use only. When the brake pads are separated from the brake caliper, new brake pads must be installed to prevent brake noise and shudder.
NOTICE: Once the foil backing is removed from the brake pads do not touch the adhesive on the backing.
NOTE: Make sure to apply the grease supplied with the brake pad kit to the brake pad-to-anchor plate contact points.
Remove the foil backing from the outboard brake pad and install the new brake pads.
 |
-
NOTICE: Make sure that the brake hose is not twisted when installing the brake caliper or damage to the brake flexible hose may occur.
Position the brake caliper and install the guide pins and covers.
Torque: 41 lb.ft (55 Nm)
 |
-
Install the new brake caliper spring.
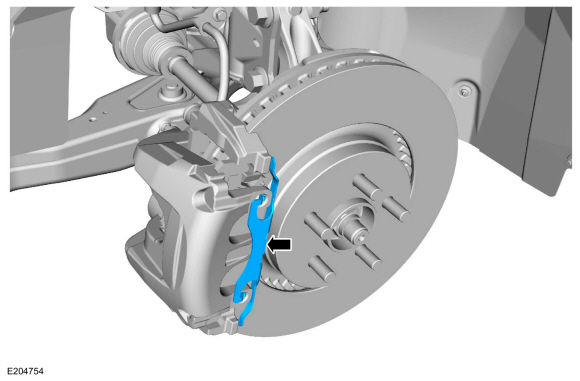 |
-
Install the wheel and tire.
Refer to: Wheel and Tire (204-04A Wheels and Tires, Removal and Installation).
-
Depress the brake pedal several times, check the brake
fluid level in the brake fluid reservoir and add the specified brake
fluid as necessary.
Material: Motorcraft® DOT 4 LV High Performance Motor Vehicle Brake Fluid / PM-20 (WSS-M6C65-A2)
 Brake Pads. Removal and Installation
Materials
Name
Specification
Motorcraft® DOT 4 LV High Performance Motor Vehicle Brake FluidPM-20
WSS-M6C65-A2
Motorcraft® Metal Brake Parts CleanerPM-4-A, PM-4-B
-
Removal
NOTE:
Removal steps in this procedure may contain installation details...
 Front Brake Flexible Hose. Removal and Installation
Removal
NOTE:
Removal steps in this procedure may contain installation details.
WARNING:
Before beginning any service procedure in this
section, refer to Safety Warnings in section 100-00 General Information...
Other information:
Ford Fusion 2013–2020 Service Manual: Dash Panel. Removal and Installation
Special Tool(s) / General Equipment Interior Trim Remover 8 mm Drill Bit MIG/MAG Welding Equipment Spot Weld Drill Bit Locking Pliers Materials Name Specification Seam SealerTA-2-B, 3M™ 08308, LORD Fusor® 803DTM - Removal NOTICE: Battery electric vehicle (BEV), hybrid electric vehicle (HEV) and plug-in hybrid electric vehicle (PHEV) cont..
Ford Fusion 2013–2020 Owners Manual: Declaration of Conformity. Declaration of Conformity - Vehicles With: SYNC 3
Declaration of Conformity Your vehicle could have components that transmit and receive radio waves and are therefore subject to government regulation. These components must accept any interference received, including interference that could cause undesired operation. For certification labels and declarations of conformity, visit www.wirelessconformity.ford.com. Declaration of Conformity - ..
Categories
- Manuals Home
- 2nd Generation Ford Fusion Owners Manual
- 2nd Generation Ford Fusion Service Manual
- Intake Manifold. Removal and Installation
- Powertrain
- Memory Function
- New on site
- Most important about car
Understanding Your Tire Pressure Monitoring System

The tire pressure monitoring system measures pressure in your road tires and sends the tire pressure readings to your vehicle. You can view the tire pressure readings through the information display. The low tire pressure warning light will turn on if the tire pressure is significantly low. Once the light is illuminated, your tires are under-inflated and need to be inflated to the manufacturer’s recommended tire pressure. Even if the light turns on and a short time later turns off, your tire pressure still needs to be checked.