
Ford Fusion: Hydraulic Brake Actuation / Brake Master Cylinder. Removal and Installation
Removal
NOTE: Removal steps in this procedure may contain installation details.
All vehicles
-
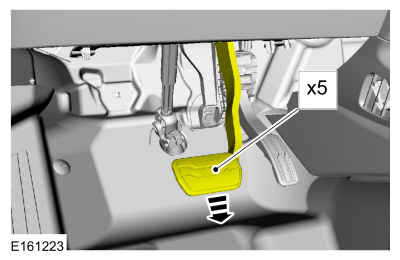
NOTICE: Before removing the master cylinder, relieve the vacuum in the brake booster or the master cylinder O-ring seal may be drawn into the brake booster, causing brake booster failure and increased brake pedal effort.
Fully apply and release the brake pedal 5 times.
 |
-
Disconnect the battery.
Refer to: Battery Disconnect and Connect (414-01 Battery, Mounting and Cables, General Procedures).
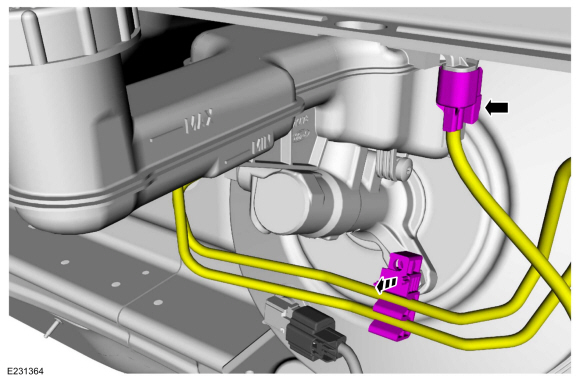
1.5L EcoBoost (118kW/160PS)/2.5L Duratec (125kW/170PS)
-
Disconnect the brake fluid level sensor electrical connector and detach the brake tube retainer.
 |
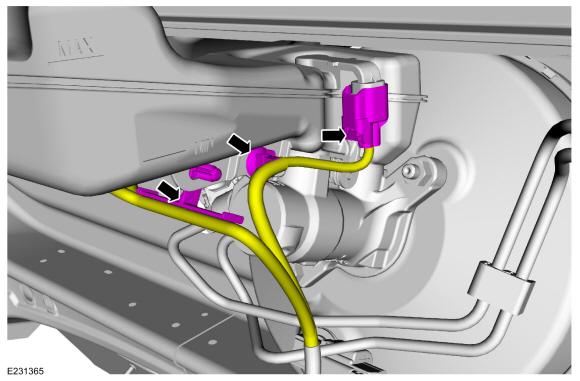
2.0L EcoBoost (184kW/250PS) - MI4/2.7L EcoBoost (238kW/324PS)
-
Disconnect the brake fluid level sensor electrical connector and detach the wiring retainers.
Torque: 18 lb.ft (25 Nm)
 |
All vehicles
NOTE: 2.0L EcoBoost engine shown
-
NOTICE: If the brake fluid is spilled on the paintwork, the affected area must be immediately washed down with cold water.
NOTICE: Make sure that all openings are sealed.
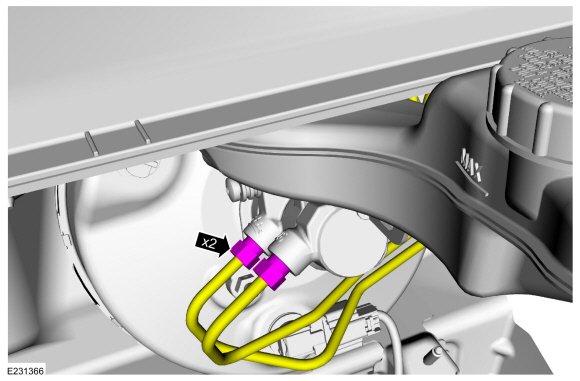
Disconnect the brake tube fittings.
Torque: 18 lb.ft (25 Nm)
 |
-
NOTE: Make sure that the master cylinder-to-booster seal is removed with the master cylinder.
Remove the nuts and the brake master cylinder. Discard the nuts.
Torque: 18 lb.ft (25 Nm)
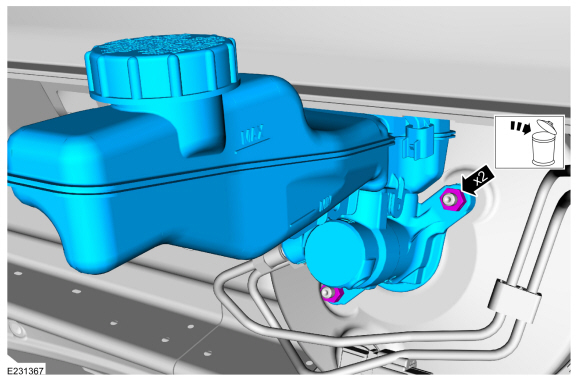 |
Installation
-
To install, reverse the removal procedure.
-
-
If a new brake master cylinder has been installed, bleed the master cylinder.
Refer to: Component Bleeding (206-00 Brake System - General Information, General Procedures).
-
If the brake master cylinder was removed to access other components, bleed the brake system.
Refer to: Brake System Pressure Bleeding (206-00 Brake System - General Information, General Procedures).
-
If a new brake master cylinder has been installed, bleed the master cylinder.
 Brake Fluid Reservoir. Removal and Installation
Materials
Name
Specification
Motorcraft® DOT 4 LV High Performance Motor Vehicle Brake FluidPM-20
WSS-M6C65-A2
Removal
NOTICE:
If the brake fluid is spilled on the paintwork, the affected area must be immediately washed down with cold water...
 Brake Pedal and Bracket. Removal and Installation
Removal
NOTE:
Removal steps in this procedure may contain installation details.
NOTICE:
Do not service the brake pedal or brake booster
without first removing the stoplamp switch...
Other information:
Ford Fusion 2013–2020 Service Manual: Steering Column - System Operation and Component Description. Description and Operation
System Operation System Diagram Item Description 1 Hall Effect Sensor 2 Steering Column Tilt Motor 3 DDM 4 SCCM 5 Memory Set Switch 6 DSM 7 BCM 8 MS-CAN 9 HS2-CAN 10 Steering Column Control Switch 11 Steering Column Telescope Motor 12 Hall Effect Sensor 13 GWM 14 HS1-CAN Network Messag..
Ford Fusion 2013–2020 Service Manual: Roll Restrictor RH. Removal and Installation
Removal With the vehicle in NEUTRAL, position it on a hoist. Refer to: Jacking and Lifting - Overview (100-02 Jacking and Lifting, Description and Operation). Remove the retainers and the engine front undershield. Remove the retainers and the engine undershield. Remove the bolts, remove the roll restrictor an..
Categories
- Manuals Home
- 2nd Generation Ford Fusion Owners Manual
- 2nd Generation Ford Fusion Service Manual
- Main Control Valve Body. Removal and Installation
- Cylinder Head Temperature (CHT) Sensor. Removal and Installation
- Front Controls Interface Module (FCIM). Removal and Installation
- New on site
- Most important about car
Direction Indicators. Interior Lamps
Direction Indicators
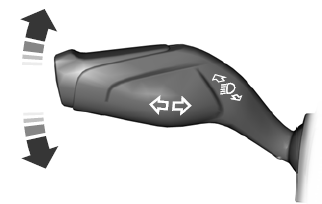
Push the lever up or down to use the direction indicators.
