Ford Fusion: Seatbelt Systems / Seatbelt Retractor and Pretensioner. Removal and Installation
Removal
NOTE: Removal steps in this procedure may contain installation details.
NOTE: RH shown, LH similar.
-
Position the front seat in the full forward position.
 |
-
If a SRS fault is present, continue to step 3. Otherwise, turn the ignition OFF, wait at least one minute and continue to step 4. WARNING:
Turn the ignition OFF and wait one minute to deplete
the backup power supply. Ignition must remain OFF until repair is
complete. Failure to follow this instruction may result in serious
personal injury or death in the event of an accidental deployment.
WARNING:
Turn the ignition OFF and wait one minute to deplete
the backup power supply. Ignition must remain OFF until repair is
complete. Failure to follow this instruction may result in serious
personal injury or death in the event of an accidental deployment.
-
Depower the SRS.
Refer to: Supplemental Restraint System (SRS) Depowering and Repowering (501-20B Supplemental Restraint System, General Procedures).
-
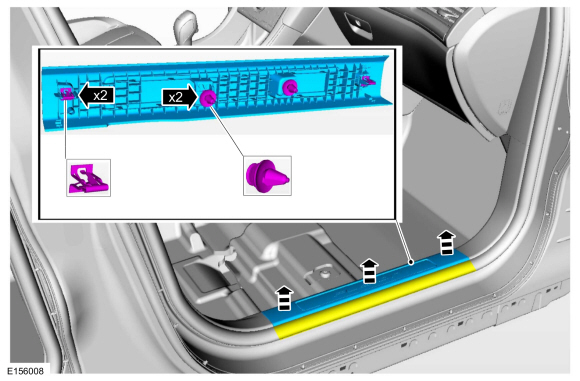
Remove the front door scuffplate trim panel.
-
Detach the weatherstrip and position aside.
-
Release the clips.
-
Detach the weatherstrip and position aside.
 |
-
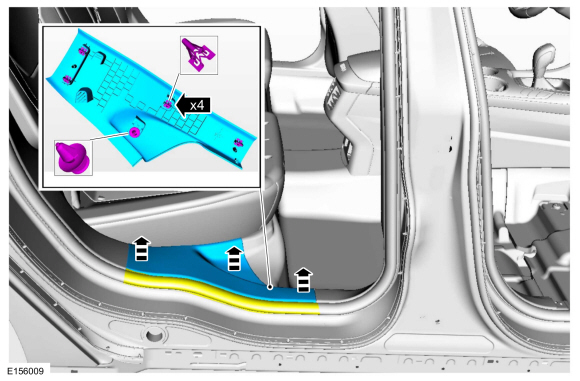
Remove the rear door scuffplate trim panel.
-
Detach the weatherstrip and position aside.
-
Release the clips.
-
Detach the weatherstrip and position aside.
 |
-
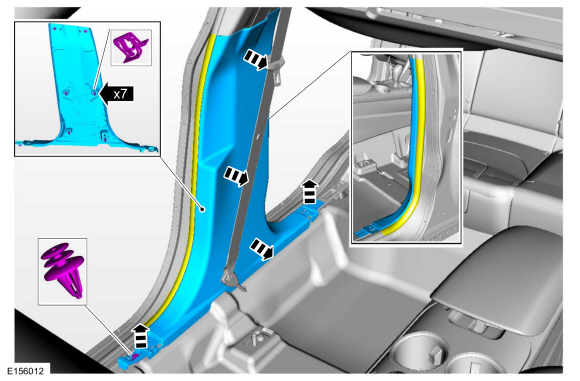
Remove the lower B-pillar trim panel.
-
Detach the weatherstrip and position aside.
-
Release the clips.
-
Detach the weatherstrip and position aside.
 |
-
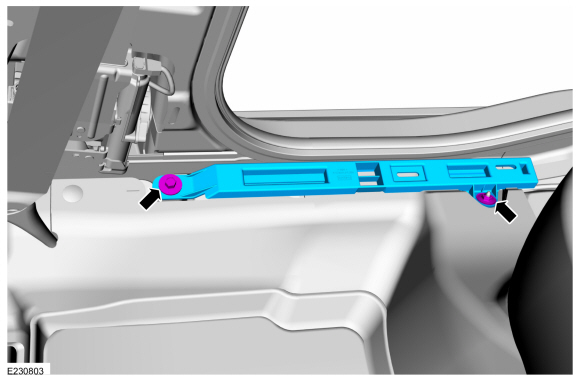
Remove the carpet trim panel bracket.
-
Remove the bolt.
Torque: 89 lb.in (10 Nm)
-
Remove the nut.
-
Remove the bolt.
 |
-
Remove the pin-type retainer and position the carpet aside.
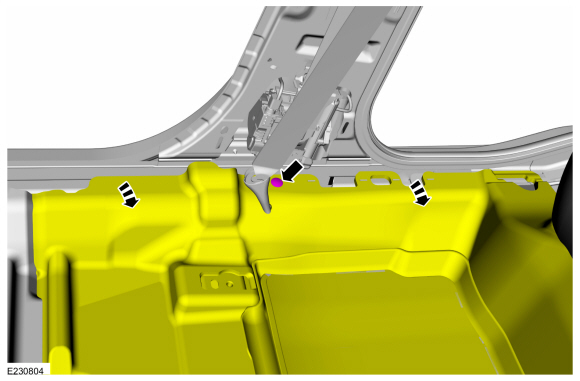 |
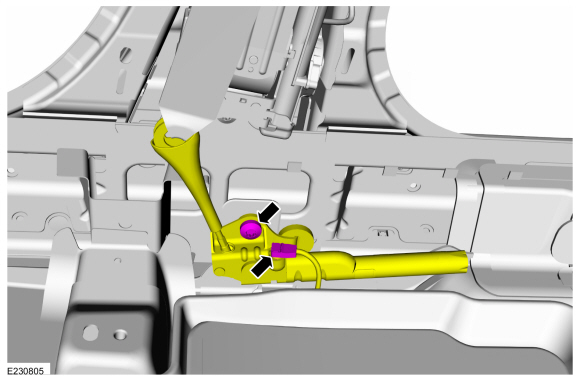
-
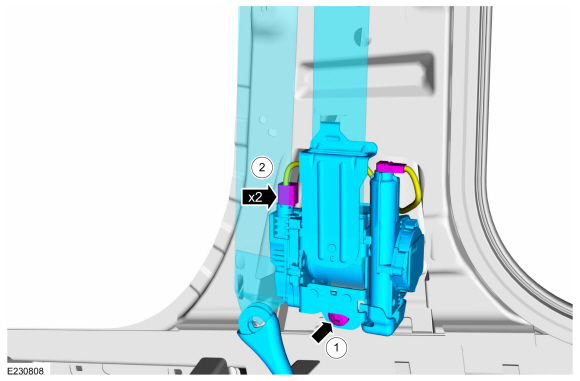
Disconnect the electrical connector, remove the bolt and position the seatbelt anchor pretentioner aside.
Torque: 30 lb.ft (40 Nm)
 |
-
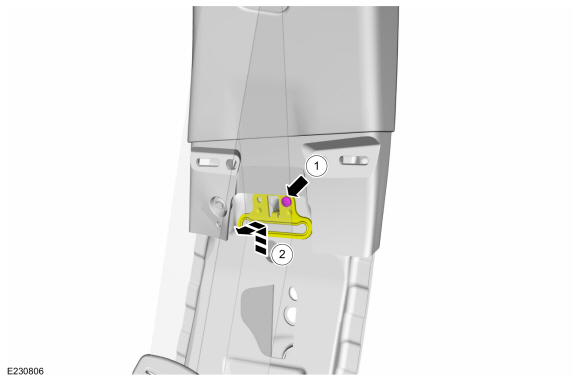
-
Remove the bolt.
Torque: 44 lb.in (5 Nm)
-
Release the locking tab and position the seatbelt guide aside.
-
Remove the bolt.
 |
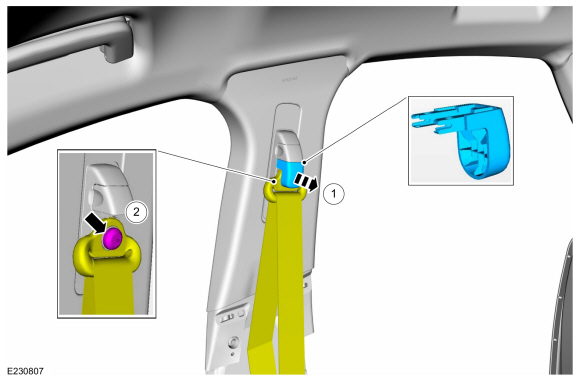
-
-
Remove the D-ring bolt cover.
-
Remove the D-ring bolt and position the seatbelt aside.
Torque: 30 lb.ft (40 Nm)
-
Remove the D-ring bolt cover.
 |
-
Remove the seatbelt retractor and pretensioner.
-
Remove the bolt.
Torque: 30 lb.ft (40 Nm)
-
Disconnect the electrical connectors.
-
Remove the bolt.
 |
Installation
-
NOTE: During installation, make sure the seatbelt webbing is not twisted and the seatbelts and buckles are accessible to the occupants.
To install, reverse the removal procedure.
-
If the SRS was depowered, repower the SRS.
Refer to: Supplemental Restraint System (SRS) Depowering and Repowering (501-20B Supplemental Restraint System, General Procedures).
-
Check the seatbelt system for correct operation.
Refer to: Seatbelt Systems (501-20A Seatbelt Systems, Diagnosis and Testing).
 Rear Seatbelt Retractor and Pretensioner. Removal and Installation
Removal
WARNING:
The following procedure prescribes critical repair steps
required for correct restraint system operation during a crash. Follow
all notes and steps carefully...
 Seatbelt Shoulder Height Adjuster. Removal and Installation
Removal
NOTE:
Removal steps in this procedure may contain installation details.
Remove the B-pillar trim panel.
Refer to: B-Pillar Trim Panel (501-05 Interior Trim and Ornamentation, Removal and Installation)...
Other information:
Ford Fusion 2013–2020 Service Manual: Side Panel Extension. Removal and Installation
Special Tool(s) / General Equipment Resistance Spotwelding Equipment Hot Air Gun Knife MIG/MAG Welding Equipment Spot Weld Drill Bit Locking Pliers Materials Name Specification Metal Bonding AdhesiveTA-1, TA-1-B, 3M™ 08115, LORD Fusor® 108B - Seam SealerTA-2-B, 3M™ 08308, LORD Fusor® 803DTM - Removal NOTICE: Battery ..
Ford Fusion 2013–2020 Service Manual: Blower Motor. Removal and Installation
Removal NOTE: Removal steps in this procedure may contain installation details. WARNING: Before beginning any service procedure in this section, refer to Safety Warnings in section 100-00 General Information. Failure to follow this instruction may result in serious personal injury. Refer to: Climate Control System Health and Safety Precautions (100-00 General Informat..
Categories
- Manuals Home
- 2nd Generation Ford Fusion Owners Manual
- 2nd Generation Ford Fusion Service Manual
- Starter Motor. Removal and Installation
- Traction Control
- Memory Function
- New on site
- Most important about car
Understanding Your Tire Pressure Monitoring System

The tire pressure monitoring system measures pressure in your road tires and sends the tire pressure readings to your vehicle. You can view the tire pressure readings through the information display. The low tire pressure warning light will turn on if the tire pressure is significantly low. Once the light is illuminated, your tires are under-inflated and need to be inflated to the manufacturer’s recommended tire pressure. Even if the light turns on and a short time later turns off, your tire pressure still needs to be checked.