Ford Fusion: Front Seats / Seat Heater Mat Removal. General Procedures
Repair
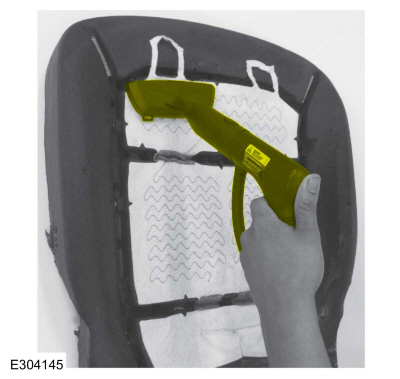
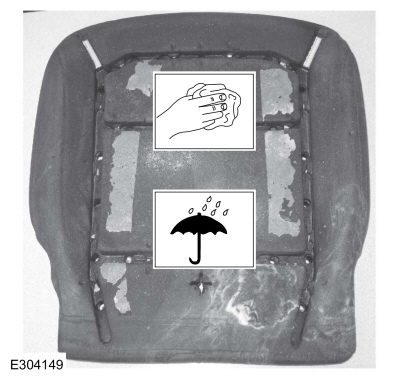
 WARNING:
To minimize the risk of injury, always wear protective
gloves when working with a steamer. Failure to follow these instructions
may result in serious personal injury.
WARNING:
To minimize the risk of injury, always wear protective
gloves when working with a steamer. Failure to follow these instructions
may result in serious personal injury.
NOTE: Click here to view a video version of the seat heater mat removal and installation.
View

NOTE: During installation, it is allowable to adhere a new heater mat to any adhesive left behind on the foam.
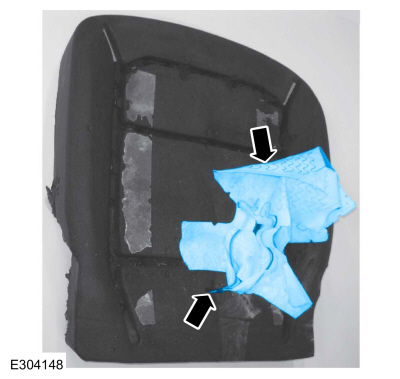
NOTE: Typical seat cushion foam and heater mat shown, other seat cushion/backrest foam and heater mats are similar.
-
Acquire an automotive upholstery steamer with the following specifications.
1 Minimum 1 liter capacity 2 1300 – 1500 watts 3 Wide, T-Shaped, high durability plastic or metal (aluminum) steamer head
-
Remove the seat cushion or backrest cover. Refer to the
appropriate procedure in this or one of the other 501-10 sections.
-
Set up the commercially available steamer following the instruction sheet provided with the equipment.
-
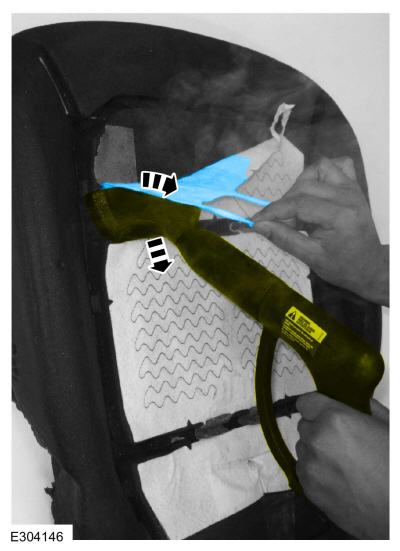
Purge any water out of the steamer line and head before placing the steamer head on the heater mat.
-
NOTE: Only the areas with adhesive need to be steamed. Look at the back of the new heater mat or place a finger between the heater mat and foam to find the locations.
To soften the adhesive, locate 1 adhesive strip in a section of the foam, place the steamer head at one end of the heater mat and apply steam to that area for approximately 15 seconds before pulling on the heater mat.
 |
-
NOTICE: Peel the heater mat off the foam slowly as to not damage the foam and to remove the most amount of adhesive as possible.
Slowly pull the heater mat down the length of the adhesive strip, allowing the steamer head to follow and continue to soften the adhesive until the heater mat is detached from that portion of foam.
 |
-
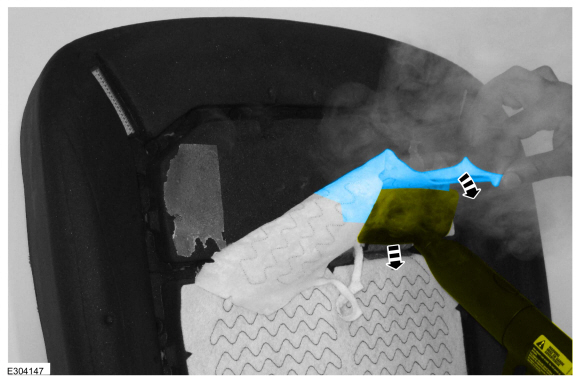
Position the steamer head on the other side of the foam
section. Apply steam to that area for approximately 15 seconds and
slowly pull the heater mat down the length of the adhesive strip,
allowing the steamer head to follow and continue to soften the adhesive
until the heater mat is detached.
 |
-
Remove the heater mat.
-
Repeat steps 5 through 7 for each adhesive strip in each section of the foam.
-
Working from one end to the other, continue applying
steam and peeling the heater mat off the foam until the heater mat is
completely removed.
-
If required, route out the heater mat wiring harness from the foam.
-
Repeat steps 5 through 7 for each adhesive strip in each section of the foam.
 |
-
NOTE: Allow enough time for the moisture/water to dry or the new heater mat will not stick to the foam.
Let the foam stand for 5 minutes to allow any residual moisture to evaporate.
 |
-
Install a new heater mat.
Refer to: Seat Heater Mat Installation (501-10A Front Seats, General Procedures).
 Seat Heater Mat Installation. General Procedures
Repair
NOTE:
Click here to view a video version of the seat heater mat removal and installation. View
NOTE:
Always install a new heater mat...
 Driver Front Seat Module (DSM). Removal and Installation
Removal
NOTE:
Removal steps in this procedure may contain installation details.
All vehicles
NOTE:
This step is only necessary when installing a new component...
Other information:
Ford Fusion 2013–2020 Service Manual: Receiver Drier Element - 1.5L EcoBoost (118kW/160PS) – I4. Removal and Installation
Special Tool(s) / General Equipment Pick Hook Cable Ties Removal NOTICE: During the removal or installation of components, cap, tape or otherwise appropriately protect all openings and tubes/fittings to prevent the ingress of dirt or other contamination...
Ford Fusion 2013–2020 Service Manual: Air Conditioning (A/C) Compressor Leak Detection - Vehicles With: R1234YF Refrigerant. General Procedures
Special Tool(s) / General Equipment Air Conditioning Service Unit Electronic Leak Detector Air Conditioning Adaptor Kit Leak detection Recover the refrigerant. Refer to Air Conditioning (A/C) System Recovery, Evacuation and Charging procedure in Group 412...
Categories
- Manuals Home
- 2nd Generation Ford Fusion Owners Manual
- 2nd Generation Ford Fusion Service Manual
- Automatic Transmission - 6-Speed Automatic Transmission – 6F35
- Engine - 1.5L EcoBoost (118kW/160PS) – I4
- Body Control Module (BCM). Removal and Installation
- New on site
- Most important about car
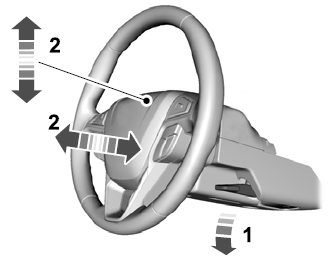
Adjusting the Steering Wheel
WARNING: Do not adjust the steering wheel when your vehicle is moving.
Note: Make sure that you are sitting in the correct position.