Ford Fusion: Rear Drive Halfshafts / Rear Halfshaft. Removal and Installation
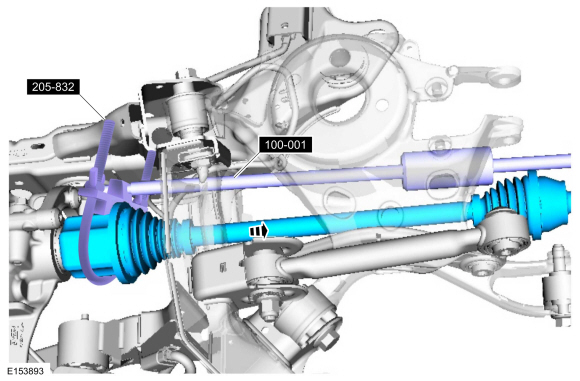
Special Tool(s) / General Equipment
 |
100-001
(T50T-100-A)
Slide Hammer |
 |
205-832 Remover, Halfshaft TKIT-2006C-FFMFLM TKIT-2006C-LM TKIT-2006C-ROW |
Materials
| Name | Specification |
|---|---|
| Motorcraft® SAE 80W-90 Premium Rear Axle Lubricant XY-80W90-QL |
WSP-M2C197-A |
Removal
NOTICE: Never pick up or hold the halfshaft by only the inner or outer Constant Velocity (CV) joint. Damage to the CV joint will occur.
NOTICE: Never use a hammer to remove or install the halfshafts. Damage to the CV joint may occur.
NOTICE: Never use the halfshaft assembly as a lever to position other components. Damage to the halfshaft or CV joint may occur.
NOTICE: Do not allow the boots to contact sharp edges or hot exhaust components. Damage to the halfshaft boots will occur.
NOTICE: Do not drop assembled halfshafts. The impact may cut the boots from the inside without evidence of external damage.
-
Remove the wheel knuckle.
Refer to: Wheel Knuckle - AWD (204-02 Rear Suspension, Removal and Installation).
-
Using the special tools, remove the rear halfshaft.
Use Special Service Tool: 205-832 Remover, Halfshaft. , 100-001 (T50T-100-A) Slide Hammer.
 |
-
Inspect the inner CV joint.
-
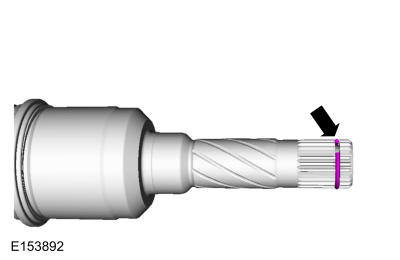
Remove and discard the halfshaft retaining circlip.
-
Inspect the halfshaft end for damage.
-
Remove and discard the halfshaft retaining circlip.
 |
Installation
-
NOTE: The halfshaft seal has to be replaced whenever the halfshaft is removed.
Replace the rear halfshaft seal.
Refer to: Rear Halfshaft Seal (205-02 Rear Drive Axle/Differential, Removal and Installation).
-
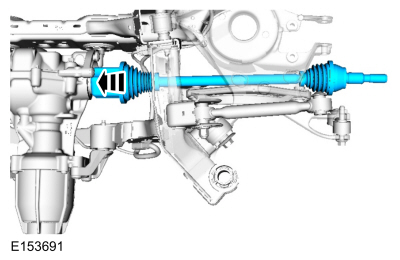
Install the new rear halfshaft retaining circlip.
 |
-
NOTE: When seated correctly, the halfshaft retainer circlip can be felt as it snaps into the differential side gear groove.
Install the rear halfshaft.
 |
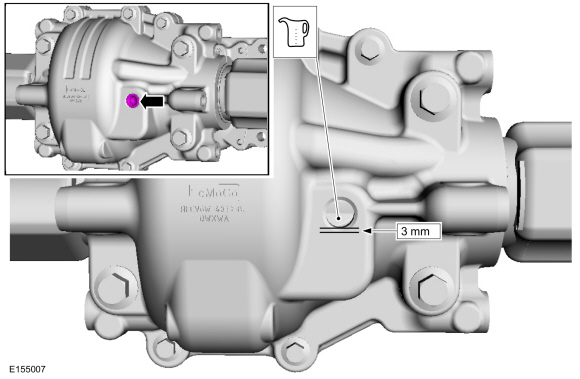
-
If empty, fill the rear axle with 0.55L (1.15 pt) of
rear axle lubricant. If fluid level is low, fill to 3-5 mm (0.118-0.196
in) below the bottom of the filler hole and install the filler plug.
Material: Motorcraft® SAE 80W-90 Premium Rear Axle Lubricant / XY-80W90-QL (WSP-M2C197-A)
Torque: 21 lb.ft (29 Nm)
 |
-
Install the wheel knuckle.
Refer to: Wheel Knuckle - AWD (204-02 Rear Suspension, Removal and Installation).
 Rear Drive Halfshafts. Diagnosis and Testing
Preliminary Inspection
Visually inspect the CV joints, housing, boots, and clamps for obvious signs of mechanical damage.
If an obvious cause for an observed or reported concern is
found, correct the cause (if possible) before proceeding to the next
step
If the cause is not visually evident, verify the symptom and REFER to Symptom Chart: NVH...
 Brake System
..
Other information:
Ford Fusion 2013–2020 Service Manual: Transmission Fluid Auxiliary Pump. Description and Operation
Transmission Fluid Auxiliary Pump Components Item Description 1 Transmission assembly 2 Transmission fluid auxiliary pump supply tube assembly 3 Check ball (part of the transmission fluid auxiliary pump supply tube) 4 Transmission fluid auxiliary pump-to-transmission case gasket 5 Tran..
Ford Fusion 2013–2020 Owners Manual: Technical Specifications - 1.5L EcoBoost™/2.0L EcoBoost™/2.5L
Wheel Lug Nut Torque Specifications WARNING: When you install a wheel, always remove any corrosion, dirt or foreign materials present on the mounting surfaces of the wheel or the surface of the wheel hub, brake drum or brake disc that contacts the wheel. Make sure to secure any fasteners that attach the rotor to the hub so they do not interfere with the mounting surfaces of the wheel. Inst..
Categories
- Manuals Home
- 2nd Generation Ford Fusion Owners Manual
- 2nd Generation Ford Fusion Service Manual
- Body Control Module (BCM). Removal and Installation
- Main Control Valve Body. Removal and Installation
- Traction Control
- New on site
- Most important about car
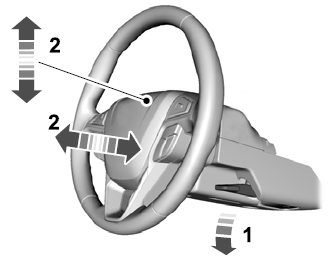
Adjusting the Steering Wheel
WARNING: Do not adjust the steering wheel when your vehicle is moving.
Note: Make sure that you are sitting in the correct position.