Ford Fusion: Instrument Panel and Console / Glove Compartment. Removal and Installation
Ford Fusion 2013–2020 Service Manual / Body and Paint / Body and Paint / Instrument Panel and Console / Glove Compartment. Removal and Installation
Special Tool(s) / General Equipment
| Interior Trim Remover |
Removal
NOTE: Removal steps in this procedure may contain installation details.
-
Refer to: Health and Safety Precautions (100-00 General Information, Description and Operation). WARNING:
Before beginning any service procedure in this
section, refer to Safety Warnings in section 100-00 General Information.
Failure to follow this instruction may result in serious personal
injury.
WARNING:
Before beginning any service procedure in this
section, refer to Safety Warnings in section 100-00 General Information.
Failure to follow this instruction may result in serious personal
injury.
-
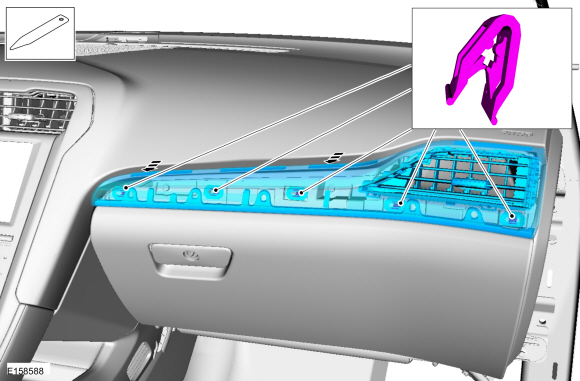
Release the clips and remove the RH instrument panel side trim panel.
Use the General Equipment: Interior Trim Remover
 |
-
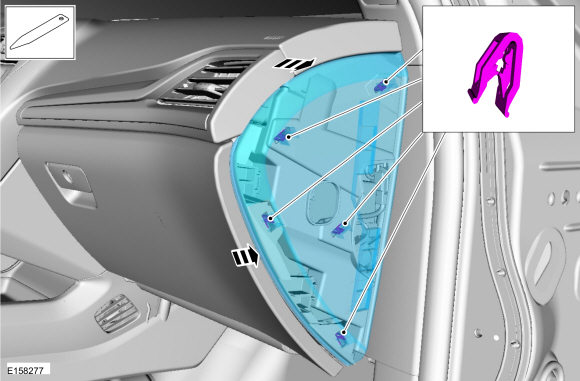
Release the clips and remove the RH instrument panel finish panel.
Use the General Equipment: Interior Trim Remover
 |
-
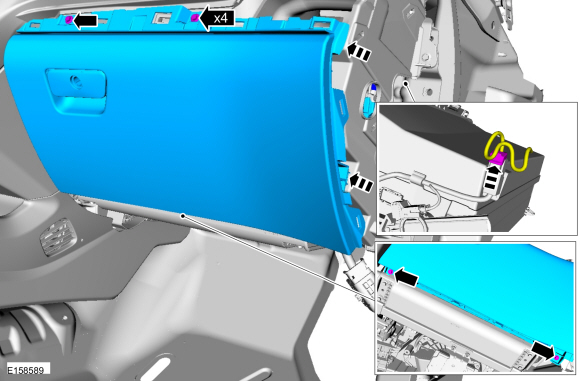
Remove the bolts, release the retaining tabs and remove
the glove compartment. Disconnect the electrical connector.
Torque: 22 lb.in (2.5 Nm)
 |
Installation
-
To install, reverse the removal procedure.
 Floor Console. Removal and Installation
Special Tool(s) /
General Equipment
Interior Trim Remover
Removal
NOTE:
Removal steps in this procedure may contain installation details...
 Instrument Panel. Removal and Installation
Special Tool(s) /
General Equipment
Hose Clamp(s)
Interior Trim Remover
Removal
NOTE:
Removal steps in this procedure may contain installation details...
Other information:
Ford Fusion 2013–2020 Service Manual: A-Pillar Reinforcement. Removal and Installation
Special Tool(s) / General Equipment Resistance Spotwelding Equipment 8 mm Drill Bit MIG/MAG Welding Equipment Spot Weld Drill Bit Locking Pliers Removal NOTICE: Battery electric vehicle (BEV), hybrid electric vehicle (HEV) and plug-in hybrid electric vehicle (PHEV) contain a high-voltage battery...
Ford Fusion 2013–2020 Service Manual: Azimuth System Check. General Procedures
Check NOTE: Car shown, trucks are similar. Turn the ignition ON, engine OFF. Set the parking brake on. For automatic transmission place the selector lever in DRIVE (D). For manual transmission place the gearshift lever in FIRST GEAR...
Categories
- Manuals Home
- 2nd Generation Ford Fusion Owners Manual
- 2nd Generation Ford Fusion Service Manual
- Under Hood Overview - 1.5L EcoBoost™, 2.0L EcoBoost™, 2.5L, 2.7L EcoBoost™
- Memory Function
- Starter Motor. Removal and Installation
- New on site
- Most important about car
Manual Climate Control
Note: Depending on your vehicle option package, the controls may look different from what you see here.
Copyright © 2026 www.fofusion2.com