Ford Fusion: Engine Emission Control - 1.5L EcoBoost (118kW/160PS) – I4 / Crankcase Vent Oil Separator. Removal and Installation
Ford Fusion 2013–2020 Service Manual / Powertrain / Engine / Engine Emission Control - 1.5L EcoBoost (118kW/160PS) – I4 / Crankcase Vent Oil Separator. Removal and Installation
Special Tool(s) / General Equipment
| Hose Clamp Remover/Installer |
Removal
NOTE: Removal steps in this procedure may contain installation details.
-
Remove the intake manifold.
Refer to: Intake Manifold (303-01A Engine - 1.5L EcoBoost (118kW/160PS) – I4, Removal and Installation).
-
Remove the starter motor.
Refer to: Starter Motor (303-06A Starting System - 1.5L EcoBoost (118kW/160PS) – I4, Removal and Installation).
-
-
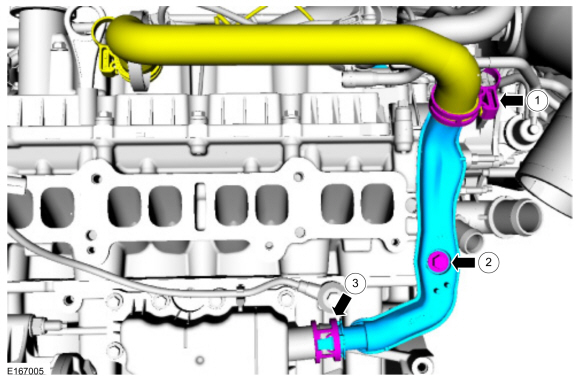
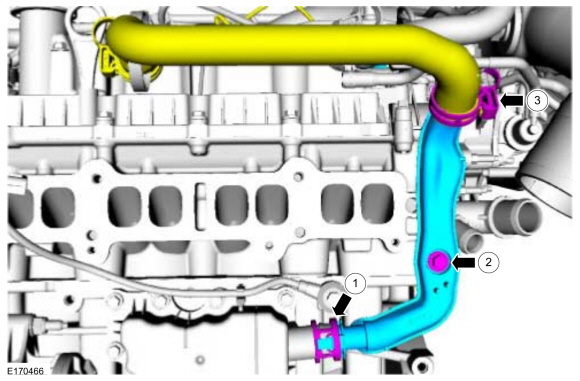
Disconnect the upper crankcase ventilation tube and
clamp from the lower crankcase ventilation tube and then position the
upper crankcase ventilation tube out of the way.
Use the General Equipment: Hose Clamp Remover/Installer
-
Remove the lower crankcase ventilation tube retaining bolt.
-
Disconnect the lower crankcase ventilation tube
quick release coupling from the crankcase oil separator and then remove
the lower crankcase ventilation tube.
Refer to: Quick Release Coupling (310-00A Fuel System - General Information - 1.5L EcoBoost (118kW/160PS) – I4, General Procedures).
-
Disconnect the upper crankcase ventilation tube and
clamp from the lower crankcase ventilation tube and then position the
upper crankcase ventilation tube out of the way.
 |
-
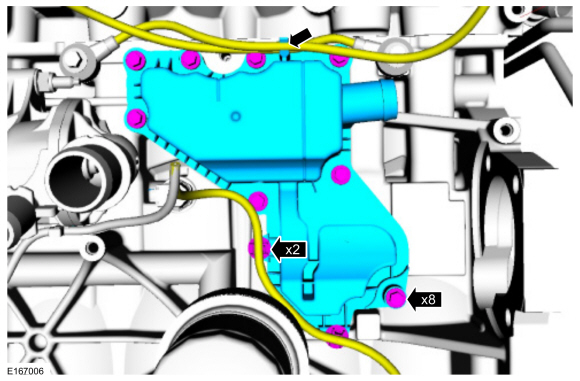
Detach the knock sensor wiring harness from the harness
retainers. Remove the crankcase vent oil separator bolts and then remove
the crankcase vent oil separator.
 |
Installation
NOTICE: Make sure that the mating faces are clean and free of foreign material.
-
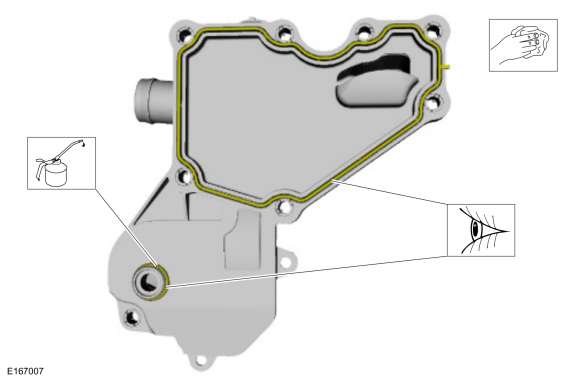
Inspect the crankcase vent oil separator gasket and the
O-ring seal. Replace as needed. Lubricate the crankcase oil separator
O-ring seal with clean engine oil.
 |
-
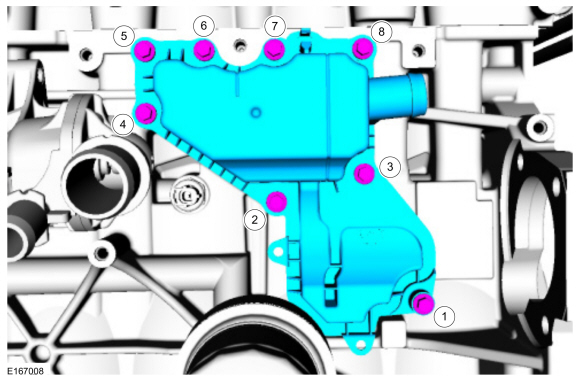
Push the spigot into the engine block while installing
the crankcase oil separator, then install and tighten the crankcase oil
separator bolts in the stages and in the sequence shown.
Torque:
Stage 1: Tighten bolts 1, 2 and 3 to: : 53 lb.in (6.0 Nm)
Stage 2: Tighten bolts 4, 5, 6, 7 and 8 to: : 53 lb.in (6.0 Nm)
Stage 3: Tighten all bolts in sequence to: : 89 lb.in (10.0 Nm)
 |
-
Attach the knock sensor wiring harness to the harness retainers.
 |
-
-
Install the lower crankcase ventilation tube and
connect the lower crankcase ventilation tube quick release coupling to
the crankcase oil separator.
Refer to: Quick Release Coupling (310-00A Fuel System - General Information - 1.5L EcoBoost (118kW/160PS) – I4, General Procedures).
-
Install and tighten the lower crankcase ventilation tube retaining bolt.
Torque: 89 lb.in (10 Nm)
-
Connect the upper crankcase ventilation tube and clamp to the lower crankcase ventilation tube.
Use the General Equipment: Hose Clamp Remover/Installer
-
Install the lower crankcase ventilation tube and
connect the lower crankcase ventilation tube quick release coupling to
the crankcase oil separator.
 |
-
Install the starter motor.
Refer to: Starter Motor (303-06A Starting System - 1.5L EcoBoost (118kW/160PS) – I4, Removal and Installation).
-
Install the intake manifold.
Refer to: Intake Manifold (303-01A Engine - 1.5L EcoBoost (118kW/160PS) – I4, Removal and Installation).
 Engine Emission Control. Diagnosis and Testing
Diagnostics
in this manual assume a certain skill level and knowledge of
Ford-specific diagnostic practices. For information about these,REFER to: Diagnostic Methods (100-00 General Information, Description and Operation)...
 Positive Crankcase Ventilation (PCV) Valve. Removal and Installation
Removal and Installation
The PCV valve is serviced with the crankcase vent oil separator.
Refer to: Crankcase Vent Oil Separator (303-08A Engine Emission Control - 1...
Other information:
Ford Fusion 2013–2020 Service Manual: Air Distribution Door Actuator. Removal and Installation
Removal NOTE: Removal steps in this procedure may contain installation details. WARNING: Before beginning any service procedure in this section, refer to Safety Warnings in section 100-00 General Information. Failure to follow this instruction may result in serious personal injury...
Ford Fusion 2013–2020 Service Manual: Electronic Engine Controls. Diagnosis and Testing
DTC Chart: Powertrain Control Module (PCM) Diagnostics in this manual assume a certain skill level and knowledge of Ford-specific diagnostic practices. REFER to: Diagnostic Methods (100-00 General Information, Description and Operation). Powertrain Control Module (PCM) DTC Chart DTC Description Action P0125 Insufficient C..
Categories
- Manuals Home
- 2nd Generation Ford Fusion Owners Manual
- 2nd Generation Ford Fusion Service Manual
- Body Control Module (BCM). Removal and Installation
- Load Carrying
- Intake Manifold. Removal and Installation
- New on site
- Most important about car
Power Door Locks
The power door lock control is on the driver and front passenger door panels.

Copyright © 2026 www.fofusion2.com