Ford Fusion: Rear Suspension / Toe Link. Removal and Installation
Special Tool(s) / General Equipment
| Vehicle/Axle Stands |
Removal
NOTICE: Suspension fasteners are critical parts that affect the performance of vital components and systems. Failure of these fasteners may result in major service expense. Use the same or equivalent parts if replacement is necessary. Do not use a replacement part of lesser quality or substitute design. Tighten fasteners as specified.
-
Remove the wheel and tire.
Refer to: Wheel and Tire (204-04 Wheels and Tires) .
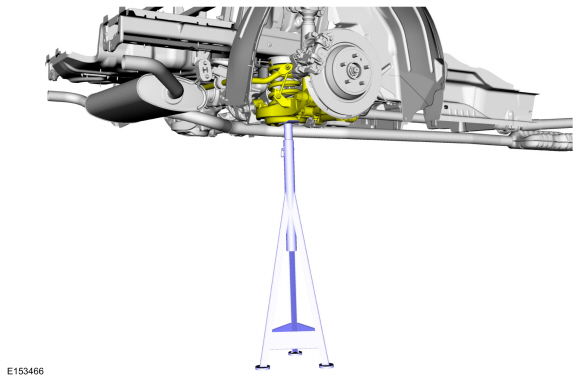
-
Support the rear suspension to ride height.
Use the General Equipment: Vehicle/Axle Stands
 |
-
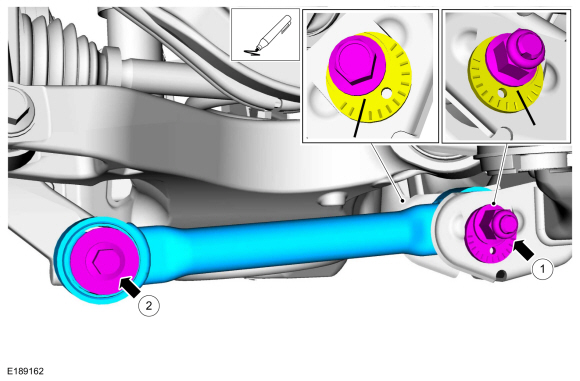
Index mark the cam adjusters for reference during installation.
-
Remove the toe link-to-subframe cam bolt and nut.
-
Remove the toe link-to-wheel knuckle bolt.
-
Remove the toe link-to-subframe cam bolt and nut.
 |
Installation
-
NOTICE: Tighten the suspension bushing fasteners with the suspension loaded or with the weight of the vehicle resting on the wheels and tires, otherwise incorrect clamp load and bushing damage may occur.
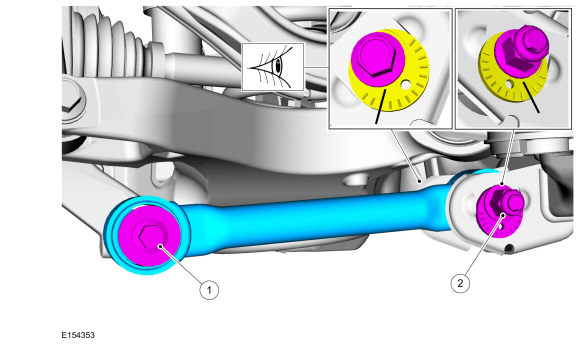
Align reference marks made during removal.
-
Install the toe link-to-wheel knuckle bolt.
Torque: 76 lb.ft (103 Nm)
-
Install the toe link-to-subframe cam bolt and nut.
Torque: 129 lb.ft (175 Nm)
-
Install the toe link-to-wheel knuckle bolt.
 |
-
Install the wheel and tire.
Refer to: Wheel and Tire (204-04 Wheels and Tires) .
-
Check and if necessary adjust rear toe.
Refer to: Rear Toe Adjustment (204-00 Suspension System - General Information, General Procedures).
 Wheel Studs. Removal and Installation
Special Tool(s) /
General Equipment
Hydraulic Press
Removal
Remove the wheel bearing and wheel hub.
Refer to: Wheel Bearing and Wheel Hub - FWD (204-02 Rear Suspension, Removal and Installation)...
 Wheel Knuckle - AWD. Removal and Installation
Special Tool(s) /
General Equipment
Vehicle/Axle Stands
Removal
NOTICE:
Suspension fasteners are critical parts that affect the
performance of vital components and systems...
Other information:
Ford Fusion 2013–2020 Service Manual: Halfshaft Seal LH. Removal and Installation
Special Tool(s) / General Equipment 205-153 (T80T-4000-W) Handle 307-626Installer, Differential SealTKIT-2008ET-FLMTKIT-2008ET-ROW Puller Punch Removal Remove the LH halfshaft. Refer to: Front Halfshaft LH (205-04 Front Drive Halfshafts, Removal and Installation)...
Ford Fusion 2013–2020 Service Manual: Transmission Description - System Operation and Component Description. Description and Operation
System Diagram Item Description 1 SSB 2 SSC 3 SSD 4 SSE 5 LPC Solenoid 6 TCC Solenoid 7 OSS Sensor 8 TSS Sensor 9 Transmission 10 Transmission 11 TR Sensor 12 TFT Sensor 13 SSA 14 PCM Network Message Chart Broadcast Message Originating Module Message Purpose Engine Speed ..
Categories
- Manuals Home
- 2nd Generation Ford Fusion Owners Manual
- 2nd Generation Ford Fusion Service Manual
- Under Hood Overview - 1.5L EcoBoost™, 2.0L EcoBoost™, 2.5L, 2.7L EcoBoost™
- Traction Control
- Intake Manifold. Removal and Installation
- New on site
- Most important about car
Understanding Your Tire Pressure Monitoring System

The tire pressure monitoring system measures pressure in your road tires and sends the tire pressure readings to your vehicle. You can view the tire pressure readings through the information display. The low tire pressure warning light will turn on if the tire pressure is significantly low. Once the light is illuminated, your tires are under-inflated and need to be inflated to the manufacturer’s recommended tire pressure. Even if the light turns on and a short time later turns off, your tire pressure still needs to be checked.